Payload Design Theory
This article will cover the gameplay side of creating a payload map: what elements are used where and how to make the map fun and balanced for both teams.
Contents
Introduction
The TF2 Design Theory article gives a good description of how a payload map is unique:
"Payload has many similarities to CP assault, but also some subtle differences. The biggest is that the objective area doesn't leap from one area to another as it does in CP: the bomb trundles steadily, meaning that attackers can't ninja cap the next point before the defenders are ready. This removes the temptation some players feel to defend a locked point 'just in case'."
The article also makes the point that the bomb is a clear focal point at all times: the Blu team will attempt to push the bomb towards the checkpoints, while the Red team will move their defence in order to combat where the bomb is at any given time. Generally, it will be the centre of conflict between the two teams.
The Payload Track
Because of the linear nature of a Payload map, the route that your bomb track takes will be where the majority of combat will happen and the main route that players take. Since this route is largely predictable, the areas surrounding the track will need to provide possibilities for different classes to function.
Checkpoints
Checkpoints should generally be considered similar to control points: they will be the hotspots for combat. In Badwater Basin, Valve has used each checkpoint along the bomb's path as the focal point for the Red team, using the surrounding geometry to allow advantages for different classes.
Checkpoint 1
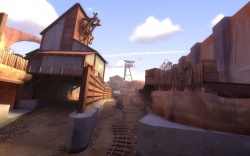
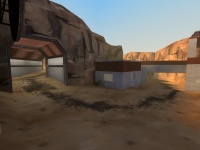
In the screenshot, we can see that the checkpoint has been placed directly in front of the enclosed space of the doorway, allowing Red engineers to build sentry nests there in order to protect the checkpoint. There are also raised cliffs and some health/ammo pickups to allow both teams to launch assaults from above (if there are still Red players present on the cliffs at this point).
Generally, Blu have the largest space from which to attack; while they can use the whole width of the cliff tops, any Red players are limited to entering the combat arena from the "corridor" on the right. Teleports can be used to transport Red players, for example, into the enclosed doorway area in the side of the cliff, but once destroyed it is difficult for these to be rebuilt.
Checkpoint 2
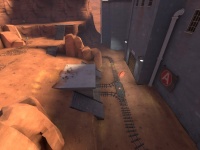
The most significant aspect of this next checkpoint is the roof space that Red can use to their advantage. To combat this, there is a large section of space behind the rooftop to allow Blu players to destroy sentry nests in order to move the cart forwards. In normal matches, the bomb cart is usually pushed up to the point where it is level with the corner of the wall on the left; just out of sentry range, the cart can be left here while players concentrate on removing Red's presence from the area before continuing on to capture the checkpoint.
Checkpoint 3
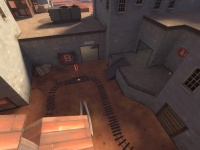
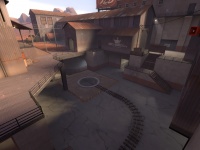
This checkpoint is just at the point where it is visible to enemies around the corner. The surrounding walkways and raised vantage points allow both teams to build up sentry nests, meaning that combat is very much focused between the far top right corner and the opening of the tunnel at the bottom on the screenshot. In this scenario the bomb cart commonly stops just before the checkpoint, where the Blu team have to concentrate on taking out any enemy sentries on the left and right in order to proceed to capture it.
Check Point 4 (Terminus)
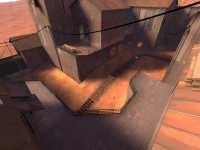
The final terminus is more Red-oriented than the preceding checkpoints, being large, open and providing several enclosed spots for Red to set up sentries. In the area to the left, outside the screenshot, there are flanking routes for Blu players to utilise, offering the opportunity for Engineers to set up bases in these areas. This provides a secondary focus for Red, meaning that not all their effors are necessarily concentrated on the main area and making it a little easier for Blu to push forward.
Usually, an Uber or two is required here for Blu to successfully take down all of Red's sentries and push the bomb to its target.
In-Between
Between checkpoints, the surroundings are generally simple and allow for nothing more than player vs. player combat. Generally, if there are several Blu players around the cart, they should not encounter great difficulty in moving forwards. Deviations from the main track, such as flanking routes, should stick to the areas surrounding checkpoints and should not channel combat too much towards these "between" areas, otherwise Blu may find it very difficult to progress.
Sub-Routes
Other, smaller routes that run alongside the main Payload track can be useful for either team to flank their opponents. Between checkpoints 2 and 3 in Badwater, the minor side-routes are often used by Blu players in order to push forward and break up Red's defence, allowing the cart to move through the area.
Differences From Control Point Gameplay
Unlike in control point maps, a straight-off choke point can cause serious difficulty for the Blu team. In a control point game, the primary focus is for each team to push through the other's line of defence in order to capture the control point: Warpath is a good example of where this mechanic is very successful.
However, in a Payload game the situation is subtley different: the Blu team not only have to break through Red's defences but also have to push the cart further to the desired checkpoint in order to control the area. This is substantially more difficult than simply capturing a control point, since it requires that the Red team be continually held at bay for the cart to progress. The more players attacking Red, the less there are to move the cart, meaning that it is very difficult for these two continuous objectives to be achieved concurrently. Adding to this imbalance is that, unlike control point games where Red would also be aiming to capture Blu's point, in Payload their one and only focus is their defence; effectively, half of Blu's team would need to be pushing the cart, and the other half holding off the entirety of the Red team for a prolonged amount of time, for Blu to be successful.
For these reasons, choke points often imbalance a Payload match dramatically in Red's favour. Following Valve's example from above, choke points and other combat-intensifying mechanics should only be employed just before, or ideally right on top of, a checkpoint, and should be balanced to ensure that Blu has a fair chance of succeeding. Obviously, the final checkpoint can be a little more in favour of Red but should not be impossible to breach.
High Ground and Low Ground
The Attack/Defend Balance and Layout Guide at TF2maps.net, written by Grazr, identifies the applications of "high", "medium" and "low" ground in maps such as Dustbowl and Goldrush.
"The high ground will be favoured by the Sniper where he's hard to reach and far from sight, and will usually have a window or bay to position himself on, as well as the Soldier where he can drop some easily placed rockets into his enemy before jumping down to finish off the job, and inevitably complete the map objective. They are also favoured by players whom prefer to penetrate further into enemy territory with lowered risk of being intercepted, incurring the element of surprise.
The low ground will provide the best ambushing position due to greater territory penetration. Less flak will be received from the low ground as visibility is limited which means it is more likely to be overlooked by defenders in comparison to larger and more likely threats; the high and middle grounds. This route will be favoured by Spies and Pyros and usually provides deeper territory penetration than high ground.
In contrast to the standard assault mode, Payload mode can contradict this trend due to the single moving objective. The objective which travels forwards along a predefined path defines the main route itself, and may occupy and subsequently redefine the higher or lower grounds as the main route. However, in the name of balance it normally occupies the middle or lower ground,so the low ground frequently becomes the main route."
Exits
In multiple-round maps like Goldrush, exits and entrances linking areas are designed to channel players. In the afore mentioned article, Grazr says that "[A 16-player team] becomes a small amount when you start to split them up into any more than 3 routes", meaning that "any more than 3 paths is a bad idea and breaks player focus". Spawn room exits are usually split into "either 3 minor exits, or 1 major and 1 minor exit", to prevent players on either team being split up too much.
At spawn rooms, three minor exits give the team three different locations from which to begin engaging with the enemy. One major and one minor exit draw focus to the major one, leaving an opportunity for the weaker classes such as Scout or Spy to leave via a less noticeable route. Which of these setups is appropriate is up to the level designer to decide, depending on the scenario they are looking to create.
General Map Layout
Grazr comments on the layout of the playable area of attack/defend maps:
"The best trend to exercise for a map that will inevitably occupy a length of space, such as A/D, is to wrap it around itself. This not only means you have less of a chance to reach your map boundaries but that you have more opportunities to increase optimisation and vary your maps gameplay aspects with bends and corners. This is also true for 5 CP push maps which regularly take on an S shape."
The downside to having a spiral-like layout like Dustbowl is that it can be difficult to judge the exact amount of space needed for the arena in the centre of the map, meaning that having too little or too much space in the centre would require moving large portions of the outside areas in order to compensate. One option would be to build the map backwards (ie. from the centre outwards) to ensure that the central arena space is the right size before other areas of the map are built around it.
