Layout
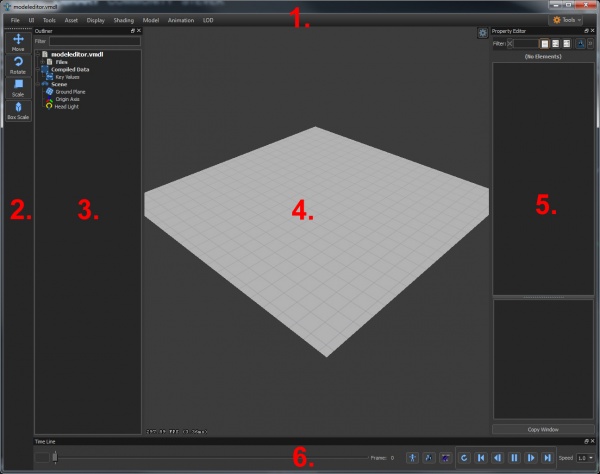
![]() Model Editor layout summary and breakdown of the various panels available.
Model Editor layout summary and breakdown of the various panels available.
1. Main Menu
File
Common file operations such as Save, Save As, Recent Files, etc. Model editor can open files from game ( .vmdl_c ), as well as content side ( .vmdl ) files.
UI
Show and hide UI elements.
Tools
Access model editor tools:
- View Sequences: Launches the view sequences widget.
- View Materials: Brings up a widget with the model's materials on it.
- Edit Material Groups: If material groups are present, brings up a UI for editing them.
- Morph Explorer: UI for previewing morph shapes.
- Bone Merge Tool: UI for bone merging models into the session.
- Load Stock Hero Items: For DOTA heroes, brings in their default items.
- View Keyvalues: View keyvalues compiled into the model.
- Preferences: UI for setting, saving and loading preferences.
- Screenshot: Take a screen shot of the viewport.
- Force Save All: Save every file the session depends on.
- Recompile > Recompile Asset: Recompile the asset.
- Recompile > Force Recompile Asset: Force recompile everything the vmdl depends on.
Asset
Access the asset menu, allows inspection of the high level asset options.
Display
Toggle viewport display elements.
Shading
Toggle various viewport shading options.
Model
Add meshes, hitboxes, and attachments. See Model Menu.
Animation
Add animations. See Animation Menu.
LOD
Select the LOD level currently displayed in the model.
2. Tool Bar
Selects the mode the gizmo is in.
Available modes:
- Move
- Rotate
- Scale
- Box Scale
3. Outliner
The outliner is a hierarchical view of the model. The outliner is composes of two parts, editable data and compiled data. Selecting an editable data item in the outliner will send the data to the Property Editor where it can be edited.
Editable Data
- VMDL item
- The first item in the outliner represents the VMDL. of the model.
- Items under the vmdl represent data that is saved directly in the vmdl, or external data the vmdl is referring to.
- Child items of the VMDL in the outliner tree represent different groups of data associated with the model.
- File
- Items under the files represent the on disk files the vmdl is dependent on.
Compiled Data
This section of the tree represents the complied model data. This data is visible in the viewport but cannot be edited.
Scene
- Ground Plane
- Select this item, and edit the properties in the property editor to change the appearance of the ground plane.
- Origin Axis
- Select this item, and edit the properties in the property editor to change the appearance of the origin axis.
- Head Light
- Select this item, and edit the properties in the property editor to change the attributes of the head light. Note: This is not supported in Dota 2.
4. Viewport
The viewport contains a rendering of the model being worked on.
Camera controls:
| WASD+ |
Camera forward, left, back, right. |
| Alt+ |
Camera orbit around model. |
| Alt+ |
Camera zoom. |
| Alt+ |
Camera pan. |
| Camera rotation. | |
| ⇧ Shift+A | Center on model. |
Display > Reset Camera resets the camera to the defaul location.
- Model Stats
- Toggles model information including polygon count.
- HUD Messages
- Toggles the display of viewport messages that alert the user to various events (i.e. the model is read-only, imported from Source engine, etc. ).
- Frame Rate
- Toggles the frame rate display.
- Grid
- Toggles the wireframe grid.
- Origin Axis
- Toggles the origin axis.
Display Menu
Use this menu to toggle display options related to the model.
Shading Menu
Use this menu to alter the shading of the model, as well as toggle wireframe overlays.
5. Property Editor
Displays the editable data for a given selected item. The Property Editor supports multiple selection.
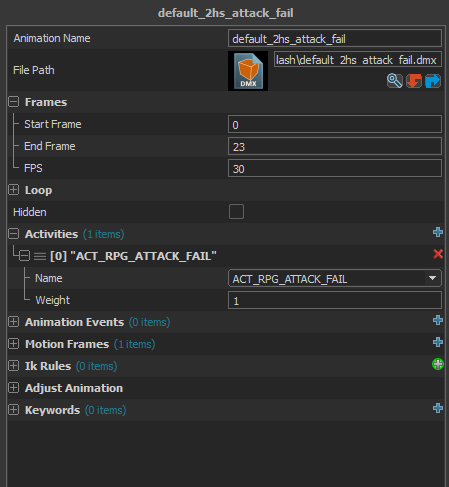
Outside of the standard editing (text, checkboxes, or numbers) there is some custom UI that shows up in the property editor.
File Browsing
- Next to "File Path" you will see a text field with some buttons associated with it. This UI element indicates that "File Path" is something that can be browsed to.
- Clicking on the magnifying glass icon will bring up a browser that allows a file to be selected.
- The file name is almost always going to be relative to the current content directory.
Adding and removing list elements
- The "+" icon means you can add a new element to a list. In this case, clicking it next to Activities will add a new activity.
- To remove the element, click the red "x" icon.
Add a new element
- The circle with a "+" icon indicates that a item can be created. In this case, clicking the icon associated with "IK Rules" will create a new "IK Rules" element.
- To remove an element, click the red "x" icon.
Combo boxes
- Type in the text field of a combo box to filter available options by that text.
- Typing in the text field and hitting enter will force that text to be the value. This is useful when the required text is not available in the drop down UI.
6. Timeline
Use the timeline to control animation playback.
- Time slider
- Grab the slider to pause and scrub the animation
- Bind Pose
- Hitting this button will force the model back to the bind pose ( the pose before animation is applied )
- Animation will not play while in bind pose
- Physics Simulate
- Hitting this button will force physics to take over
- Animation will not play when in Physics mode
 Note:This does not work in the initial release of the Tools.
- Cloth Simulate
- Hitting this button will force the cloth to simulate
- Playback Controls
- Restart
- Go To Start
- Step Back
- Play/Pause
- Step Forward
- Go To End
- Playback Speed


