Skybox (GoldSrc)
For help, see the VDC Editing Help and Wikipedia cleanup process. Also, remember to check for any notes left by the tagger at this article's talk page.

Skyboxes in ![]() GoldSrc are simple "cubemap" textures that display in the background behind the level.
GoldSrc are simple "cubemap" textures that display in the background behind the level.
Adding sky to a map
Simply texture a world brush (not a brush entity) with the sky texture.
In-game, the skybox will be seen through each surface that sky is applied to.
sky brushes do not need to be box-shaped.
Changing the displayed skybox

By default, no skybox is defined, so GoldSrc defaults to the desert skybox. You can change it by setting the skybox name in Hammer's Map Properties dialog. With the correct map opened, follow these steps:
- Go to the Map menu
- Choose Map Properties... from the drop down list
- In the Object Properties window, select the enviroment map (cl_skyname) field.
- Enter the name of the skybox you wish to display. If using a supported FGD,
 J.A.C.K. will show a drop down list of skyboxes available to the current game configuration.
Creating a Custom 2D Skybox Texture
Skybox textures in GoldSrc MUST be 256x256 (except in ![]() ), and they follow the same naming convention as
), and they follow the same naming convention as ![]() Quake II and
Quake II and ![]() Source, as so:
Source, as so:
<skyname>BK
<skyname>DN
<skyname>FT
<skyname>LF
<skyname>RT
<skyname>UP
Both TGA and BMP images are supported, but TGA is recommended for quality and compatibility reasons.
Software mode defaults to BMP skyboxes, and reads the TGA version if a BMP version is not present.
OpenGL mode defaults to TGA skyboxes. It will attempt to use the BMP version if a TGA version is not present, but not all modern GPUs support this.
Skybox textures must be encoded using the following settings
| Format | TGA | BMP |
|---|---|---|
| Resolution | 256 x 256 | 256 x 256 |
| Color depth | 24-bit (true color, no alpha channel) | 8-bit paletted (256 colors, no fewer) |
| Compression | Uncompressed or |
Uncompressed |
| Additional settings | Image origin: Bottom-Left | Compatibility: No color space information |
Skybox textures must be put in ![]()
<moddir>\gfx\env\, or a subfolder thereof.

 GIMP export settings for TGA skyboxes; RLE compression is optional, but recommend
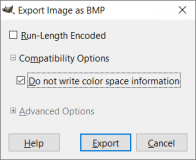 GIMP export settings for BMP skyboxes (optional in Steam release)


Creating a skybox for GoldSrc, using Source
It is possible to create an area of a ![]() Source map into a Skybox to be used in
Source map into a Skybox to be used in ![]() GoldSrc. Here's an simple example:
GoldSrc. Here's an simple example:
- Create a large outdoor area with some displacement maps and treelines, and fog to hide the edges. Let's call it carrotjuice.
- Load the carrotjuice map ingame and turn cheats on (sv_cheats 1).
- Activate noclip mode by simply opening the console and enter noclip and hit Enter.
- Fly to the center of where you want the skybox. Use setpos if a specific coordinate is desired.
- Open up the console and type mat_envmaptgasize 256, hit ↵ Enter.
- Now type envmap and press Enter. Now, 6 TGA files are now created and saved into a folder named cubemap_screenshots in your Source game's mod folder ( i.e. for
 Portal 2:
Steam\steamapps\common\Portal 2\portal2\cubemap_screenshots).
Since the mapname was carrotjuice, the name of the 6 TGA files are as following:

carrotjuicert.tga(Right)carrotjuiceft.tga(Front)carrotjuicelf.tga(Left)carrotjuicebk.tga(Back)carrotjuiceup.tga(Up)carrotjuicedn.tga(Down)
You can now copy or move these to your mod's ![]()
gfx\env folder, to use it as skybox in a level.