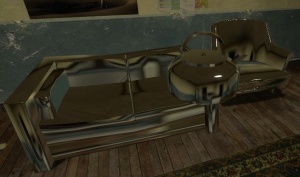
Cubemaps
Many specular and environment-mapped materials rely on external data to calculate their appearance. This data may take the form of a cubemap, a texture that represents a 360-degree rendering of the surrounding area. Using the cubemap as a sampling point, specular and environment-mapped materials are able to more accurately reflect their environments. Defining cubemaps and their positions in space is simple, but it is important to place them properly for both aesthetic and performance issues.
Placement
To define a cubemap’s position in space inside of a game map, we use the env_cubemap entity. When the map is compiled with VBSP, world geometry surfaces automatically associate themselves with the nearest cubemap to their surface.
It is important to note that cubemaps can have multiple uses depending on how they are placed in a game map. Some cubemaps will need to be placed to help reflections on static world geometry. Other cubemaps must be placed to help reflections on entities like NPCs or the player. The placement of these cubemaps must follow a few simple heuristics (depending on their utility) to ensure the maximal benefit, visually.
- If a cubemap is intended for NPCs or the player, it should be placed 64 units above the ground so that it most accurately represents the world at that point in space for a standing creature.
- If a cubemap is intended for static world geometry, it should be at least 16 units away from all brush surfaces.
- Cubemaps should be placed in all areas of visual contrast. A hallway with bright yellow light will need a cubemap, especially if it is next to a room with low blue light. Without these two distinct cubemaps, reflections and specular highlights will seem incorrect on entities and world geometry.
Building
Once a map has been compiled and lit by VBSP and VRAD (respectively), the cubemaps can be built. Run the map and allow the any node graphs or other pre-process activities to finish. Then use the buildcubemaps console command to begin building the cubemaps for the level. In the upper left-hand corner of the screen you’ll be able to see each facet of the cubemap (six per cubemap) render. Depending on your video card, driver and complexity of your scenes, this can take seconds or minutes to complete. Once finished, the map must be restarted for the cubemaps to properly be applied to all surfaces.
sv_cheats 1) before running the buildcubemaps command.Cubemaps and HDR
If the map has been compiled with the HDR lighting option enabled in VRAD, cubemaps must be built in both HDR and LDR (non-HDR) modes. Building cubemaps in only one mode will mean that cubemaps will not be present the other mode. For information on how to build cubemaps under HDR, see HDR Lighting Basics.
Cubemaps should be built for LDR and HDR maps. Presuming you are already in HDR mode and have your map loaded fresh from compilation (VRAD must have the '-both' parameter enabled). Go to the console and execute the following commands:
buildcubemaps
mat_hdr_level 0 (to go to LDR)
map mapname (to reload map)
buildcubemaps
mat_hdr_level 2 (to go back to HDR)
map mapname (to reload map)
Testing
Cubemaps are best tested by using the impulse 81 console command. This replaces the current weapon model with the "cubemap weapon"; a set of spheres, each with different reflective surfaces. By moving around the level it is possible to see what cubemap is being applied at that position in space at any given time, as well as if that cubemap accurately describes the area’s lighting and color. This is the best way to assess the validity of your cubemaps.
For some reason, Team Fortress 2 does not have the "cubemap weapon". The Sniper's primary weapon, however, has a slightly reflective lens on the scope and the Demoman's Bottle, and thus will reflect the cubemap.
The cubemap weapon can be copied from Steam\steamapps\user\half-life 2\hl2\models\ShaderTest\envballs.mdl to a desired mod, which doesn't have it.
Performance
The env_cubemap entity allows the user to define how large the target cubemap’s texture resolution is. While a larger texture resolution will provide more accurate and “sharp” results when sampled, it also incurs a cost in texture memory. Most cubemaps should only use the default setting in the env_cubemap entity for their texture resolution (32x32 pixels for each surface). This is generally acceptable in normal conditions. Some exceptions may be necessary for areas of high reflectivity or detail, such as set-pieces for acting.
Because surfaces must approximate their surroundings via cubemaps, using too many cubemaps in a small area can cause noticeable visual discontinuities when moving around. For areas of high reflectivity, it is generally more correct to place one cubemap in the center of the surface and no more. This avoids seams or popping as the view changes.
To determine the cost of cubemaps in any one area, first look at the World Rendering category using the +showbudget console command. If this category is registering an unusually high cost, it may be due to using too many cubemaps in an area. A simple solution to check for this scenario is to use Hammer to Hide all the cubemaps in the map, and then compile and run the map again. If the performance is noticeably better, cubemap density or resolution may need to be reduced.
Eventually this can also be checked by turning off cubemaps, by using r_specular 0 to disable it, however this needs confirmation.

