Choreography Implementation
Introduction
This page is meant to illustrate practical techniques used to implement Choreography scenes into Source. The focus here is on vcd's and how to use them effectively. However, the relevant techniques often reach outside of faceposer, and into hammer, XSI, etc.
The first thing you should do to get familiar with the basic elements of a Choreo scene is to play through the sample map provided in the SDK: "...\SteamApps\<your username>\sourcesdk_content\hl2\mapsrc\sdk_faceposer.vmf" This map was created as a tutorial during HL2 production.
Compile this map from Hammer, and then load the map in HL2. All of the VCD's used in this map can be found here: "...\SteamApps\<your username>\half-life 2\hl2\scenes\ChoreoExamples". I suggest you look at these VCD's in Faceposer while playing through the map, if you can. If you want to edit these VCD's while HL2 is open, remember to type scene_flush from the console, and restart the map to see the VCD changes.
(The following is a suggested outline. It will change as it gets fleshed out.)
Why use VCD's?
- Power. VCD's can choreograph a wide range of elements together very precisely -- audio, FX, Actor Direction (blocking), animation, and scene/map logic.
- Fast iteration. You don't need to recompile the map to see vcd changes. Use Scene_Flush. Especially relevant in tweaking the timing of events.
How do VCD's play in Source?
- In a map via the LCS entity
- Through the Response System
- Lead/follow behaviour example (post aftermath?)
Scene approach and planning
- What elements are involved?
- What actors are involved?
- How is the player involved?
- How is the scene incorporated into the map logic?
- Conditions for scene to start
- Conditions for pausing / resuming or interrupting the scene
- Benefit of driving as much as possible from the VCD's
- The all-important Fire Trigger event
Blocking out a scene
- Info_target entity
- Using DebugText
- Adding new dialog entries
- Getting scene logic functional
Using !Target# Names
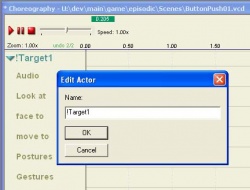
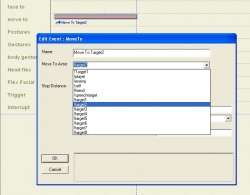
The names "!Target#", where "#" is a number 1-8 ("!Target1", "!Target2",..."!Target8") are special placeholder names in Faceposer. When you use a "!Target#" name in a VCD, you specify the entity that name points to in the Logic_choreographed_scene properties. This flexible naming method is useful if a VCD you're creating is meant to be played in a variety of places, and the Actor and Event Target names need to be different in each case.
"!Target#" names can be given to Actors or Event Targets.(Figs 2a , 2b)
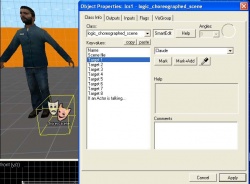
You specify the entity each "!Target#" name points to in the properties of the LCS entity in your map. (Fig 2c). Note that there are 8 Target keyvalues in the Logic_Choreographed_Scene's properties; one for each possible corresponding "!Target#" name ("!Target1"..."!Target8").
Example Illustration
link forthcoming
Pausing / Resuming a Scene
- Using a Global Pause event
- Using a Fire Trigger event to pause itself indefinitely
- The behaviour of paused VCD's
- Events remain active (lookAt, faceTo, moveTo, etc)
- Pausing in the "loop" section of a Gesture event
- Setting up Nags
Controlling your Actors
- NPC input, Start Scripting
- NPC flag, Use Alternate Collisions
- Using non-conventional Actors
- Generic_actor entity
- Radio example
- Lamarr
Player Participation in the Scene
- Using Triggers, Look Triggers, and AI_Script_Conditions
- Eli's lab example
- Taking control of the player
- Point_viewcontroller
- Alyx intro example
- Vehicles
- Breen scene example
- Point_viewcontroller
Playing Animations in a Scene
Gesture events
Gesture events are a very powerful and flexible means of adding life to your characters in Source. A Gesture event uses a unique type of animation sequence which has special compositing rules -- they are generally animations that are layered on top of an underlying sequence. For example you can make a Gesture animation of a character scratching his nose, and then play that Gesture while the character is sitting, standing, walking, running, etc. In addition you can adjust the magnitude and timing of Gestures from within Faceposer. You will find that with even a small library of Gestures you can get constant effective use out of them.
Postures, Gestures, and BodyGestures
So far the term "Gesture" has been very broad; It means any animation that has unique compositing rules. There are in fact many different varieties, and we've organized them into 3 main types: Postures, Gestures, and BodyGestures.
All 3 types are placed in Faceposer using the Gesture event, though each type has its own characteristic use as described below.
Postures
Like the name suggests, Postures are used to control the entire body of your character. Use them when you want to control your character's entire stance (weight shifts, leaning, bending over, squatting down, etc). Postures will only play when the character is idle; they will not play while the character is moving (walk, run, etc).
- For more info about Postures go here.
- For info on the different types of postures go here
- For how to Animate a posture and build it into your model go here.
- for how to look at a posture in HLMV go here
Gestures
Gesture animations are those which concern mostly the arms and upper body. Imagine a character gesturing with his hands as he talks -- that is what Gestures are for. A Gesture animation will take complete control of your characters arms, hands, and fingers, but the animation of the hips, spine, neck, and head is additive. That is, it is just added on top of whatever animation is already playing. Gestures can be played at any time, no matter what your character is doing.
- More about Gestures Here.
- Info about the different types of gestures here
- How to Animate a Gesture and build it into your model Here
- how to look at a gesture in HLMV go here
BodyGestures
BodyGestures are the most subtle type, and are used for accents. They are entirely additive -- that means the animation of the hips, spine, neck, head, arms, and hands is just added on top of whatever animation is already playing. A common use of BodyGestures is to help accent dialogue. A BodyGesture can be played at any time, no matter what your character is doing.
- more info about them here
- how to Animate a BodyGesture and build it into your model here
- how to look at a BodyGesture in HLMV here
- Organizing in faceposer
- Authoring a new gesture/posture in XSI, building into your model
- Playing gesture events over SS's or ActBusies
- Using IK rules in gestures
- Barney hands-on-hips posture
- Alyx's button push gesture
Illustration
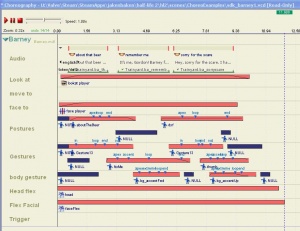
Open Faceposer and load the Barney.mdl. Then open "...\Steam\SteamApps\<your username>\half-life 2\hl2\scenes\ChoreoExamples\sdk_barney1.vcd"
This VCD is a good example of how Postures, Gestures, and BodyGestures were used in HL2. You can double-click on a channel to disable it -- do that to see how each channel adds to the end result.
Note the use of NULL Gesture events to allow for breaks in between events.
Sequence events (use sparingly)
Flex animation
Using Scripted Sequences in a scene
- Getting the Actor(s) in position
- Fire_trigger event to start SS
- Using a NULL sequence event to time other events (dialog, etc) to the animation
- Using Look At !Self to suppress AI head movement
- Using SS's OnFrameEvent outputs to trigger other scene events
More to be added.


