Creating an Addon
This page either contains information that is only partially or incorrectly translated, or there isn't a translation yet.
If this page cannot be translated for some reason, or is left untranslated for an extended period of time after this notice is posted, the page should be requested to be deleted.
Also, please make sure the article complies with the alternate languages guide.
开始
请先确保您已经安装 Half-Life: Alyx 创意工坊工具集!
当您安装好工具集并且进入了工具集启动器(Workshop Tools),点击"Create New Addon"创建一个新的插件,输入名字,之后点击"Launch Tools"。
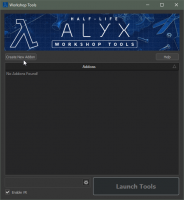
点击Create New Addon...

... 并且给它命名。


创建地图
您已经做了个空插件,现在它需要内容!
当您加载好工具,点击位于左上角工具栏的 hammer 图标来打开 Hammer(Half-Life: Alyx关卡编辑器)。

您可以导入起始模板来替代从零开始创建地图。工具中还包括一张基本的入门地图。
- 在File菜单,选择New Map From Template。
- 转到maps\templates\并选择basic_setup.vmap
- 您打开的新地图应该像这样:

- 按下快捷键 Ctrl-S 或者File菜单的Save来保存您的地图。在这个例子中,以"example.vmap"来保存您的地图。
如果您想尝试构建地图并且四处走走,现在正是时候!
- 在构建之前,您需要生成预览光烘焙。
- 为了预览烘焙,去到 Lighting 菜单选择"Preview Baked Lighting"。在这个如此简单的地图上,这只需要花一点点时间。
- 为了构建和游玩您的地图, 按下 F9 或选择 File 菜单上的 Build Map。 默认选择 Full Compile (完全编译),这正是您想要的。点击 Build 按钮并等待 Hammer 构建您的地图。
- 游戏引擎窗口会出现在前台,并加载您的地图,您就知道构建完成了。如果您之前勾选了 Enable VR,戴上头显并四处走走!
将地图加入您的插件
Congratulations, you've made and built a map! Now it's time to formally add that map to your addon, so you can select the map from within Half-Life: Alyx's new game menu.
- Close the tools, and re-launch them to return to the Tools Launcher.
- Right-click your addon, or select it and press the gear icon, then choose "Edit Addon Info..."

In the window that pops up, click the + icon next to Maps, and add your test map by typing in its name. You don't need the file extension! These names are based on the file path starting at the maps directory, so since your test map is maps/example.vmap, you'd just type in "example." (If your map was located in maps/testmaps/example.vmap you would type in "testmaps/example")

In addition to editing addon info, the right-click menu contains some other useful options:
- Edit Addon Info...
- Once you've created maps for your addon, this is where you'll list them.
- Create Desktop Shortcut
- Places a shortcut on your desktop with the appropriate command switches to directly launch the tools with the appropriate addon. You can create separate shortcuts to launch your addon in tools with and without VR.
- Show Launch Command Line
- Shows you the command line string to launch directly into this addon's tools with your current launch options.
- Explore Content Folder & Explore Game Folder
- Opens a Windows Explorer window at the location of your addon's content directory (your source content, most of what you will be editing in tools), or game directory (your compiled content, and a few exceptions like LUA scripts and webm videos).
- Set As Default
- Marks an addon as default when launching the Half-Life: Alyx Workshop Tools. Default is saved between sessions.
- Duplicate
- Creates an addon with the desired name and copies the files from your selected addon into a new directory.
Play your addon
Now that you've made a map and added it to your addon, you can play it locally in game:
- Quit the tools and launch Half-Life Alyx normally from Steam.
- Go to the Addons menu. You should see your addon there, in the list of local addons. Make sure your addon is enabled.
- From the main menu, start a New Game.
- Click through the tabbed menu at the top of the New Game menu to change from the main Alyx campaign to Addon maps.
- Your addon should be there, ready to be played. Click it and start!

Upload your addon
Now that you've played your addon, if you think it's ready to be shared with the world, it's time to upload it in the Workshop.
Launch the Workshop Manager tool.

Select "New Submission."

Fill out the Publish dialog including a preview image, and hit submit.

Once your addon has been created and uploaded, the workshop web page for the addon will automatically open.
Update your addon
Launch the tools for your addon, as above. Go to the Workshop Manager tool, then right click the entry for your addon and select "Re-Upload."
Type a description of what's changed into the Change Log, make whatever other changes you see fit to the Title, Description, and Preview Image, and hit Submit.