Ru/Hammer Face Edit Disps
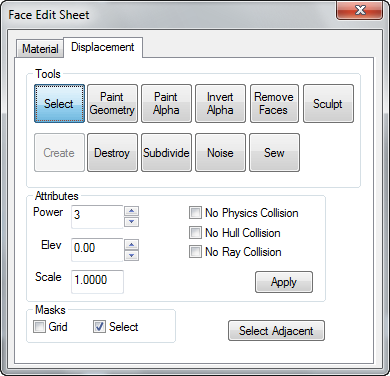
Выбирая Texture Application Tool, вы вызываете диалоговое окно Face Edit Sheet . Вкладка Displacement содержит инструменты для создания и редактирования деформированной геометрии. Вкладка Materials содержит инструменты, используемые при редактировании свойств текстур объектов на уровне граней. См. редактирование граней, материалы.
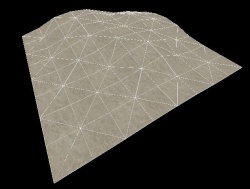
Геометрия деформации - это поверхности брашей, преобразованные в треугольную сетку, которые можно как угодно искажать и придавать им различную скульптурную форму. Первоначальная функция деформированных поверхностей - это создание ландшафта -- холмов, долин, углублений, склонов и т.д.
Вкладка Displacement
Вкладка Displacement в диалоговом окне Face Edit позволяет создавать и совершать манипуляции с деформированными поверхностями на выбранных гранях браша. Чтобы выбрать грань браша, щелкните по нему в окне 3D-вида левой кнопкой мыши. Чтобы выделить несколько граней, удерживайте клавишу CTRL. Также, можно выбрать несколько брашей до выбора инструмента Texture Application.
Инструменты, доступные на вкладке Face Edit Displacements, описаны ниже.
Select
Используется, чтобы выбирать грани брашей и деформаций для редактирования. Удерживая CTRL можно добавлять грани, а SHIFT - инвертировать выбранные грани.
Create
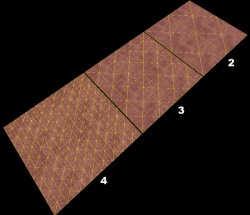
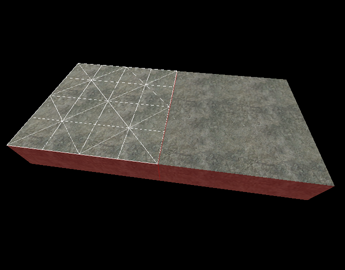
Создает новую деформированную поверхность на выбранной грани браша. Деформации имеют три уровня разрешений: 2, 3, или 4. Это изображение показывает уровни разрешения деформации.
Разрешения (или power на 2):
- 2 - создает 4 деления вдоль каждого края грани ( 2^2 )
- 3 - создает 8 делений вдоль каждого края грани ( 2^3 )
- 4 - создает 16 делений вдоль каждого края грани ( 2^4 )
Destroy
Удаляет выбранные деформированные поверхности, возвращая их в состояние обычных граней.
Paint Geometry
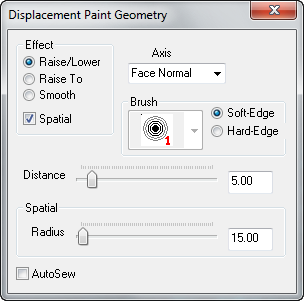
Открывает панель Displacement Paint Geometry, которая позволяет изменять геометрию выбранных деформаций с помощью инструмента рисования.
Effect
Определяет тип рисования геометрии, который вам нужен:
- Raise/Lower - В пространственном и брашевом режимах рисования увеличивает или уменьшает высоту геометрии. Левой кнопкой мыши геометрия поднимается вдоль текущей оси, правой - опускается. Ползунок Distance задает глубину смещения на каждый щелчок мыши.
- Raise to - В пространственном режиме рисования задает высоту геометрии относительно высоты, указанной в ползунке Distance в единицах, соответствующих деформированной грани.
- Smooth - В пространственном режиме рисования усредняет позицию геометрии, эффективно сглаживая неровности.
Spatial
Включает пространственный режим рисования. Снятие этого флажка переводит инструменты в режим рисования браша. Пространственное рисование использует трехмерную сферу, которая определяет геометрию рисунка. Брашевое рисование использует фиксированные вершины браша, влияя на число окружающих вершин относительно его центра.
Axis
Определяет направление оси рисования:
- X, Y, Z - Геометрия будет рисоваться только по осям X, Y, или Z, независимо от направления деформации.
- Face Normal - Геометрия рисуется относительно определенной оси, заданной конкретной гранью. Выбирать направление рисования можно с помощью <Alt>+щелчок правой кнопкой на любой грани в окне 3D-вида. Просто щелчок по грани последовательно переключает направление.
- Subdiv Normal - Ось рисования задается кривой, сгенерированной командой Subdivide на выбранной грани.
Brush
В режиме браша можно задавать размер изменяемой геометрии. Число на иконке кисти показывает количество охватываемых ей вершин. Например, "3" - действует в радиусе трех вершин, где вы щелкнули по деформации. Brush не активен, когда выключен режим Spatial.
Soft-Edge/Hard-Edge
Switches the falloff of painting when in spatial editing mode. In Soft-Edge mode, geometry near the center of the painting sphere will be most affected by painting operations, with the effect diminishing towards the edges of the sphere. In Hard-Edge mode, all geometry will be identically affected by painting operations, regardless of their position in the sphere.
These controls only affect Spatial painting mode, and are disabled when Spatial painting is not active.
Distance
When in Raise/Lower mode, this slider sets the amount that geometry will move with each click while painting geometry, as a distance of world units. For example, if the Distance slider is set to "5", each click with the left mouse button while in Raise/Lower painting mode will move the geometry 5 world units.
While in Raise To mode, this slider sets the height that geometry will move to, in world units. For example, if the Distance slider is set to "128", each click with the left mouse button while in Raise/Lower painting mode will move the geometry to exactly 128 world units from the base brush face.
While in Smooth painting mode, the lower the value of the Distance slider, the more smoothing will be applied.
Radius
Sets the size of the painting sphere while in Spatial painting mode. The Radius slide only affects Spatial painting mode, and is disabled when Spatial painting is turned off.
Autosew
Enabling this option will force Hammer to automatically do a Sew command after every paint operation on the selected geometry.
Basic Displacement Creation
How to create and paint a displacement surface:
- Create a brush with the Block Tool that will be used a the base for the created displacement surface.
- Click the Texture Application tool to bring up the Face Edit dialog, and select the Displacement tab.
- In the 3D view, left-click on a brush face to select it. <Ctrl>-click to add or remove faces from the current selection.
- Click Create in the Displacement tab. Enter a value from 2 to 4 for the displacement density and click OK.
- Select the Paint Geometry tool on the Displacement tab. The Paint Geometry panel will open.
- In the 3D View, Left-click on a displacement to raise a section, and right-click to lower it. Use the Radius slider in the Paint Geometry panel to control the size of the painting sphere.
Paint Alpha
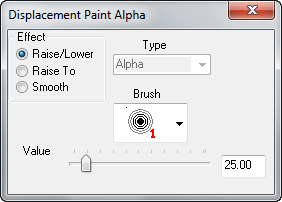
Opens the Displacement Paint Alpha panel, which allows you to paint the alpha channel for the selected displacements. The alpha channel controls the visibility of two separate textures on the displacement surface.
Effect
Determines what type of alpha painting you wish to do:
- Raise/Lower - Increase or decrease the alpha value of the vertices affected. Left-clicking raises the alpha value, Right-clicking lowers it. The Value slider determines how quickly the value will change as you paint.
- Raise to - Sets the alpha value of the affected vertices to the value specified in the Value slider, from 0 to 255.
- Smooth - Averages the alpha value of the affected vertices, effectively smoothing out any variations.
Brush
When in alpha painting mode, selecting a brush here will use that brush size to determine which vertices are altered when painting. The number next to each brush icon represents how many vertices wide the brush is. For example, a "3" brush will affect all vertices within a 3 vertex radius of where you clicked on a displacement.
Value
When in Raise/Lower mode, this slider sets the how quickly the alpha values will change with each click while painting geometry.
While in Raise To mode, this slider sets the exact alpha value that each vertex will be set to, from 0 to 255.
The Value slider has no effect while in Smooth painting mode.
Invert Alpha
Inverts all alpha data on the selected displacements.
Subdivide
Create a smooth subdivision surface out of two or more selected displacement surfaces.
Noise
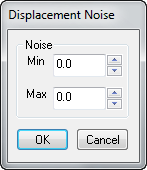
Add random noise to the selected displacement surface.
- The Min value sets the greatest distance in units that a point on the displacement will move downward along the face normal.
- Max sets the greatest distance upward along the face normal.
- Clicking OK will randomize the position of the points on the displacement somewhere between these two values.
Sew
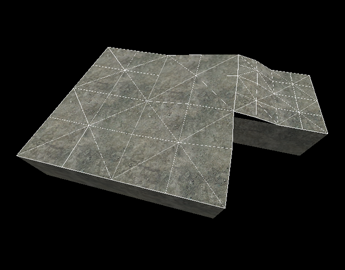
Connect the edges of two or more selected displacement surfaces. You can sew displacement surfaces in any of the following circumstances:
- Any two displacements whose base brushes surfaces share a common edge when coincident endpoints.
- Displacements with different resolution settings.
- A displacement surface to a non-displacement brush face, as long as the base face of the displacement shares a common edge.
- A displacement surface to another displacement surface where a shared edge is exactly half the width of the other (called a T-junction).
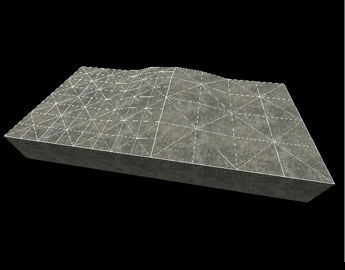
Examples of circumstances where the Sew command can be used:
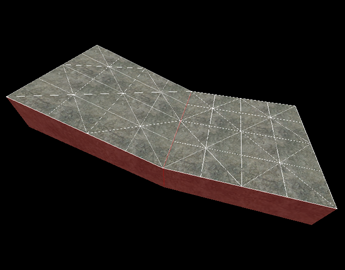
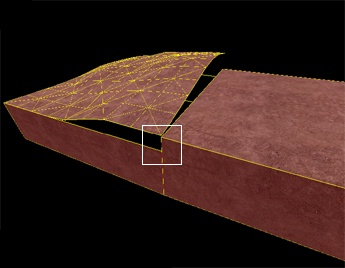
Surfaces cannot be sewn together if the base faces of the displacements do not share a common edge:
Sculpting
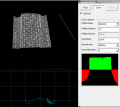
Opens the Displacement Sculpt panel. This tool is unique as it makes on-the-fly changes to the size when you modify the displacements.
Hotkeys Use Right-Click and drag to the right to increase the size of the brush, and drag it to the left to decrease the size of the brush. Ctrl + click works in the same fashion as right click on the Paint Displacement tool. Shift + click will attempt to even out the area you are clicking over. Alt + Right-click
Settings
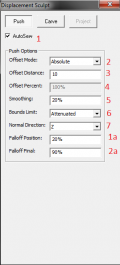
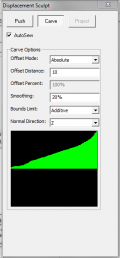
Two major ways of editing displacements, Push, and Carve. Both of these are more powerful than the original Displacement tool.
There are a number of settings that are present on both editing tools, and they have the exact same usages in both tools.
- AutoSew - Fairly self-explanatory. It automatically sews any two displacements together when editing if enabled.
- Offset Mode - There's two major offsets; Absolute, and Adaptive. Absolute adds any value you set to the X,Y,Z axis or any combination thereof. Adaptive, however, adds a certain % value of the brush you modify the displacement with.
- Offset Distance - Only applicable when using the Absolute Offset Mode. This is the distance, in units, in which the point(s) will be moved when they are edited.
- Offset Percent - Only applicable when using the Adaptive Offset Mode. This is the percentage of the size of the brush that the point(s) will be moved when they are edited.
- Smoothing - How much smoothing is added to the modified area.
- Bounds Limit - Has two settings; Additive and Attenuated. Additive applies the offset every time you go over a brush with your modifier. Attenuated applies the offset to each point once. Very useful.
- Normal Direction - Which direction should the offset be applied to. Has X, Y, Z, Brush Center, Screen, and Selected. Brush center will move the brushed area in the direction of where the center of your brush is. Screen will move the brushed area towards the camera, or away from it. Selected works by taking the line perpendicular to the face you Alt + Right-Click on.
Push Settings
- Falloff Position - Percentage of the interior of the brush where the entire offset will be applied.
- Falloff Final - Percentage of the offset of where the fallout will not go below. For example, if offset distance is 10, and falloff final is 90%, the areas where falloff will be applied will not go below 9.
Carve Settings
Carve is different from Push because instead of a circle, you are given an editable graph. By modifying the graph's shape, you can change the shape of the area you modify. This tool is extremely fickle, so go slowly and smoothly.
Attributes
Different attributes that can be changed for displacement surfaces.
- Power - Sets the resolution of the displacement. Possible values are 2, 3, and 4.
- Elev - Changes the distance of the displacement from the base face.
- Scale - Scales the displacement "height" -- the distance from the base face.
- No Physics Collision - Disables any physics objects colliding with the displacement. Useful for snow, mud, etc.
- No Hull Collision - Disables any player or NPC collisions with the displacement.
- No Ray Collision - Disables raycasts colliding with the displacement. Gunfire and bullets will not collide with the displacement surface.
- Apply - Commits any changes to the Power, Elev, or Scale values.
Masks
These options change the way displacement surfaces are displayed when selected in the 3D Views. Enabling the Grid mask disables the drawing of the wireframe displacement grids when selecting displacements. Choosing Select disables the red shading of selected displacements.
See also
- Editing Displacements - Basic displacement description and editing techniques.
- Face Edit, Materials
- Displacement Mask and Displacement Edge Collapse icons from the Map Operations toolbar.
- Hotkey Reference - for useful Displacement editing keyboard shortcuts.
- Creating Holes in Displacements
