User:Brandished/List Test: Difference between revisions
Jump to navigation
Jump to search
Brandished (talk | contribs) |
Brandished (talk | contribs) mNo edit summary |
||
| Line 346: | Line 346: | ||
: '''AVI (XVID)''' | : '''AVI (XVID)''' | ||
:: [http://www.interlopers.net/tutorials/video Video Tutorials] | :: [http://www.interlopers.net/tutorials/video Video Tutorials] | ||
---- | |||
Revision as of 16:43, 8 October 2008
Table Layout Tests
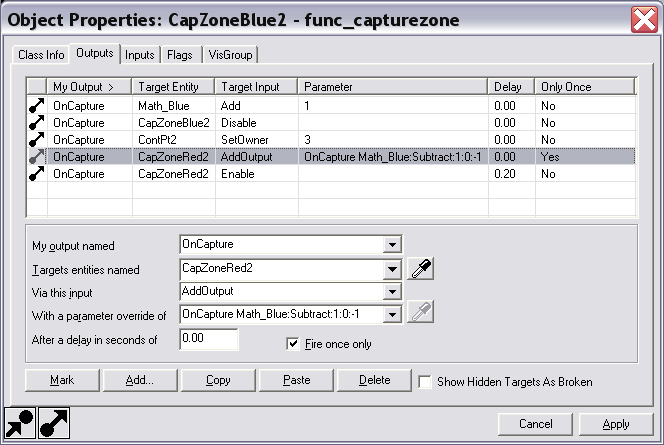
Sample Outputs Table Reference
Sample Outputs Table 1a
HTML:
| My Output Named | Target Entity | Target Input | Parameter | Delay | Only Once | |
|---|---|---|---|---|---|---|
| OnCapture | Math_Blue | Add | 1 | 0.00 | No | |
| OnCapture | CapZoneBlue2 | Disable | - | 0.00 | No |
WiKi:
| My Output Named | Target Entity | Target Input | Parameter | Delay | Only Once | |
|---|---|---|---|---|---|---|
| OnCapture | Math_Blue | Add | 1 | 0.00 | No | |
| OnCapture | CapZoneBlue2 | Disable | - | 0.00 | No |
Sample Outputs Table 1b
HTML:
| My Output Named | Target Entity | Target Input | Parameter | Delay | Only Once | |
|---|---|---|---|---|---|---|
| OnCapture | Math_Blue | Add | 1 | 0.00 | No | |
| OnCapture | CapZoneBlue2 | Disable | - | 0.00 | No |
WiKi:
| My Output Named | Target Entity | Target Input | Parameter | Delay | Only Once | |
|---|---|---|---|---|---|---|
| OnCapture | Math_Blue | Add | 1 | 0.00 | No | |
| OnCapture | CapZoneBlue2 | Disable | - | 0.00 | No |
| Image:Io11.png | |
| Image:Io12.png | |
| Image:Io21.png | |
| Image:Io22.png |
Sample Outputs Table 2a
| My Output Named | OnCapture | OnCapture |
|---|---|---|
| Target Entity | Math_Blue | CapZoneBlue2 |
| Target Input | Add | Disable |
| Parameter | 1 | - |
| Delay | 0.00 | 0.00 |
| Only Once | No | No |
Sample Outputs Table 2b
| My Output Named | OnCapture | OnCapture |
|---|---|---|
| Target Entity | Math_Blue | CapZoneBlue2 |
| Target Input | Add | Disable |
| Parameter | 1 | - |
| Delay | 0.00 | 0.00 |
| Only Once | No | No |
List Tests
Sample List 1
- Bruce Eckel's Thinking in C++ 2nd Edition
- C++ for you
- Programmer's Heaven
- CoderSource.net: C++ Programming Tutorials
- The Code Project
- MSDN: Getting Started with Visual C++
- LearnCpp.com
- Xoax.net C++ Video Tutorials
- Learn C++ Programming
- Cprogramming.com
- cplusplus.com
- wikibooks: C++ Programming
- An introduction to C, by Tom Torfs
Sample List 2
- python.org
- wikibooks: Python
- A Beginner's Python Tutorial
- Instant Python
- Dive Into Python
- Python in 10 minutes
- A Byte of Python
Sample List 3
Articles ideas / Works in progress
Source Level Design - Video Tutorials
RenStrike
- vimeo
Big Lou
Vaatrad
- YouTube
- Source Mapping Tutorial 1 - Your First Map
- Source Mapping Tutorial 2 - A Few Tips
- Source Mapping Tutorial 3 - Basic Sky
- Source Mapping Tutorial 4 - Objectives and Tips on Spawns
- Source Mapping Tutorial 5 - Brushes
- Source Mapping Tutorial 6 - Textures and Decals
- Source Mapping Tutorial 7 - Stairs and Ladders
- Source Mapping Tutorial 8 - GUNS!
- Source Mapping Tutorial 9 - Water, Glass and Teleporters
- Source Mapping Tutorial 10 - Doors
- Source Mapping Tutorial 11 - Props
Brandished
- Flash/HTML
- Making a 5 Control Point Map
Interlopers.net
- AVI (XVID)
Setting the Cap Point Layout
This is mostly true for the cap layout section in the team_control_point_master entity.
If these were the index settings for the team_control_point entities in your map:
 0 = Red's Final Control Point
 1 = Neutral Center Control Point
 2 = Blue's Final Control Point
typing:
<0 1 2>
for the cap layout would give you this in game:
and typing:
<0 2,1>
for the cap layout would give you this in game:
But if this is what you wanted:
You would have to type
< 1,0 2>
for the cap layout. Thats:
