Exporting a model/XSI: Difference between revisions
TomEdwards (talk | contribs) |
TomEdwards (talk | contribs) (rm. that silly cubes stuff) |
||
| Line 4: | Line 4: | ||
'''To learn about the general usage of XSI, see the [[XSI Beginner Tutorial]].''' | '''To learn about the general usage of XSI, see the [[XSI Beginner Tutorial]].''' | ||
== Add a texture and UV map == | == Add a texture and UV map == | ||
| Line 17: | Line 13: | ||
The filename of the image you import into XSI defines the name of the [[Valve Texture Format|VTF]] file Source will try to apply to the model in-game (though not its location). To avoid confusion, try to keep the texture name the same as the model name. If you don’t want to worry about textures yet, you can stick with XSI’s default – but your model will be covered in Source’s purple “missing material” checkerboard when you try to use it. | The filename of the image you import into XSI defines the name of the [[Valve Texture Format|VTF]] file Source will try to apply to the model in-game (though not its location). To avoid confusion, try to keep the texture name the same as the model name. If you don’t want to worry about textures yet, you can stick with XSI’s default – but your model will be covered in Source’s purple “missing material” checkerboard when you try to use it. | ||
Next is the texture projection, or [[UV map]]. The XSI [[Studio Model Data|SMD]] exporter will decide what to export by looking at what has UV data, rather than what is hidden and what is visible, even if the mesh is intended for a [[collision model]] | Next is the texture projection, or [[UV map]]. The XSI [[Studio Model Data|SMD]] exporter will decide what to export by looking at what has UV data, rather than what is hidden and what is visible, even if the mesh is intended for a [[collision model]], so don't forget this step! | ||
{{tip|The second and third sections of the Texture toolbar contain shortcuts for applying UV maps.}} | {{tip|The second and third sections of the Texture toolbar contain shortcuts for applying UV maps.}} | ||
| Line 36: | Line 30: | ||
You may see your meshes’ lighting change slightly when you un-check the box. | You may see your meshes’ lighting change slightly when you un-check the box. | ||
{{warning|Neglecting to change this setting will result in | {{warning|Neglecting to change this setting will result in any collision meshes being merged into a single shape!}} | ||
==Freeze transforms and history== | ==Freeze transforms and history== | ||
| Line 45: | Line 39: | ||
If you have any non-enveloped meshes, which to say if the model isn't animating, you must freeze their transforms (i.e. scale, translate, rotate) before each export operation. Enveloped meshes should have been frozen before their envelope was applied! | If you have any non-enveloped meshes, which to say if the model isn't animating, you must freeze their transforms (i.e. scale, translate, rotate) before each export operation. Enveloped meshes should have been frozen before their envelope was applied! | ||
To freeze, first select | To freeze, first select all of your meshes. Then click the section header for ‘Transform’, on the right-hand menu, and choose ‘Freeze All Transforms’, which is directly beneath the first divider. This will ‘bake’ the translation you performed on your first cube. If you try to transform it after freezing, you will notice that the tri-directional arrows now appear the centre of the world rather than the centre of the mesh. | ||
You will also notice if you try that that the texture projection box has moved to the centre of the world as well. To bake that, and perform various other tidying-up operations, choose ‘Freeze History -> Modeling’ from the right-hand menu. | You will also notice if you try that that the texture projection box has moved to the centre of the world as well. To bake that, and perform various other tidying-up operations, choose ‘Freeze History -> Modeling’ from the right-hand menu. | ||
| Line 63: | Line 57: | ||
== Export SMDs == | == Export SMDs == | ||
Your model is no ready for export to SMD. The export dialogue can be found from the main menu, under ‘ValveSource -> Export SMD...’. | |||
There are four types of SMD to choose from: | |||
#[[Body mesh]] | |||
#[[Collision mesh]] | |||
#[[Skeletal animation]] | |||
#[[Vertex animation]] (for facial expressions) | |||
Every model needs at least one body and, even if it isn't actually animated, at least one skeletal animation (traditionally called ‘idle’). Generally, except for idle animations which can be created from the body mesh, each SMD will be exported from its own XSI file. | |||
{{tip|Uncheck ‘Remove all unused bones’ if you are exporting an animated collision model. Otherwise you can usually leave the checkboxes alone.}} | |||
It's recommended that you follow a naming convention and use these suffixes on your SMDs: | |||
*<code>ref</code> for the body | *<code>ref</code> for the body | ||
*<code>phys</code> for the collision model | *<code>phys</code> for the collision model | ||
*<code> | *<code><animation name></code> for each animation | ||
So you might save | So you might save ‘mymodel-ref.smd’, for example. ‘ref’ is short for ‘reference’. | ||
== Compile! == | == Compile! == | ||
With a body and skeletal animation SMD exported, you are ready to [[Compiling a model|compile your model]]. | |||
Revision as of 09:50, 27 April 2008
This tutorial will show you how to export a simple model from the XSI Mod Tool for compiling with studiomdl.
To learn about the general usage of XSI, see the XSI Beginner Tutorial.
Add a texture and UV map
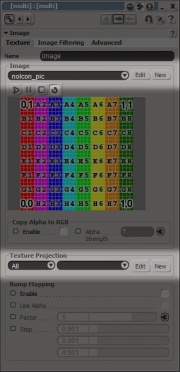
In the third group of left-hand menu buttons you will find ‘Textures’. Select both of your meshes (Ctrl+A), click the button and choose the first sub-option, ‘Add -> Image’. There are two parts of this dialogue we are interested in: ‘Image -> New’ and ‘Texture Projection -> New’.
The filename of the image you import into XSI defines the name of the VTF file Source will try to apply to the model in-game (though not its location). To avoid confusion, try to keep the texture name the same as the model name. If you don’t want to worry about textures yet, you can stick with XSI’s default – but your model will be covered in Source’s purple “missing material” checkerboard when you try to use it.
Next is the texture projection, or UV map. The XSI SMD exporter will decide what to export by looking at what has UV data, rather than what is hidden and what is visible, even if the mesh is intended for a collision model, so don't forget this step!
Disable automatic discontinuity
It isn’t clear why this next step is required – it may be a bug in the SMD exporter. Nevertheless:
- Open the ‘Explorer’ view. Find it in the Views section of the upper toolbar, or press 8
- Expand either of your meshes (
cubeorcube1) - Double-click on ‘Geometry Approximation’
- Choose ‘no’ when prompted to make a local copy of the data
- Click on the ‘Polygon Mesh’ tab of the new dialogue
- Un-check ‘Discontinuity -> Automatic’
You may see your meshes’ lighting change slightly when you un-check the box.
Freeze transforms and history
If you have any non-enveloped meshes, which to say if the model isn't animating, you must freeze their transforms (i.e. scale, translate, rotate) before each export operation. Enveloped meshes should have been frozen before their envelope was applied!
To freeze, first select all of your meshes. Then click the section header for ‘Transform’, on the right-hand menu, and choose ‘Freeze All Transforms’, which is directly beneath the first divider. This will ‘bake’ the translation you performed on your first cube. If you try to transform it after freezing, you will notice that the tri-directional arrows now appear the centre of the world rather than the centre of the mesh.
You will also notice if you try that that the texture projection box has moved to the centre of the world as well. To bake that, and perform various other tidying-up operations, choose ‘Freeze History -> Modeling’ from the right-hand menu.
You should do this before every export. Much like disabling automatic discontinuity, the fact that this step is required seems to be no more than a limitation of the XSI SMD exporter. You can sometimes get away with skipping it, but it’s best to get into the habit for all of the times when you can’t!
Merge meshes
If your model has or will have animations you must merge all of its geometry into the same mesh (otherwise studiomdl will do so itself, destructively). Choose ‘Mesh -> Merge’ from the left-hand menu.
This has created a new ‘polymsh’ object that contains some, but not all, of the data from your existing meshes. To merge the last few pieces of information in, open Explorer with 8 and double-click on ‘polymsh -> Polygon Mesh -> Merge Meshes’. Look in the lower half of the new dialogue for two buttons labelled ‘Merge’ and press them, then press the ‘Delete’ button in the top half to remove the old input meshes.
Export SMDs
Your model is no ready for export to SMD. The export dialogue can be found from the main menu, under ‘ValveSource -> Export SMD...’.
There are four types of SMD to choose from:
- Body mesh
- Collision mesh
- Skeletal animation
- Vertex animation (for facial expressions)
Every model needs at least one body and, even if it isn't actually animated, at least one skeletal animation (traditionally called ‘idle’). Generally, except for idle animations which can be created from the body mesh, each SMD will be exported from its own XSI file.
It's recommended that you follow a naming convention and use these suffixes on your SMDs:
reffor the bodyphysfor the collision model<animation name>for each animation
So you might save ‘mymodel-ref.smd’, for example. ‘ref’ is short for ‘reference’.
Compile!
With a body and skeletal animation SMD exported, you are ready to compile your model.

