|
|
| Line 1: |
Line 1: |
| {{LanguageBar|Glass Light (Portal 2)|title=玻璃灯条}} | | {{LanguageBar|Glass Light (Portal 2)|title=玻璃灯条}} |
| [[File:Walllights.jpg|thumb|right|300px|Wall Glass Lights.]] | | [[File:Walllights.jpg|thumb|right|300px|墙面玻璃灯条]] |
| '''Glass Lights''', more commonly known as '''Light Strips''' in Portal 2 replace the [[Creating a wall light|Recessed Lights]] from the original [[Portal]]. They are used in almost every Portal 2 test chamber and often are the main source of lighting along with Observation Rooms. | | '''玻璃灯条'''(Glass Lights),在《传送门2》中更常被称为'''光带'''(Light Strips),取代了初代《传送门》中的[[Creating a wall light|嵌入式壁灯]](Recessed Lights)。它们几乎出现在《传送门2》的每个测试室里,通常与观察室一同构成主要光源。 |
| In this tutorial, you will learn how to create these light strips for your test chamber.
| | 本教程将教你如何为测试室创建这些玻璃灯条。 |
|
| |
|
| {{note|Although recessed lights can still be created in Portal 2, it's usually a better idea to use the "new" glass lights for the sake of continuity.}} | | {{note|尽管《传送门2》中仍可制作嵌入式壁灯,但为保持风格统一,通常建议使用"新型"玻璃灯条。}} |
|
| |
|
| ==Instances== | | ==实例化制作== |
| | 这比手动创建每条光带要简便得多。先在墙面开洞用于放置实例。若墙壁较薄,需覆盖侧面以防漏光。 |
|
| |
|
| This is often much easier than creating every light strip manually. Create a hole to place the instance in. If your walls are thin, you will have to cover the sides in order to seal leaks.
| | 在 `instances/lights` 文件夹中有多种预设实例,相关实例以 `light_panel_` 开头。 |
|
| |
|
| There are various instances in the instances/lights folder. The relevant instances begin with ''light_panel_''.
| | {{note|若安装了[https://github.com/BenVlodgi/BEE2.4/releases BEEMOD],也可使用 `instances/p2editor` 文件夹中的新版光带实例。这些实例无需开洞——直接放置在表面就能用。但需注意其光照效果不如旧版实例。}} |
| | |
| {{note|If you have [https://github.com/BenVlodgi/BEE2.4/releases BEEMOD] installed, you can also work with the newer light strip instances found in the instances/p2editor folder. These instances don't need any holes — just place some on a surface and you're good to go. Be aware though that the lighting won't look as good as the older instances.}} | |
| | | |
| ==Manual Creation== | | ==手动制作== |
| ===Step 1=== | | ===第一步=== |
| Create a standard room.
| | 创建标准房间。 |
|
| |
|
| ===Step 2=== | | ===第二步=== |
| Cut a hole, 128 units wide, 32 units high, into the surfaces where you want your light strip(s) to go.
| | 在需要安装光带的表面开洞,尺寸为宽128单位×高32单位。 |
|
| |
|
| {{Tip|If you want to create a vertical light strip, swap the measurements}} | | {{Tip|制作垂直光带时请互换宽高尺寸}} |
|
| |
|
| ===Step 3=== | | ===第三步=== |
| Create a solid, also 128 units wide and 32 units high. Move it inside the hole you just cut, but retract it into the wall (watch out for leaks). Texture the face pointing inside the room with ''lights/light_panel_cool'' (or the neutral or warm variants). Texture the remaining faces with ''tools/toolsnodraw''.
| | 创建同等尺寸的实体(宽128单位×高32单位)。将其移入刚开的墙洞中,但需缩回墙内(注意避免漏光)。面向房间的内侧贴图使用 `lights/light_panel_cool`(或中性/暖色调变体),其余面使用 `tools/toolsnodraw`。 |
|
| |
|
| ===Step 4=== | | ===第四步=== |
| Create a [[prop_static]]. Set its world model to ''models/props_lab/glass_lightcover.mdl'' and set 'Disable Shadows' to 'Yes'. Use it to cover up the hole inside the wall and rotate as needed.
| | 创建[[prop_static]]实体。将其世界模型设为 `models/props_lab/glass_lightcover.mdl` 并启用"禁用阴影"(Disable Shadows)。用此模型覆盖墙洞,按需旋转。 |
| {{tip|You can also set the skin of the model to match the light texture you chose in the previous step. Skin 0 is cool, 1 is warm, and 2 is neutral.}} | | {{tip|可调整模型皮肤(skin)匹配上步选择的灯光贴图:皮肤0=冷光,1=暖光,2=中性光。}} |
|
| |
|
| ===Step 5=== | | ===第五步=== |
| Create another solid, also 128 units wide, 32 units high, and 2 units thick. Move it on top of your light strip. Texture all faces with ''tools/toolsinvisible''. Tie this brush to a [[func_portal_bumper]].
| | 再创建实体(宽128单位×高32单位×厚2单位),覆盖在光带表面。所有面贴图使用 `tools/toolsinvisible`。将此实体关联至[[func_portal_bumper]]。 |
|
| |
|
| ===Step 6=== | | ===第六步=== |
| Another job well done. Rinse and repeat.
| | 大功告成。依样重复制作其他光带。 |
|
| |
|
| ==Editing Brightness== | | ==调整亮度== |
| It is possible to edit the brightness of the light by selecting the Texture Application (Shift+A) and adjusting the "Texture scale" values of the light texture. The higher the numbers, the dimmer the light. For example, 2.0 is much darker than 0.25.
| | 可通过纹理贴图工具(Shift+A)调整灯光贴图的"纹理比例"(Texture scale)值来修改亮度。数值越大,光线越暗。例如:2.0的亮度远低于0.25。 |
|
| |
|
| <gallery> | | <gallery> |
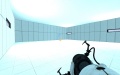
| Image:Glass-light-bright.jpg|Three lights in a basic room with a texture scale of 0.25. | | Image:Glass-light-bright.jpg|基础房间内三盏亮度为0.25的灯 |
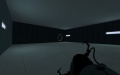
| Image:Glass-lights-dim.jpg|Same room, but with the scale turned up to 2.0. | | Image:Glass-lights-dim.jpg|相同房间,纹理比例调至2.0的效果 |
| </gallery> | | </gallery> |
|
| |
|
| {{note| Make sure that mat_fullbright is set to 0 in your console in order to see the changes to lighting.}} | | {{note|需在控制台输入 `mat_fullbright 0` 才能看到光照变化效果。}} |
|
| |
|
| [[Category:Portal 2 Level Design]] | | [[Category:Portal 2 Level Design]] |
| [[Category:Portal 2 Tutorials]] | | [[Category:Portal 2 Tutorials]] |
玻璃灯条(Glass Lights),在《传送门2》中更常被称为光带(Light Strips),取代了初代《传送门》中的嵌入式壁灯(Recessed Lights)。它们几乎出现在《传送门2》的每个测试室里,通常与观察室一同构成主要光源。
本教程将教你如何为测试室创建这些玻璃灯条。
 注意:尽管《传送门2》中仍可制作嵌入式壁灯,但为保持风格统一,通常建议使用"新型"玻璃灯条。
实例化制作
这比手动创建每条光带要简便得多。先在墙面开洞用于放置实例。若墙壁较薄,需覆盖侧面以防漏光。
在 `instances/lights` 文件夹中有多种预设实例,相关实例以 `light_panel_` 开头。
注意:若安装了BEEMOD,也可使用 `instances/p2editor` 文件夹中的新版光带实例。这些实例无需开洞——直接放置在表面就能用。但需注意其光照效果不如旧版实例。
手动制作
第一步
创建标准房间。
第二步
在需要安装光带的表面开洞,尺寸为宽128单位×高32单位。
 提示:制作垂直光带时请互换宽高尺寸
第三步
创建同等尺寸的实体(宽128单位×高32单位)。将其移入刚开的墙洞中,但需缩回墙内(注意避免漏光)。面向房间的内侧贴图使用 `lights/light_panel_cool`(或中性/暖色调变体),其余面使用 `tools/toolsnodraw`。
第四步
创建prop_static实体。将其世界模型设为 `models/props_lab/glass_lightcover.mdl` 并启用"禁用阴影"(Disable Shadows)。用此模型覆盖墙洞,按需旋转。
提示:
第五步
再创建实体(宽128单位×高32单位×厚2单位),覆盖在光带表面。所有面贴图使用 `tools/toolsinvisible`。将此实体关联至func_portal_bumper。
第六步
大功告成。依样重复制作其他光带。
调整亮度
可通过纹理贴图工具(Shift+A)调整灯光贴图的"纹理比例"(Texture scale)值来修改亮度。数值越大,光线越暗。例如:2.0的亮度远低于0.25。
注意:需在控制台输入 `mat_fullbright 0` 才能看到光照变化效果。