Blender Modeling Walkthrough (3.6.1): Difference between revisions
No edit summary |
|||
| Line 62: | Line 62: | ||
<p>Now we should have a clean workspace to start creating our model. | <p>Now we should have a clean workspace to start creating our model. | ||
== Starting | == Adding the Starting Cylinder == | ||
Now we need a cylinder to create our can from. We can add prefab objects to the scene with {{key|Ctrl+A}}</p> | Now we need a cylinder to create our can from. We can add prefab objects to the scene with {{key|Ctrl+A}}</p> | ||
<p>Hover your mouse over the "Mesh" category at the top of the opened menu, then click the "Cylinder" option to add one to the scene.</p> | <p>Hover your mouse over the "Mesh" category at the top of the opened menu, then click the "Cylinder" option to add one to the scene.</p> | ||
Revision as of 12:20, 7 August 2023
As a courtesy, please do not edit this while this message is displayed.
If this page has not been edited for at least several hours to a few days, please remove this template. This message is intended to help reduce edit conflicts; please remove it between editing sessions to allow others to edit the page.
The user who added this notice, should you wish to contact them, is: Lawlypops tr = idir.
This tutorial covers creating a model in Blender and exporting it to the Source Engine. The model we will make is a soda can.
This tutorial was created on version 3.6.1 of Blender for Windows. If you still need the old 2.48 version, you can find it here:
Blender Modeling Walkthrough (Outdated)
Tools Used
The tools used for this tutorial are as follows:
Blender for creating a mesh and texture mapping.
Blender Source Tools for exporting the model from Blender.
Crowbar for compiling the model into a .mdl for source games.
VTFEdit for converting textures into VTFs for source games.
| Key Reference | |
|---|---|
| Left Mouse Button | |
| Middle Mouse Button | |
| Right Mouse Button | |
| MW | Mouse Wheel |
| MWUp | Mouse Wheel Up |
| MWDown | Mouse Wheel Down |
| 9 | 9 on the number row |
| Num9 | 9 on the number pad |
Quick Overview
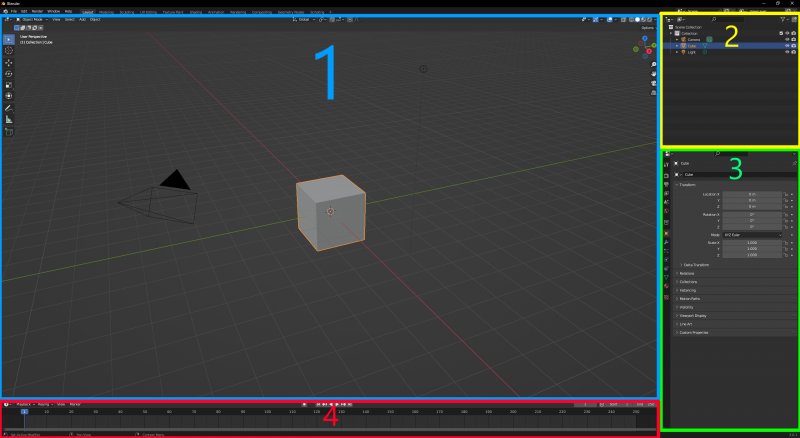
Now, if you haven't already, open Blender. You should have the default screen, seen below.
For a brief overview, Blender's workspace is divided into different areas called viewports. Each viewport contains a different "Editor Type" that can be changed by clicking on the Editor Type icon. Also, every "Editor Type" has a header that can be relocated to the top or bottom of the window, or be removed entirely by clicking on it with the RMB and unchecking "Show Header". This can be undone by clicking the small down arrow icon that appears at the top-right of the viewport. Blender starts with four viewports open by default:
   1. 3D Viewport
   2. Outliner
   3. Properties
   4. Timeline
These will be covered in more detail as we use them.
Cleaning Up the Workspace
To get started, we will need to delete the "Default Cube". This is the first critical step in any 3D modeling adventure. First, select the cube with ![]() , then press X to delete it.
, then press X to delete it.
Since we will not be needing the camera or the light objects for making a Source model, we can delete those too. Pressing A will select everything in the scene. Then press X to delete them as well.
Now we should have a clean workspace to start creating our model.
Adding the Starting Cylinder
Now we need a cylinder to create our can from. We can add prefab objects to the scene with Ctrl+A
Hover your mouse over the "Mesh" category at the top of the opened menu, then click the "Cylinder" option to add one to the scene.
Now we have a wonderful cylinder that does most of our work for us. However, cans are a little more detailed than what we have, so next is to add some detail.
Editing the Cylinder
First order of business is to align our model with the standard of source engine by having the object origin at the bottom. The origin is indicated by the orange dot in the middle of the cylinder. We don't want to move the origin from the center of the scene, but rather move the object upwards.
Your cylinder should be selected already, as shown by the orange highlight around it. If not, select it with ![]() .
Now we can enter "Edit Mode" with Tab ⇆. This will allow us to select each vertex that makes up the mesh. Each vertex is connected to each other with an "edge", and 3 or more edges can form a "face"
.
Now we can enter "Edit Mode" with Tab ⇆. This will allow us to select each vertex that makes up the mesh. Each vertex is connected to each other with an "edge", and 3 or more edges can form a "face"
In edit mode, we can hit A to make sure we have all the vertices selected. Next, press G to "grab" the vertices and move them.
While we can freely move the cylinder how we want, we should keep it centered, and only move it upwards. By pressing Z, we can snap our movement to the "Z" (Up and Down / Blue) axis.
To align the bottom of our object perfectly with the origin, we can press 1 to move it 1 unit along the currently selected axis. Confirm your changes with either ![]() or ↵ Enter. If you need to cancel an action, you can press
or ↵ Enter. If you need to cancel an action, you can press ![]() .
.
