Your First BM Source Level: Difference between revisions
DavidSon713 (talk | contribs) No edit summary |
DavidSon713 (talk | contribs) No edit summary |
||
| Line 9: | Line 9: | ||
===The Block Tool=== | ===The Block Tool=== | ||
[[Image:block_tool.png|right]] | [[Image:block_tool.png|right]] | ||
The block tool is fairly easy to use. | The block tool is fairly easy to use. | ||
# You can draw out a "brush" by clicking on the white cube on the left on the toolbar {{hammer block}} or {{key|Shift}}+B | # You can draw out a "brush" by clicking on the white cube on the left on the toolbar {{hammer block}} or {{key|Shift}}+B | ||
| Line 17: | Line 16: | ||
# After you've done that, click on the {{hammer select}}. on the toolbar. | # After you've done that, click on the {{hammer select}}. on the toolbar. | ||
# Make sure the room has been completely sealed especially if you’ve been designing your room on a relatively large grid scale. | # Make sure the room has been completely sealed especially if you’ve been designing your room on a relatively large grid scale. | ||
[[File:Hammer roomEnclosed.png|frame|none|'''7:''' The complete room, with no leaks.]] | |||
Revision as of 09:19, 31 December 2022
| Skill Level
This tutorial expects you to have this amount of knowledge within the topic to follow along smoothly. | |||||
|---|---|---|---|---|---|
| Novice | Familiar | Competent | Proficient | Expert | |
This is a very short tutorial on how to build your first Black Mesa (Source) level. It is also vital to include an immersive experience when creating your map and that is demonstrated in: PLACEHOLDER but you don't need to worry about that now. This tutorial will just cover the basics of what you need to know when you're first starting out in Hammer.
Construction
The Block Tool
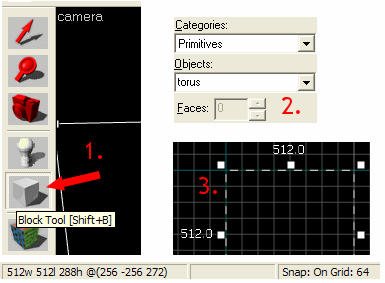
The block tool is fairly easy to use.
- You can draw out a "brush" by clicking on the white cube on the left on the toolbar Block tool
 or ⇧ Shift+B
 - Then, simply drag out a square on the top grid view. It should be at least 1024L×1024W×512H units large so you can work smoothly.
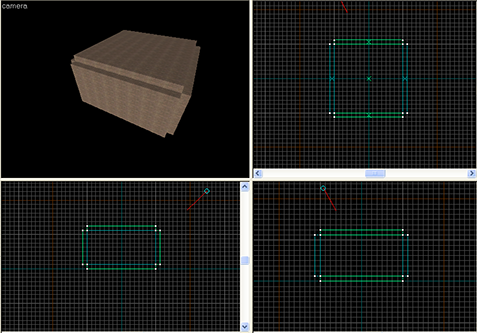
- Continue to make walls by dragging a brush on all 4 sides; constructing walls.
- Then, ⇧ Shift+drag the floor on top of the walls "cloning" the floor; making a ceiling.
- After you've done that, click on the Selection tool
 . on the toolbar.
 - Make sure the room has been completely sealed especially if you’ve been designing your room on a relatively large grid scale.
Texturing
To texture your walls you just placed down, select all of the brushes while holding (ctrl) then, click browse on the right of the screen to browse for textures. Choose any texture to your liking and then double click it. To apply the texture go to the toolbar then click on

