Bounce (level design): Difference between revisions
Kalashnikov (talk | contribs) |
(AM - more emphasis on design, rather than visuals or story) |
||
| Line 2: | Line 2: | ||
==Description== | ==Description== | ||
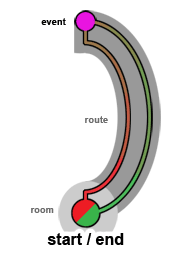
[[Image:bounce_diagram.png|A symbolic diagram of a bounce | [[Image:bounce_diagram.png|A symbolic diagram of a bounce.|right]] | ||
A bounce is a layout element that guides the player to an area which exhibits some kind of change, then leaves him to backtrack and utilize this change. In some ways, it is similar to a [[loops (level design)|loop]]; accordingly, it also shares similar advantages. | A bounce is a layout element that guides the player to an area which exhibits some kind of change, then leaves him to backtrack and utilize this change. In some ways, it is similar to a [[loops (level design)|loop]]; accordingly, it also shares similar advantages. It begins in a room with an obstacle (locked door, force field) and leads to an event that destroys this obstacle (disaster sequence, physics puzzle, button pushing), thus allowing the player to backtrack and proceed past the removed obstacle. | ||
===Resources=== | ===Resources=== | ||
In terms of resources, bounces are incredibly efficient. You're effectively using the same rooms and areas twice. | |||
(bounces are efficient - effectively using the same area twice) | (bounces are efficient - effectively using the same area twice) | ||
===Guidance=== | ===Guidance=== | ||
The use of the same environment allows for easy guidance of the player | The use of the same environment allows for easy guidance of the player. Since the player has already explored the area before, it can be assumed that the player will at least partially remember the room structure and which exits lead to where. Also, it is technically impossible for the player to get lost. | ||
===Ease of Use=== | ===Ease of Use=== | ||
Bounces can be as simple as making the player fight through three rooms of monsters to activate a keypad. Other, more complex bounces can adhere to multiple areas with multiple objectives just to pass through one area. Bounces are also very easy to produce because the level designers needs only create one uniform environment for the player to travel in. These devices can "occupy" the player so that the designer can focus on more important areas. | |||
==Disadvantages== | ==Disadvantages== | ||
Within many players, there has been an emerging awareness of "backtracking." Many players possess a negative view of the mechanic, and see it as an example of laziness on the part of the designer, or simply a very confusing layout element. | Within many players, there has been an emerging awareness of "backtracking." Many players possess a negative view of the mechanic, and see it as an example of laziness on the part of the designer, or simply a very confusing layout element. | ||
| Line 26: | Line 24: | ||
In general, a bounce is much simpler to implement than a loop, but can still be effective. Here are some notable examples: | In general, a bounce is much simpler to implement than a loop, but can still be effective. Here are some notable examples: | ||
===[[Half-Life|Anomalous Materials]] <sup>([[Goldsource]])</sup>=== | ===[[Half-Life|Anomalous Materials / Unforeseen Consequences]] <sup>([[Goldsource]])</sup>=== | ||
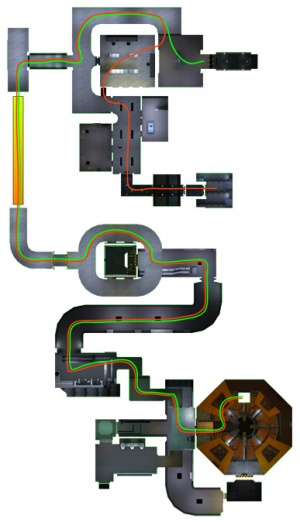
[[Image:anommat bounce.jpg|thumb|right|Anomalous Materials diagram]] | [[Image:anommat bounce.jpg|thumb|right|Anomalous Materials diagram]] | ||
This bounce is used for dramatic effect, primarily to emphasize the contrast between the pre-disaster and the post-disaster [[Black Mesa]]. When the player initially arrives, he is greeted by friendly NPCs and playfully chastised for being late to work again. After the resonance cascade, the player's former colleagues have mutated into zombies; dead bodies and wreckage are littered around the level; the lighting is noticeably darker. The player comprehends the "unforeseen consequences" of his actions. | |||
From the | From a design perspective, this bounce at the beginning of [[Half-Life]] is very effective. Although the player is given very little direction after the [[resonance cascade]], the player still manages to find his way through the ruined labs and up to the office complex. The player's familiarity with the labs helps the player navigate, and also serves to empower the player: he is not relying on an objective list displayed on the HUD to progress through the level, but rather he is relying on his own memory of the level layout as he initially explored. | ||
===[[Blue Shift|Power Struggle]] <sup>([[Goldsource]])</sup>=== | ===[[Blue Shift|Power Struggle]] <sup>([[Goldsource]])</sup>=== | ||
In this | {{TODO|more detail}} | ||
In this level, the player has to drain a pool of coolant, go into it, rearrange the barrels, re-fill the pool, and cross on the rearranged barrels. | |||
===[[Route Kanal]] <sup>([[Source]])</sup>=== | ===[[Route Kanal]] <sup>([[Source]])</sup>=== | ||
{{TODO|diagram, description}} | {{TODO|diagram, description}} | ||
The player must leave the airboat, fight through a small Combine outpost, break open the canal doors, then backtrack to the airboat and proceed through. | |||
===[[MINERVA|Metastasis 1]] <sup>([[Source]])</sup>=== | ===[[MINERVA|Metastasis 1]] <sup>([[Source]])</sup>=== | ||
{{TODO|diagram, description}} | {{TODO|diagram, description}} | ||
The player must descend into an underground bunker area, press a button to open the Combine gates, then return to the surface and proceed to the center of the island. | |||
[[Category:Level Design]] | [[Category:Level Design]] | ||
[[Category:Theory]] | [[Category:Theory]] | ||
Revision as of 14:22, 10 February 2006
Description
A bounce is a layout element that guides the player to an area which exhibits some kind of change, then leaves him to backtrack and utilize this change. In some ways, it is similar to a loop; accordingly, it also shares similar advantages. It begins in a room with an obstacle (locked door, force field) and leads to an event that destroys this obstacle (disaster sequence, physics puzzle, button pushing), thus allowing the player to backtrack and proceed past the removed obstacle.
Resources
In terms of resources, bounces are incredibly efficient. You're effectively using the same rooms and areas twice. (bounces are efficient - effectively using the same area twice)
Guidance
The use of the same environment allows for easy guidance of the player. Since the player has already explored the area before, it can be assumed that the player will at least partially remember the room structure and which exits lead to where. Also, it is technically impossible for the player to get lost.
Ease of Use
Bounces can be as simple as making the player fight through three rooms of monsters to activate a keypad. Other, more complex bounces can adhere to multiple areas with multiple objectives just to pass through one area. Bounces are also very easy to produce because the level designers needs only create one uniform environment for the player to travel in. These devices can "occupy" the player so that the designer can focus on more important areas.
Disadvantages
Within many players, there has been an emerging awareness of "backtracking." Many players possess a negative view of the mechanic, and see it as an example of laziness on the part of the designer, or simply a very confusing layout element.
(author doesn't make the "change" apparent enough)
Implementation
In general, a bounce is much simpler to implement than a loop, but can still be effective. Here are some notable examples:
Anomalous Materials / Unforeseen Consequences (Goldsource)
This bounce is used for dramatic effect, primarily to emphasize the contrast between the pre-disaster and the post-disaster Black Mesa. When the player initially arrives, he is greeted by friendly NPCs and playfully chastised for being late to work again. After the resonance cascade, the player's former colleagues have mutated into zombies; dead bodies and wreckage are littered around the level; the lighting is noticeably darker. The player comprehends the "unforeseen consequences" of his actions.
From a design perspective, this bounce at the beginning of Half-Life is very effective. Although the player is given very little direction after the resonance cascade, the player still manages to find his way through the ruined labs and up to the office complex. The player's familiarity with the labs helps the player navigate, and also serves to empower the player: he is not relying on an objective list displayed on the HUD to progress through the level, but rather he is relying on his own memory of the level layout as he initially explored.
Power Struggle (Goldsource)
In this level, the player has to drain a pool of coolant, go into it, rearrange the barrels, re-fill the pool, and cross on the rearranged barrels.
Route Kanal (Source)
The player must leave the airboat, fight through a small Combine outpost, break open the canal doors, then backtrack to the airboat and proceed through.
Metastasis 1 (Source)
The player must descend into an underground bunker area, press a button to open the Combine gates, then return to the surface and proceed to the center of the island.

