Zh/Adapting PBR Textures to Source: Difference between revisions
No edit summary |
No edit summary |
||
| Line 37: | Line 37: | ||
=== 法线贴图 === | === 法线贴图 === | ||
法线贴图的技术这些年来毫无改变,所以可以直接拿到起源引擎去。绿色通道是否需要反转依然要看具体情况;虽然这跟PBR没有关系。 | |||
:; | :; 法线<sub>起源</sub> = 法线<sub>PBR</sub> | ||
=== 位移贴图 === | === 位移贴图 === | ||
| Line 87: | Line 87: | ||
== 金属 == | == 金属 == | ||
按照定义,金属材料是很少见的,因为现实中见到的大部分金属都是氧化的或者上了漆的,这些属于非金属范畴。它们并没有裸露的金属表面。然而,从一些纹理样本中可以看到,某些陶瓷也可以有一定程度的金属性。 | |||
下面的例子展示了一张瓷砖纹理,整体粗糙度比较一致,但镜面反射率不同。镜面反射贴图中较亮的地方代表附加的金属性。 | |||
[[Image:Adapting_PBR_Textures_to_Source_Pic_4_Metal_Example.png|||400px| | [[Image:Adapting_PBR_Textures_to_Source_Pic_4_Metal_Example.png|||400px|展示不同金属性的陶瓷纹理示例]] | ||
这种附加的金属性按理应该带来较高的镜面反射率。因此,除了以上步骤以外,还可以再应用一个函数。 | |||
:; | :; 镜面反射<sub>起源</sub> = 滤色 (镜面反射<sub>PBR</sub>, 镜面反射<sub>起源</sub>) | ||
至于那种少见的,裸露的金属,现实中它的漫反射率几乎为零。人所感知到的颜色几乎全是由镜面反射带来的。然而,在起源引擎中,只有漫反射可以被其他表面以漫反射和镜面反射的形式接收。镜面反射则只能被其他表面以相同方式接收,即使如此,也要求多次运行<code>[[buildcubemaps]]</code>。如果你不打算纠结于<code>buildcubemaps</code>和满地图到处放辅助光源,把感知颜色作为漫反射贴图依然值得推荐,跟非金属一样。金属和非金属不应该有任何区别。 | |||
所以如果纹理的漫反射贴图几乎是黑的,考虑用镜面反射贴图把它照亮。其他过程应该跟非金属大同小异。 | |||
== 结论 == | == 结论 == | ||
Revision as of 07:52, 29 September 2019
As a courtesy, please do not edit this while this message is displayed.
If this page has not been edited for at least several hours to a few days, please remove this template. This message is intended to help reduce edit conflicts; please remove it between editing sessions to allow others to edit the page.
The person who added this notice will be listed in its edit history should you wish to contact them.
近年来,基于物理渲染的(PBR)纹理及其相关工作流程已经成为最新的行业标准。起源引擎由于年代久远而无法利用之,结果无缘于最新、最优秀的纹理技艺。为了使起源引擎继续发挥余热,我们要求这些纹理适应起源引擎的实现。
目前,网上很难找到正式的研究,但依然可以凭经验推出一套转换公式。本教程就是一个尝试。
本教程针对的是固体材质,所以略过了比较复杂的冯氏贴图。确保你有一个图像处理程序来做这些转换。
分析
首先,了解起源引擎和PBR的做法及其区别是很有帮助的。本质上讲,包括起源引擎在内的传统方法针对的是渲染结果;而PBR纹理针对的则是材质的物理性质,然后通过人类的理解去推测渲染结果。
具体而言,起源引擎的材质包含以下三个层次:
这种逻辑很简单。一个表面的总反射率被分解为两个类别:漫反射和镜面反射,分别由漫反射贴图和镜面反射贴图来表示。法线贴图表示的是局部的凹凸。
PBR纹理技艺因提供者而异。显然每位纹理家都有各自的做法,但非金属纹理的设定通常包括:
有金属性的纹理会使用一种附加的贴图,要么是镜面反射贴图,要么是金属度贴图。关键在于理解每个贴图对漫反射率和镜面反射率的影响,然后才能把它模仿出来。
非金属
对于非金属材料,我们只需要建立一系列函数,把PBR的五张贴图转换成起源引擎的三张贴图。
法线贴图
法线贴图的技术这些年来毫无改变,所以可以直接拿到起源引擎去。绿色通道是否需要反转依然要看具体情况;虽然这跟PBR没有关系。
- 法线起源 = 法线PBR
位移贴图
This shows the displacement or height of the surface. The information should have been addressed by the normal map, so it's probably alright to drop it. Alternatively, especially when AO isn't present, the displacement map may be baked into the albedo or the blue channel of the normal map. Let it screen, multiply, or overlay the other layer with opacity no more than 25%.
If that loose advice doesn't make sense to you, just try:
- albedoSource = multiply ((12.5%) displacementPBR, albedoPBR)
AO
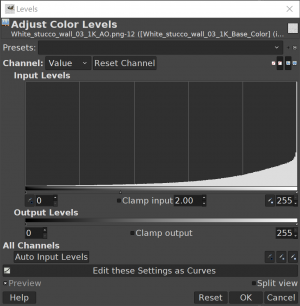
This determines the reflectivity of ambient light. Not supported for brushes in Source, it has to be baked into the albedo. Supposedly it should multiply the albedo, but with high opacity the result can be gloomy. An opacity of 25% is a good starting point.
- albedoSource = multiply ((25%) AOPBR, albedoSource)
An alternative way is to level it up before blending, as shown in picture.
Try letting it multiply the albedo with about 50% opacity.
粗糙度贴图
The roughness map is a tricky one because it has to do with both diffuse and specular reflectivity. A rough surface reflects less specular light compensated by more diffuse light, and vice versa. The law of energy conservation applies, meaning that
- diffuse + specular = constant
In practice there's no human way to balance that equation, so some creative mind is useful. Inverting and applying a curve to the roughness map may give a satisfactory result for the specular map:
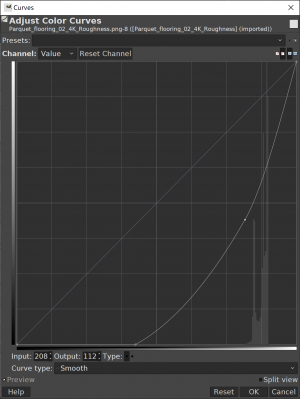
- specularSource = curve (1 - roughnessPBR, 128 > 16)) in sRGB
where the curve looks like this:
An interesting result of the function is that roughness higher than 64% sRGB will render zero specular reflectivity. Most of such textures are for coarse earth, fabric, concrete, etc. In Source convention, these materials generally don't have a specular map indeed.
Instead, it may be favorable to increase diffuse reflectivity for such rough surfaces. One possible solution is:
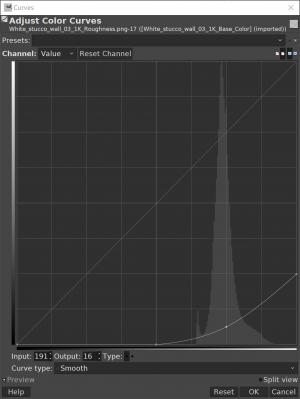
- albedoSource = dodge ((25%) curve (roughnessPBR, 127 > 0, 191 > 16, 255 > 64), albedoSource) in sRGB
where the curve looks like this:
金属
按照定义,金属材料是很少见的,因为现实中见到的大部分金属都是氧化的或者上了漆的,这些属于非金属范畴。它们并没有裸露的金属表面。然而,从一些纹理样本中可以看到,某些陶瓷也可以有一定程度的金属性。
下面的例子展示了一张瓷砖纹理,整体粗糙度比较一致,但镜面反射率不同。镜面反射贴图中较亮的地方代表附加的金属性。
这种附加的金属性按理应该带来较高的镜面反射率。因此,除了以上步骤以外,还可以再应用一个函数。
- 镜面反射起源 = 滤色 (镜面反射PBR, 镜面反射起源)
至于那种少见的,裸露的金属,现实中它的漫反射率几乎为零。人所感知到的颜色几乎全是由镜面反射带来的。然而,在起源引擎中,只有漫反射可以被其他表面以漫反射和镜面反射的形式接收。镜面反射则只能被其他表面以相同方式接收,即使如此,也要求多次运行buildcubemaps。如果你不打算纠结于buildcubemaps和满地图到处放辅助光源,把感知颜色作为漫反射贴图依然值得推荐,跟非金属一样。金属和非金属不应该有任何区别。
所以如果纹理的漫反射贴图几乎是黑的,考虑用镜面反射贴图把它照亮。其他过程应该跟非金属大同小异。
结论
至此,你应该已经有办法为起源引擎制备漫反射贴图、镜面反射贴图和法线贴图了。之后,你可能想要用老办法创建材质。
本教程的公式是要给出比较中庸的风格,所以在一些特殊情况下不好用并不奇怪。笔者鼓励你自行尝试。实际上,更常见的是调整纹理以适应你的地图,而非试图重现原貌。


