Ko/Teleporters: Difference between revisions
No edit summary |
|||
| Line 7: | Line 7: | ||
:* 'Flags'탭의 'Clients' 항목을 플레이어들이 순간이동 될수있게 체크해주세요. | :* 'Flags'탭의 'Clients' 항목을 플레이어들이 순간이동 될수있게 체크해주세요. | ||
다음은, [[info_teleport_destination]]을 [[Entity_Creation|entity]]로 텔레포터의 ''출구'' 가 되길 원하는 곳에 설치해주세요. 이 점으로 이제 플레이어가 순간이동 됩니다. | |||
:* | :* 'Name' 항목을 전 단계에 사용했었던 ('''teleport_destination_1''')과 똑같은 적절한 이름을 넣어주세요. | ||
{{note:ko| | {{note:ko|이 엔티티를 바닥에서 조금 위로 올려서 배치해주세요. 이유인 즉슨 엔티티가 바닥과 나란하게 배치되면 플레이어들이 낄수가 있습니다. 어느 정도 띄위면 순간이동후 바닥으로 떨어집니다.}} | ||
{{clr}} | {{clr}} | ||
이제 게임에서, 당신이 [[trigger_teleport]]를 만지면, 당신은 [[info_teleport_destination]]로 나올것입니다. | |||
== Two-way teleporter == | == Two-way teleporter == | ||
Revision as of 18:01, 27 June 2014
텔레포터들은 Source의 기본 엔티티들을 이용해서 만들수 있습니다.
편도 텔레포터
tools/toolstrigger텍스쳐로 발려진 블럭을 만드는 것으로 시작합니다. 이제 그 블럭을 누르고 CTRL + T 를 누르거나 우클릭을 사용해 Tie To Entity 를 선택하세요, trigger_teleport를 선택하시고 적용해주세요. 이제 이 공간은 플레이어가 순간이동 하려면 꼭 들어가야 하는 장소가 됬습니다 (오른쪽 그림).
- 'Remote Destination'의 이름을 적절한걸로 설정해주세요 (예를 들자면teleport_destination_1처럼).
- 'Flags'탭의 'Clients' 항목을 플레이어들이 순간이동 될수있게 체크해주세요.
다음은, info_teleport_destination을 entity로 텔레포터의 출구 가 되길 원하는 곳에 설치해주세요. 이 점으로 이제 플레이어가 순간이동 됩니다.
- 'Name' 항목을 전 단계에 사용했었던 (teleport_destination_1)과 똑같은 적절한 이름을 넣어주세요.
이제 게임에서, 당신이 trigger_teleport를 만지면, 당신은 info_teleport_destination로 나올것입니다.
Two-way teleporter
Making a two-way teleporter is very similar to a one-way teleporter, and if you can make one of those work successfully, all thats required is common sense.
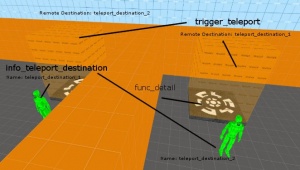
Firstly, create the 2 brushes that will become your teleport entrances, and texture them with tools/toolstrigger. Now, as with one-way teleports, press CTRL + T, or right-click and select Tie To Entity and select trigger_teleport for both of them.
- Set the keyvalues and flags the same as a one-way teleporter, except for Remote Destination.
- Set the Remote destination keyvalue of one teleport entrance to an appropriate name (teleport_destination_1, for example) and the other entrance, to another name such as teleport_destination_2.
- Name these brush entities something appropriate, like teleport_entrance_1 and teleport_entrance_2.
Now create 2 info_teleport_destination entities. These will be where you are teleported to.
- Set the Name of each of them to the appropriate names thought up earlier (teleport_destination_1 and teleport_destination_2, for example).
- Place the one teleport destination near to the entrance that does not teleport to it.
- Place the other teleport destination near to the other teleport entrance.
Template:Note:ko
Now when you step into teleport_entrance_1 you will be teleported to teleport_destination_1 and the same with teleport_entrance_2 and teleport_destination_2.
Making Teleporters Team-Specific
If you have teleporters in your map that are out in the open, and you want to make them team-specific, add 1 filter_activator_tfteam per teleporter that you are making team-specific.
- In the filter_activator_tfteam properties, name your activator, and set the 'Team' to RED/BLU based on which team you want the teleporter to be used by.
- Open your trigger_teleport properties, and set 'Filter Name' to the name of the corresponding filter_activator_tfteam.
