Ru/Diversity Vent: Difference between revisions
No edit summary |
m (Fixed otherlang2) |
||
| Line 1: | Line 1: | ||
{{otherlang2 | {{otherlang2 | ||
|title = Вакуумные трубы | |title=Вакуумные трубы | ||
| | |en=Diversity Vent | ||
}} | }} | ||
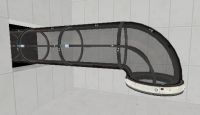
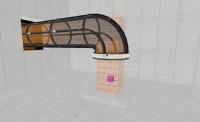
'''Вакумные трубы или Система Доставки''' вырезанный игровой элемент. Но инструменты и модели для создания этого элемента остались. Они являются частью вакуумных труб в P2 которые там только для красоты. Вакуумные трубы служат системой доставки разнообразных тестовых элементов, таких как [[cubes (Portal 2)|cubes]], [[turret (Portal 2)|turrets]], and [[gel (Portal 2)|gel]]. Или в качестве игровых элементов что бы всасывать их. | '''Вакумные трубы или Система Доставки''' вырезанный игровой элемент. Но инструменты и модели для создания этого элемента остались. Они являются частью вакуумных труб в P2 которые там только для красоты. Вакуумные трубы служат системой доставки разнообразных тестовых элементов, таких как [[cubes (Portal 2)|cubes]], [[turret (Portal 2)|turrets]], and [[gel (Portal 2)|gel]]. Или в качестве игровых элементов что бы всасывать их. | ||
Revision as of 07:28, 30 April 2012
Вакумные трубы или Система Доставки вырезанный игровой элемент. Но инструменты и модели для создания этого элемента остались. Они являются частью вакуумных труб в P2 которые там только для красоты. Вакуумные трубы служат системой доставки разнообразных тестовых элементов, таких как cubes, turrets, and gel. Или в качестве игровых элементов что бы всасывать их.
Кубы и турели которые двигаются в них имеют анимацию. Если хотите посмотрите в папку "props_vac_anim".
Создание вакуумной системы
- Создайте энтитю prop_static и введите в поле "World model" props_bts\vactube_128_straight_b.mdl.
- Соедините их и сделайте ещё одну энтититю prop_static и присвойте ей модель props_bts\vactube_90deg_01.mdl. Это закончит рубу.
- Чтобы было красивее сделайте опять же энтитю prop_static и присвойте ей модель props_bts\vactube_connector.mdl
Создаем вакум- УВИИИИ!
О какая сложная часть. Рекомендую использовать info_placement_helper чтобы помочь вам найти правильное направление для поля, ("рыскания и крена значения"P.S. я лично таких выражений не знаю, маппер что ли так пендостанский матерится) trigger_push.info_placement_helperбудет иметь такую большу красненькую стрэлочку которая будет показавать направление пыли и всасывания когда ихняя значения будут установлены (я НЕ ЧУДО ПЕРЕВОДЧИК НО ВСЁ ЖЕ ЛУЧШЕ ЧЕМ ГУГЛ СОГЛАСИТЕСЬ?). нАПРОВЛЕНИЕ КРАСНОЙ СТРЕЛКИ БУДЕТ ТАКОЕЖЕ В КОТОРОМ ОБЪЕКТЫ БУДУТ ВСАСЫВАТСЯ в trigger_push, просто скопируйте направления и углы(вроде так) из info_placement_helper в свойства нашего толчкового trigger_push.
- For straight tubes: create a 64x64 trigger_push brush entity and texture it with the Trigger texture. Place it inside the straight tubes and line it up with the origin of the straight tubes to ensure it's directly in the center.
- Make the brush length as long as the vent tubes.
- For the curved tube: create another 64x64 trigger_push brush entity textured with Trigger. Place it inside the curved tube and stretch it down to the floor and up to the bottom of the straight tube's trigger_push entity. This will lift physics objects into the straight tubes, then carried away.
In the object properties of all trigger_push entities, ensure the Physics Objects flag is checked. The Speed of Push should be set to 1500, and make sure the Push Direction is correctly set with the direction of the tubes.
Removing vacuumed objects
- At the opposite end of the tube, where the player may lose sight of objects being carried away by the vacuum, place a trigger_multiple brush entity that is 128x128x16 large. This will be used to remove the physics objects in the tube.
- For the trigger_multiple entity:
Finishing up
- Directly underneath the entry tube where objects will be sucked in, place a info_placement_helper on the floor. Set the Radius to 64, and set the Force placement to Yes.
- Above the info_placement_helper, and below the entry tube, place a point_push facing up (-90, 0, 0). Adjust the Radius to about 250, and set the Magnitude to -40. This will add an effect of dust being sucked into the portal when placing portals.
- At the opening of the vent place an info_particle_system facing down (90, 0, 0) with Particle System Name of broken_tube_suck. Make sure Start Active? is set to yes. This will add an effect of dust being sucked in the vent, not only to the portal, but also from it.
External links
- Original tutorial with example map (Portal 2 Mods) - appears to be broken

