Multi-stop elevators: Difference between revisions
Markboydude (talk | contribs) |
Markboydude (talk | contribs) (Completely rewrote the tutorial. I hope it is much cleaner as easier to read. Feedback is welcome.) |
||
| Line 1: | Line 1: | ||
Multi-stop elevators can be used in maps to allow players to move freely between three or more floors without having to cycle all the way through every floor. | |||
{{warning|This will be a long tutorial, as creating a multi-stop elevator is a long process. Before you decide to make a fully controllable, multi-story elevator, be sure that you need it!}} | |||
{{ | {{note|It is advised to use the same entity names as used in this tutorial to minimize confusion.}} | ||
== | == Brush Work == | ||
=== Making the Elevator === | |||
[[Image:1_Elevator_Properties.png|thumb|200px|right|Figure 1 - The func_tracktrain properties box.]] | |||
We start of by making the elevator. You want to make the walls as tall as the space in between your level's floor and ceiling, in my case 128 units. Make the elevator floor and ceiling as thick as your level's floor and ceiling. Make sure the elevator floor is flush with the floor of your level. Cut out a hole for the doors. I have made the front wall 1 unit thinner so the doors can go in and wont clip through the wall. After that is done, pick a texture of your choice and texture only the inside. Leave the rest nodraw, unless someone can get inside your elevator shaft and can see the outside of your elevator. | |||
Now | Now select all the elevator brushes and tie them to a [[func_tracktrain]]. Refer to ''Figure 1'' for the properties. You can set the sounds and speed to whatever you like. For the flags, check only <code>No User Control</code>, <code>Fixed Orientation</code>, & <code>Is unblockable by player</code>. Then move the origin (the little blue ball) to the X (in the 2D view) of the floor of the elevator (''Figure 2''). | ||
[[Image:2_3D_Helper.png|thumb|200px|right|Figure 2 - Where to place the blue ball.]] | |||
[[Image: | [[Image:3_Elevator.png|thumb|200px|right|Figure 3 - How the elevator looks.]] | ||
=== Making the Shaft === | |||
Now you will want to make a shaft that encloses the elevator and goes all the way up to the first floor. It's really just 3 tall brushes and then a floor and ceiling. Make sure that you have door holes cut out that are the same size as the elevator's door hole. You want to keep the entire shaft nodraw unless someone can somehow see it. | |||
=== | === Making the Doors === | ||
First we will make doors for the actual elevator. Just make 2 brushes that fit into the door hole you have cut out. I have mine 2 units thick, 112 units tall, and 32 units wide each. You can texture the doors with anything you like, but I recommend <code>metal/offelevdrsa</code>. It may take a while adjusting the texture so it fits with the door. Now tie each door to a [[func_door]]. Refer to ''Figure 4'' for the properties. Be sure to name both doors the same name and parent them to the elevator. You also might need to change move direction. Again, you can change the sounds and speed to whatever you like. Now go to the flags and uncheck <code>Touch Opens</code>. | |||
[[Image:4_Door_Properties.png|thumb|200px|right|Figure 4 - The elevator door properties box.]] | |||
Next we will make doors for each floor. You can simply copy the doors you made for the elevator and paste them to match with the door hole you made when building the shaft. The only difference is that for each floor they have to be named something different. For example for the first floor I used "elev_doors_1" and for the second floor "elev_doors_2", while for the elevator doors I used "elev_doors". Keep in mind both doors have to be named the same thing. The name only changes for different floors. | |||
== Entity Work == | |||
=== Making the Path === | |||
[[ | We begin our work with the entities by making a [[path_track]]. Line this <code>path_track</code> up with the center X of the floor, just like with the blue ball. Then name it something like "elev_stop_1" (''Figure 5''). Set the <code>Orientation Type</code> to <code>No change</code>. Now copy this path_track and paste it, lining it up with the x in the second floor. Do this for all your floors, making sure to change the name for each <code>path_track</code> to correspond with it's floor. | ||
[[Image:5_Path_track_Lineup2.png|thumb|200px|right|Figure 5 - How to place the patch_tracks.]] | |||
Now go back to your first <code>path_track</code> and set it's <code>Next Stop Target</code> to "elev_stop_2", or your second floor's <code>path_track</code>. Do this for all your floors except the top floor. Once you've finished that, go to your top floor's <code>path track</code> and set it's <code>Branch Path</code> to the <code>path_track</code> below it (elev_stop 3). Do this for all your <code>path_tracks</code> except for the first one (elev_stop_1). Once you've done all this your shaft should look something like ''Figure 6''. | |||
{{ | {{bug|It appears as though for some levels the elevator doesn't line up with the floor. I don't know why this is cause because I have all possible properties set to a value that makes sure the elevator wont move out of its origin.}} | ||
[[Image:6_Shaft.png|thumb|200px|right|Figure 6 - How the shaft looks.]] | |||
=== Logic Entities === | |||
==== Opening Doors ==== | |||
To open and close the doors automatically, we will first create a [[logic_relay]]. Name it something like "elev_dooropen_1" and set start disabled to "Yes". Now add these outputs: | |||
OnTrigger elev_doors_1 Open - 0.00 No | |||
OnTrigger elev_doors Open - 0.00 No | |||
OnTrigger elev_doors_1 Close - 5.00 No | |||
OnTrigger elev_doors Close - 5.00 No | |||
{{note|- means empty.}} | |||
If you have different names for the doors be sure to change the outputs to yours. Now copy that <code>logic_relay</code> and rename it to correspond with the next floor. Change the outputs to correspond with the next floor too (e.g. for floor 3 "elev_doors_1" would become "elev_doors_3"). | |||
Now make another <code>logic_relay</code> and name it something like "elev_stop". This one is NOT starting disabled. Set these outputs for it: | |||
OnTrigger elev Stop - 0.00 No | |||
OnTrigger elev_doors Open - 0.50 No | |||
OnTrigger elev_dooropen* Open - 0.50 No | |||
{{note|Don't worry if elev_dooropen* is in red, it will work.}} | |||
==== Making It All Move ==== | |||
Create a [[logic_compare]] and name it something like "elev_compare". Set the <code>Intitial value</code> and <code>Compare value</code> to the floor the elevator starts on, in my case, 1 or the 1st floor. Now add these outputs: | |||
OnEqualTo elev_stop Trigger - 0.00 No | |||
OnGreaterThan elev_stop_1 Trigger - 0.50 No | |||
OnGreaterThan elev_stop_2 Trigger - 0.50 No | |||
OnGreaterThan elev_stop_3 Trigger - 0.50 No | |||
OnGreaterThan elev_stop_4 Trigger - 0.50 No | |||
OnGreaterThan elev StartForward - 1.00 No | |||
OnLessThan elev_stop_1 Trigger - 0.50 No | |||
OnLessThan elev_stop_2 Trigger - 0.50 No | |||
OnLessThan elev_stop_3 Trigger - 0.50 No | |||
OnLessThan elev_stop_4 Trigger - 0.50 No | |||
OnLessThan elev StartForward - 1.00 No | |||
Now go to your first path_track and add this output: | |||
OnPass elev_compare SetValueCompare 1 0.00 No | |||
Do this for the rest of your path_tracks, changing the parameter to correspond with the floor (e.g. Floor 4 will have a parameter value of 4). | |||
=== Buttons === | |||
For our final step we will be adding buttons. Create a brush for each floor, texture it to your likings, and tie each to a [[func_button]]. Name each button corresponding to the floor it's for (such as elev_button_1) and parent each button to the elevator. Now go to the flags and check only <code>Don't Move</code> and <code>Use Activates</code>. After that, go to the outputs tab and add these: | |||
OnPressed elev_doors* Close - 0.00 No | |||
OnPressed elev_compare Compare - 2.00 No | |||
OnPressed elev_dooropen_* Enable - 0.00 No | |||
OnPressed elev_dooropen_1 Enable - 0.20 No | |||
OnPressed elev_doors* SetCompareValue 1 0.50 No | |||
For each button be sure to change the parameter override for <code>SetCompareValue</code> to the value that corresponds to the floor the button is for. | |||
Copy all the buttons and place each button on the outside of the elevator on the floor that it's for. Then change the name to something like elev_button_call_# (# being the floor number) and unparent the buttons from the elevator. Go to the outputs tab and change the delay of "<code>elev_compare</code>" "<code>compare</code>" to 1.50. | |||
==== | ==== Locking the Buttons ==== | ||
You wouldn't want someone spamming the buttons and causing the elevator to glitch, so to fix this we will lock the buttons when the elevator is in use. To do this, first add this output to your <code>logic_compare</code>: | |||
OnEqualTo elev_button* Unlock - 0.00 No | |||
{{note|For some reason [[Hammer]] says the output is invalid, but it still works, so ignore it.}} | |||
Now add this output to ALL your elevator buttons (including the call ones): | |||
OnPressed elev_button* Lock 1 0.00 No | |||
== | == Further Editing == | ||
That's it! You have made a multi-stop elevator. Now you can make it better with lights, sprites, sounds, etc. | |||
=== Bell Sound === | |||
For a elevator bell sound, I found that <code>plats/elevbell1.wav</code> works nice. You can implement it into your elevator with an [[ambient_generic]] and some outputs. | |||
=== Shake === | |||
[[Image:7_Env_shake_Properties.png|thumb|200px|right|Figure 7 - The env_shake properties box.]] | |||
You can also add an [[env_shake]]. You can use two outputs to make it work. In your <code>logic_compare</code> add this output: | |||
OnEqualTo elev_shake StopShake - 0.00 No | |||
and this output in your <code>func_tracktrain</code> (your elevator): | |||
OnStart elev_shake StartShake - 0.10 No | |||
Refer to ''Figure 7'' for <code>env_shake</code> propeties. | |||
== Hammer Map File == | |||
I have uploaded a [http://uppit.com/nvec02dz5mce/Elevator_Tutorial.zip vmf] that contains what can be constructed if one follows this tutorial. | |||
[[Category:Level Design Tutorials]] | [[Category:Level Design Tutorials]] | ||
Revision as of 17:35, 11 July 2011
Multi-stop elevators can be used in maps to allow players to move freely between three or more floors without having to cycle all the way through every floor.
Brush Work
Making the Elevator
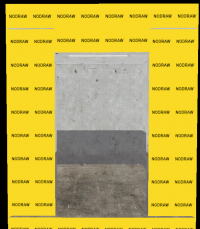
We start of by making the elevator. You want to make the walls as tall as the space in between your level's floor and ceiling, in my case 128 units. Make the elevator floor and ceiling as thick as your level's floor and ceiling. Make sure the elevator floor is flush with the floor of your level. Cut out a hole for the doors. I have made the front wall 1 unit thinner so the doors can go in and wont clip through the wall. After that is done, pick a texture of your choice and texture only the inside. Leave the rest nodraw, unless someone can get inside your elevator shaft and can see the outside of your elevator.
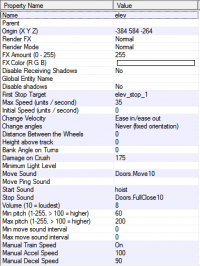
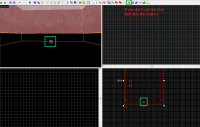
Now select all the elevator brushes and tie them to a func_tracktrain. Refer to Figure 1 for the properties. You can set the sounds and speed to whatever you like. For the flags, check only No User Control, Fixed Orientation, & Is unblockable by player. Then move the origin (the little blue ball) to the X (in the 2D view) of the floor of the elevator (Figure 2).
Making the Shaft
Now you will want to make a shaft that encloses the elevator and goes all the way up to the first floor. It's really just 3 tall brushes and then a floor and ceiling. Make sure that you have door holes cut out that are the same size as the elevator's door hole. You want to keep the entire shaft nodraw unless someone can somehow see it.
Making the Doors
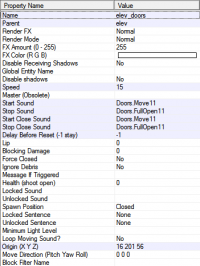
First we will make doors for the actual elevator. Just make 2 brushes that fit into the door hole you have cut out. I have mine 2 units thick, 112 units tall, and 32 units wide each. You can texture the doors with anything you like, but I recommend metal/offelevdrsa. It may take a while adjusting the texture so it fits with the door. Now tie each door to a func_door. Refer to Figure 4 for the properties. Be sure to name both doors the same name and parent them to the elevator. You also might need to change move direction. Again, you can change the sounds and speed to whatever you like. Now go to the flags and uncheck Touch Opens.
Next we will make doors for each floor. You can simply copy the doors you made for the elevator and paste them to match with the door hole you made when building the shaft. The only difference is that for each floor they have to be named something different. For example for the first floor I used "elev_doors_1" and for the second floor "elev_doors_2", while for the elevator doors I used "elev_doors". Keep in mind both doors have to be named the same thing. The name only changes for different floors.
Entity Work
Making the Path
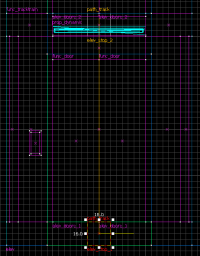
We begin our work with the entities by making a path_track. Line this path_track up with the center X of the floor, just like with the blue ball. Then name it something like "elev_stop_1" (Figure 5). Set the Orientation Type to No change. Now copy this path_track and paste it, lining it up with the x in the second floor. Do this for all your floors, making sure to change the name for each path_track to correspond with it's floor.
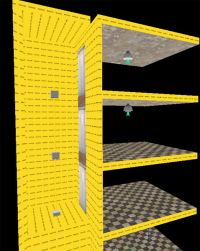
Now go back to your first path_track and set it's Next Stop Target to "elev_stop_2", or your second floor's path_track. Do this for all your floors except the top floor. Once you've finished that, go to your top floor's path track and set it's Branch Path to the path_track below it (elev_stop 3). Do this for all your path_tracks except for the first one (elev_stop_1). Once you've done all this your shaft should look something like Figure 6.
Logic Entities
Opening Doors
To open and close the doors automatically, we will first create a logic_relay. Name it something like "elev_dooropen_1" and set start disabled to "Yes". Now add these outputs:
OnTrigger	elev_doors_1 	Open	-	0.00	No
OnTrigger	elev_doors	Open	-	0.00	No
OnTrigger	elev_doors_1	Close	-	5.00	No
OnTrigger	elev_doors	Close	-	5.00	No
If you have different names for the doors be sure to change the outputs to yours. Now copy that logic_relay and rename it to correspond with the next floor. Change the outputs to correspond with the next floor too (e.g. for floor 3 "elev_doors_1" would become "elev_doors_3").
Now make another logic_relay and name it something like "elev_stop". This one is NOT starting disabled. Set these outputs for it:
OnTrigger	elev 		Stop	-	0.00	No
OnTrigger	elev_doors 	Open	-	0.50	No
OnTrigger	elev_dooropen* 	Open	-	0.50	No
Making It All Move
Create a logic_compare and name it something like "elev_compare". Set the Intitial value and Compare value to the floor the elevator starts on, in my case, 1 or the 1st floor. Now add these outputs:
OnEqualTo	elev_stop 	Trigger		-	0.00	No
OnGreaterThan	elev_stop_1 	Trigger		-	0.50	No
OnGreaterThan	elev_stop_2 	Trigger		-	0.50	No
OnGreaterThan	elev_stop_3 	Trigger		-	0.50	No
OnGreaterThan	elev_stop_4 	Trigger		-	0.50	No
OnGreaterThan	elev 		StartForward	-	1.00	No
OnLessThan	elev_stop_1 	Trigger		-	0.50	No
OnLessThan	elev_stop_2 	Trigger		-	0.50	No
OnLessThan	elev_stop_3 	Trigger		-	0.50	No
OnLessThan	elev_stop_4 	Trigger		-	0.50	No
OnLessThan	elev 		StartForward	-	1.00	No
Now go to your first path_track and add this output:
OnPass elev_compare SetValueCompare 1 0.00 No
Do this for the rest of your path_tracks, changing the parameter to correspond with the floor (e.g. Floor 4 will have a parameter value of 4).
Buttons
For our final step we will be adding buttons. Create a brush for each floor, texture it to your likings, and tie each to a func_button. Name each button corresponding to the floor it's for (such as elev_button_1) and parent each button to the elevator. Now go to the flags and check only Don't Move and Use Activates. After that, go to the outputs tab and add these:
OnPressed	elev_doors* 	Close		-	0.00	No
OnPressed	elev_compare 	Compare		-	2.00	No
OnPressed	elev_dooropen_* Enable		-	0.00	No
OnPressed	elev_dooropen_1 Enable		-	0.20	No
OnPressed	elev_doors* 	SetCompareValue	1	0.50	No
For each button be sure to change the parameter override for SetCompareValue to the value that corresponds to the floor the button is for.
Copy all the buttons and place each button on the outside of the elevator on the floor that it's for. Then change the name to something like elev_button_call_# (# being the floor number) and unparent the buttons from the elevator. Go to the outputs tab and change the delay of "elev_compare" "compare" to 1.50.
Locking the Buttons
You wouldn't want someone spamming the buttons and causing the elevator to glitch, so to fix this we will lock the buttons when the elevator is in use. To do this, first add this output to your logic_compare:
OnEqualTo elev_button* Unlock - 0.00 No
Now add this output to ALL your elevator buttons (including the call ones):
OnPressed elev_button* Lock 1 0.00 No
Further Editing
That's it! You have made a multi-stop elevator. Now you can make it better with lights, sprites, sounds, etc.
Bell Sound
For a elevator bell sound, I found that plats/elevbell1.wav works nice. You can implement it into your elevator with an ambient_generic and some outputs.
Shake
You can also add an env_shake. You can use two outputs to make it work. In your logic_compare add this output:
OnEqualTo elev_shake StopShake - 0.00 No
and this output in your func_tracktrain (your elevator):
OnStart elev_shake StartShake - 0.10 No
Refer to Figure 7 for env_shake propeties.
Hammer Map File
I have uploaded a vmf that contains what can be constructed if one follows this tutorial.
