User:Rockn-Roll/Beginner Portal Map Tutorial: Difference between revisions
Rockn-Roll (talk | contribs) |
Rockn-Roll (talk | contribs) |
||
| Line 97: | Line 97: | ||
In order for the inside of the room to be 128x128x128 we will need a building that is 144x144x144 to account for the 8 unit thickness of the walls, ceiling, and floor. Now draw the front wall. | In order for the inside of the room to be 128x128x128 we will need a building that is 144x144x144 to account for the 8 unit thickness of the walls, ceiling, and floor. Now draw the front wall. | ||
Click the Block tool button [[Image:Hammer_block.png]] on the left toolbar. Move the mouse over to the | Click the Block tool button [[Image:Hammer_block.png]] on the left toolbar. Move the mouse over to the Top (X/Y) View in the top right quadrant. Then click and hold the left mouse button down on the lower left corner of the white square located to the left and below where the blue-green lines cross and drag the mouse one square up and 18 squares to the right until the dimension labels indicate that it is 8 x 144 as shown below. The 3D view can be displayed by selecting '''View | Center 3D Views on Selected''' from the top menu. The 2D views can be adjusted by holding the space bar down and pressing the left mouse button and moving the mouse around. | ||
[[Image:Hammer_DrawFrontWall.png]] | [[Image:Hammer_DrawFrontWall.png]] | ||
Notice that Hammer created a wall that is 64 units high and aligned the bottom of the wall with the horizontal blue-green line. Move the mouse down to the Side (X/Z) view in the bottom right quadrant and use the drag handles to move the bottom of the wall down one square below the horizontal blue-green line, and drag the top until it is 144 units tall. | |||
[[Image:Hammer_FinishFrontWall.png]] | |||
Now, Press Enter to create the Wall. The 2D views will become red/yellow dotted lines. By convention this wall is now called a [Brush]. Brushes can be used to build larger objects. This wall will be copied and used to build the other 3 walls, ceiling, and floor. | |||
Revision as of 12:34, 11 February 2011
Building your first Portal map with Hammer
Contents
This tutorial provides a step-by-step guide to working with Hammer to create a small 128x128x128 room with some walls where portals can be created and some that cannot. Finally, a player start and the portal gun are added then the map is compiled. Portal can then be started and the map loaded for play.
Tools Summary
Here is a brief description of Hammer tools.
Left Side Toolbar
Right Side Toolbars
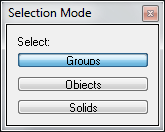
The top tool window is the Selection Mode Bar which controls what object(s) will be selected when clicking on an object. By default groups are selected when any object in a group is selected. Clicking the Objects button means only the object will be selected. Clicking the Solids button means the encompassing solid object will be selected.
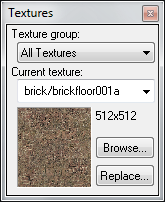
Below the Selection Mode tool window is the Texture Bar window, which shows the currently selected texture.
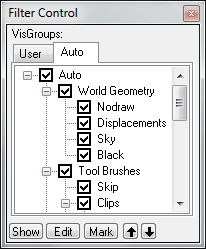
Below that is the Filter Control, which allows selection of what is visible or not visible in the view windows. The only thing listed in the Auto section of a new map will be World Geometry until new groups are created.
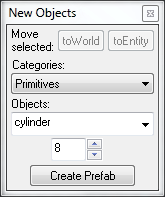
To the right of the Selection Mode window is the Object Bar tool which allows objects to be attached to entities or saved as a Prefab group. This will not be needed in this tutorial, so select View | Screen Elements from the top menu and uncheck Object Bar to save space.
To the right of the New Objects tool is the Manifest Bar tool window which appears to have something to do with Version Control as indicated in the new undocumented Instancing top menu item. Selecting Instancing | Create Manifest causes Hammer to crash, so avoid using it for now. In fact, select View | Screen Elements from the top menu and uncheck Manifest Bar to save space.
Bottom Info Bar
File:Hammer PortalStatusBar.png
At the very bottom of the screen is the Status Bar with the following information listed from left to right: Currently selected object, current cursor location, currently selected object dimensions, zoom level of the active window, whether "Snap" is enabled, and grid size.
Creating a Room
This tutorial will focus on creating a room specifically for Portal. Go to Getting_StartedFor a more detailed general tutorial.
Select File | New from the top menu. Four views will be displayed: one 3D Camera in the top left, and three 2D views; Top (X/Y) in the top right, Right Side (X/Z) in the bottom right, and Front (Y/Z) in the bottom left quadrant. A text label of each view can be displayed by hovering your mouse over the top left corner of each quadrant. The blue-green lines cross at the origin (0,0,0).
Creating a Wall
By default the grid size is 64 units (approx 64 inches) which would be very thick walls like a Castle. Portal consists of walls like a testing lab which are about 8 units thick. So change the grid size to 8 by hovering the mouse over the 2D Top view and pressing the left bracket [ or clicking the Smaller Grid icon ![]() .
.
Also, by default the zoom is set to 0.25. In order to see the entire room the zoom needs to be changed to about 1.0. Press + on the keypad until the zoom changes to 1.07.
This tutorial will create a cube with the dimensions of 128x128x128. These are the dimensions of the inside of the room. The reason we want the inside to be some specific size (and not caring about the outside) is that most textures (the pictures that are used to paint the walls) are 128x128 and making the room that size will allow the edges of the textures to properly line up with the edges of the walls.
In order for the inside of the room to be 128x128x128 we will need a building that is 144x144x144 to account for the 8 unit thickness of the walls, ceiling, and floor. Now draw the front wall.
Click the Block tool button ![]() on the left toolbar. Move the mouse over to the Top (X/Y) View in the top right quadrant. Then click and hold the left mouse button down on the lower left corner of the white square located to the left and below where the blue-green lines cross and drag the mouse one square up and 18 squares to the right until the dimension labels indicate that it is 8 x 144 as shown below. The 3D view can be displayed by selecting View | Center 3D Views on Selected from the top menu. The 2D views can be adjusted by holding the space bar down and pressing the left mouse button and moving the mouse around.
on the left toolbar. Move the mouse over to the Top (X/Y) View in the top right quadrant. Then click and hold the left mouse button down on the lower left corner of the white square located to the left and below where the blue-green lines cross and drag the mouse one square up and 18 squares to the right until the dimension labels indicate that it is 8 x 144 as shown below. The 3D view can be displayed by selecting View | Center 3D Views on Selected from the top menu. The 2D views can be adjusted by holding the space bar down and pressing the left mouse button and moving the mouse around.
Notice that Hammer created a wall that is 64 units high and aligned the bottom of the wall with the horizontal blue-green line. Move the mouse down to the Side (X/Z) view in the bottom right quadrant and use the drag handles to move the bottom of the wall down one square below the horizontal blue-green line, and drag the top until it is 144 units tall.
File:Hammer FinishFrontWall.png
Now, Press Enter to create the Wall. The 2D views will become red/yellow dotted lines. By convention this wall is now called a [Brush]. Brushes can be used to build larger objects. This wall will be copied and used to build the other 3 walls, ceiling, and floor.


