Creating a Room: Difference between revisions
m (minoro) |
(Added pictures, some small changes in text.) |
||
| Line 3: | Line 3: | ||
== Sealed rooms == | == Sealed rooms == | ||
All serious maps consist completely of rooms one way or another. Even outdoor maps are surrounded by | All serious maps consist completely of rooms one way or another. Even outdoor maps are surrounded by [[skybox]]es which seal the map. These rooms and boxes are very carefully sealed off from the black void surrounding them to allow the map to compile properly. If there are any holes, the map will not compile properly. The data that is not compiled is essential to a high FPS and proper lighting as it controls the visiblity of objects within levels. | ||
A simple room consists of six brushes: The floor, the ceiling, and the four walls—completely sealing what is within from the void outside. | A simple room consists of six brushes: The floor, the ceiling, and the four walls—completely sealing what is within from the void outside. | ||
| Line 9: | Line 9: | ||
== Moving brushes == | == Moving brushes == | ||
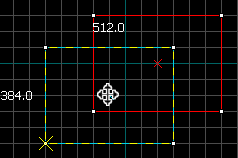
Select the [[Hammer Selection Tool|Selection Tool]] [[Image:hammer_select.png|28px]] and mouse over the brush in one of the 2D views, staying clear of the corner handles. The pointer will change into four arrows pointing in all four directions [[Image:fourArrows.png]], indicating the option to move the object. | |||
Click and drag the brush to move the brush in any of the 2D views. Upon release, the brush will be moved to that position. | |||
[[Image:hammer_movingBrushes.png|thumb|238px|left|Click & drag in any 2D view to move a brush.]] | |||
<br style="clear:both"> | |||
== Cloning brushes == | == Cloning brushes == | ||
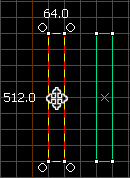
Instead of having to create new brushes with the | [[Image:hammer_cloningBrushes.png|thumb|130px|left|Shift+Drag to clone a brush.]] | ||
Instead of having to create new brushes with the [[Hammer_Block_Tool|Block Tool]] [[Image:hammer_block.png|28px]] every time, you can make a copy of an already existing brush by holding down the '''Shift''' key while moving the brush. The brush will remain in its place while the copy will end up at the position you '''Shift'''-dragged the brush to. | |||
Once you learn this technique, you will rarely have to use the | Once you learn this technique, you will rarely have to use the [[Hammer_Block_Tool|Block Tool]] to create basic brushes—you will just clone one of the existing brushes when you want a new one. | ||
<br style="clear:both"> | |||
== Deleting brushes == | == Deleting brushes == | ||
To delete a brush, select it with the | To delete a brush, select it with the [[Hammer Selection Tool|Selection Tool]] [[Image:hammer_select.png|28px]] and press the Delete key on your keyboard. | ||
== Building the room == | == Building the room == | ||
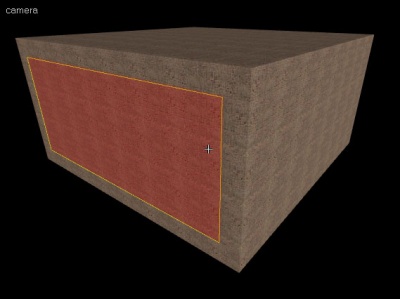
[[Image:roomcomplete.jpg|400px|thumb|right|A 3D camera view (shaded textured polygons) with one wall brush selected. Note that the wall here is "between" or "supporting" the floor, ceiling, and neighboring walls.]] | [[Image:roomcomplete.jpg|400px|thumb|right|A 3D camera view (shaded textured polygons) with one wall brush selected. Note that the wall here is "between" or "supporting" the floor, ceiling, and neighboring walls.]] | ||
In this next section, we will learn to build a room. Make sure it is a large room, as it will contain the whole level for this example. A total area of about 1024(L) x 1024(W) x 512(H) units will do fine. | |||
# | # Using the [[Hammer_Block_Tool|Block Tool]] [[Image:hammer_block.png|28px]], make a brush to use as the floor (about 1024L x 1024W x 64H). | ||
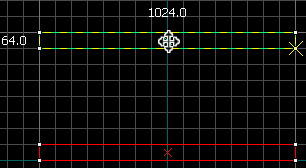
# Using the | # Using the [[Hammer Selection Tool|Selection Tool]] [[Image:hammer_select.png|28px]], Shift+drag to clone the floor brush, and move it upwards to create a ceiling of equal size to the floor. [[Image:hammer_floorCeiling.png|thumb|306px|left|Shift+Drag to clone floor.]]<br style="clear:left"> | ||
# Clone another one of the brushes and resize it so that it connects the floor to the ceiling. You can either have the wall brushes on the outside edges of the floor and ceiling brushes, or between (supporting) them. (see associated note) | # Clone another one of the brushes and resize it so that it connects the floor to the ceiling. You can either have the wall brushes on the outside edges of the floor and ceiling brushes, or between (supporting) them. (see associated note) [[Image:hammer_wall.png|thumb|219px|left|Connect the floor to the ceiling with a wall.]] <br style="clear:both"> | ||
# Clone this wall brush and drag it to its opposite end. | # Clone this wall brush and drag it to its opposite end. | ||
# Again clone and resize a brush to create a third wall. | # Again clone and resize a brush to create a third wall. | ||
# Clone this brush to the opposite end of the room to create the final wall. | # Clone this brush to the opposite end of the room to create the final wall. [[Image:hammer_roomEnclosed.png|thumb|237px|right|Complete room with no leaks.]] | ||
# Check for any gaps | # Check for any gaps. Make sure the room has been completely sealed. If you've been designing your room on a relatively large grid scale (e.g. 64 units), then any gaps will be apparent. Mouse-over the 3D view window and press Z to enter mouselook mode to carefully inspect your room. | ||
: Alternatively, you can create a single brush the size of your room, then right click on it and select the Hollow option. Though quicker, this method makes it harder to size the room to your needs. | : Alternatively, you can create a single brush the size of your room, then right click on it and select the Hollow option. Though quicker, this method makes it harder to size the room to your needs. | ||
Revision as of 16:49, 1 April 2008
Sealed rooms
All serious maps consist completely of rooms one way or another. Even outdoor maps are surrounded by skyboxes which seal the map. These rooms and boxes are very carefully sealed off from the black void surrounding them to allow the map to compile properly. If there are any holes, the map will not compile properly. The data that is not compiled is essential to a high FPS and proper lighting as it controls the visiblity of objects within levels. A simple room consists of six brushes: The floor, the ceiling, and the four walls—completely sealing what is within from the void outside.
In order to make a room quickly and easily, you’ll first need to know a few more easy brush handling techniques:
Moving brushes
Select the Selection Tool ![]() and mouse over the brush in one of the 2D views, staying clear of the corner handles. The pointer will change into four arrows pointing in all four directions
and mouse over the brush in one of the 2D views, staying clear of the corner handles. The pointer will change into four arrows pointing in all four directions ![]() , indicating the option to move the object.
, indicating the option to move the object.
Click and drag the brush to move the brush in any of the 2D views. Upon release, the brush will be moved to that position.
Cloning brushes
Instead of having to create new brushes with the Block Tool ![]() every time, you can make a copy of an already existing brush by holding down the Shift key while moving the brush. The brush will remain in its place while the copy will end up at the position you Shift-dragged the brush to.
every time, you can make a copy of an already existing brush by holding down the Shift key while moving the brush. The brush will remain in its place while the copy will end up at the position you Shift-dragged the brush to.
Once you learn this technique, you will rarely have to use the Block Tool to create basic brushes—you will just clone one of the existing brushes when you want a new one.
Deleting brushes
To delete a brush, select it with the Selection Tool ![]() and press the Delete key on your keyboard.
and press the Delete key on your keyboard.
Building the room
In this next section, we will learn to build a room. Make sure it is a large room, as it will contain the whole level for this example. A total area of about 1024(L) x 1024(W) x 512(H) units will do fine.
- Using the Block Tool
 , make a brush to use as the floor (about 1024L x 1024W x 64H).
 - Using the Selection Tool
 , Shift+drag to clone the floor brush, and move it upwards to create a ceiling of equal size to the floor.
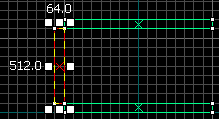
 - Clone another one of the brushes and resize it so that it connects the floor to the ceiling. You can either have the wall brushes on the outside edges of the floor and ceiling brushes, or between (supporting) them. (see associated note)
- Clone this wall brush and drag it to its opposite end.
- Again clone and resize a brush to create a third wall.
- Clone this brush to the opposite end of the room to create the final wall.
- Check for any gaps. Make sure the room has been completely sealed. If you've been designing your room on a relatively large grid scale (e.g. 64 units), then any gaps will be apparent. Mouse-over the 3D view window and press Z to enter mouselook mode to carefully inspect your room.
- Alternatively, you can create a single brush the size of your room, then right click on it and select the Hollow option. Though quicker, this method makes it harder to size the room to your needs.
