Advanced HDR: Difference between revisions
No edit summary |
(FINNALY DONE!) |
||
| Line 1: | Line 1: | ||
== '''Advanced HDR''' == | == '''Advanced HDR''' == | ||
This is a tutorial that will take some time to create but will give a better insight of the effects, modes, and different aspects of HDR through the Source Engine. Also this page is meant | This is a tutorial that will take some time to create but will give a better insight of the effects, modes, and different aspects of HDR through the Source Engine. Also this page is meant as a simple guide on orchastrating HDR effects and implementing them in to your map. | ||
===Current games that support HDR=== | ===Current games that support HDR=== | ||
| Line 10: | Line 9: | ||
*Counter-Strike:Source | *Counter-Strike:Source | ||
*Lost coast | *Lost coast | ||
*Now mods support HDR due to the new engine update | |||
So far these are the only games that support HDR. | So far these are the only games that support HDR. | ||
| Line 21: | Line 20: | ||
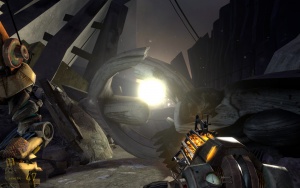
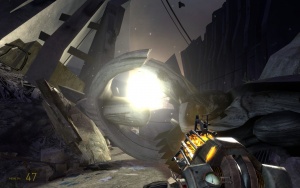
*Here is an example from Half Life 2 Lost coast: | *Here is an example from Half Life 2 Lost coast: | ||
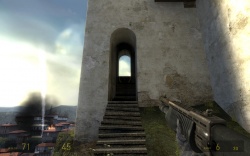
[[Image:D2 lostcoast0000.jpg|thumb | [[Image:D2 lostcoast0000.jpg|thumb|250px|Before entering the dark Area.]] | ||
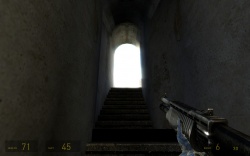
[[Image:D2 lostcoast0001.jpg|thumb | [[Image:D2 lostcoast0001.jpg|thumb|250px|Now that the player is in the darkened hall the outside area appears overly bright due to eye adjustment]] | ||
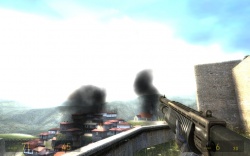
[[Image:D2 lostcoast0002.jpg|thumb | [[Image:D2 lostcoast0002.jpg|thumb|250px|Wow thats quite bright isn't it?]] | ||
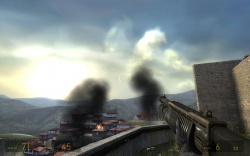
[[Image:D2 lostcoast0003.jpg|thumb | [[Image:D2 lostcoast0003.jpg|thumb|250px|Well thats better! Now the players Virtual eyes have adjusted.]] | ||
In the first screenshot you can see the player standing outside a dark hallway. Mainly here is where the [[env_tonemap_controller]] comes in! It takes care of the auto exposure, minimum and maximum as well as bloom settings for the over-bright effect that you see in the third screenshot. Right now the tonemap controller has its main autoexposure max set to 6 and its minimum exposure set to 2. Also its Bloom scale is set to 1.6. | |||
Now when the player walks into the tunnel he triggers a [[trigger_once]] Brush based entity. Its outputs are as follows: | |||
*SetAutoExposureMax-1 | |||
*SetAutoExposureMin-.9 | |||
*SetAutoBloomScale-1 | |||
All these settings cause the tonemap controller to change different parameters and cause the suns brightness and mainly the HDR lighting to be more brighter than before, and keeps the settings at that rate for a while tell the player walks through the next [[trigger_once]]. | |||
In the third Screenshot the player walks out of the tunnel and then sees the large amount of light being casted. At this time the players "virtual eyes" are being adjusted, and then finnaly in the final screenshot return back to normal. | |||
The tonemap controller is mainly commanded by a trigger once or even a [[logic_auto]]. When the map begins, outputs can be sent to the tonemap controller and at that time the tonemap controller changes the lighting parameters. Also throughout the Lost Coast map there are other many riggers the player walks through that cause the ideal brightness to change and rearrange all the exposure settings around. However if a map does not contain a env_tonemap_controller then realy the HDR effect will be a bit random. Continuesly dimming the screen and brightening it up at random times or even when the player steps into a area thats just a tad brighter than the past one. In other words the HDR settings end up acting funny towards the map and HDR is set to its default settings of 0 on all exposure and bloom parameters. | |||
On a main note though, each map requires different settings even if using the same skybox material. Of course changing the settings and keeping them the same is okay. Mainly though the only reason you might need to change the settings are to really attain or create a certain effect towards the area the player is in currently. Even if it is just for a few seconds. Depending on the amount of over bright effects in your map or even having HDR seem very low still require parameters, so in turn the best idea is really to tinker around with your map till you get just the right setting thats fits and once again if the settings dont seem to fit in a certain area you can always create [[trigger_once]] volumes around the areas the player needs to travel into that will change the settings and correct any mistakes, or get the lighting just right. The tonemap controller, however does not add more brightness to the area though, those controlls still need to be set to the current light entity. In fact it just gives lighting the HDR effect or really a brighter glow but as mentioned does '''not''' add more brightness or lighting towards the area. Each light entity has its own HDR brightness parameter which must be set as the overall HDR brightness. | |||
Here is a little example of the effects of a tone map controller in a different enviroment: | |||
[[Image:Ep1 citadel 000001.jpg|thumb|left|300px|With the tonemap controller settings on.]] | |||
[[Image:Ep1 citadel 000002.jpg|thumb|left|300px|With the settings off.]] | |||
Vavle implements the env_tonemap_controller to better controll the ideal bright effect of the sun so it's not to overly bright or in other words unrealistic. Also they gave the sun an effect with the existing fog in the map, by changing a few settings and giving a bit of more-than-normal brightness to appear layered by the fog. | |||
If you are a bit foggy on the [[I/O]] system. | |||
<br clear="right" /> | |||
| Line 30: | Line 54: | ||
Although not the simplest | Although not the simplest thing, HDR isn't a very hard technique to work with however it deals a large amount of time to the compile proccess. In Fact VRAD must run twice. Once for LDR and the second time for HDR. The first thing in creating an HDR map is of course a HDR sky texture. See this page [[Sky_List|here]] for a list of skys in HDR as well as ideal parameters for them. | ||
Once you've picked one out open the map menu located on the top right of Hammern then go to map properties. On the properties panel set the skybox material name to the skybox texture name field. Now click apply. | |||
Mainly aside from that HDR maps aren't to hard to create. In fact you need to fill in the HDR brightness field on a light entitys properties panel and thats about it. Mainly because HDR is brighter and adds a glow to the world its wise to set the brightness value a bit lower the the regular LDR brightness. In example if LDR brightness is 100 then HDR should be set to 50. Mainly it really depends though on the lights source and effect that your going for. Mainly though never have both the same. You have to take in to consideration players who dont have HDR capible Video Cards. Therefore the brightness must be eqivelent to that in-game of LDR. Once you're done setting up the values click apply on the properties pannel and well thats it. Now go ahead and run your map. Make sure you have HDR checked in the compile window checked. If you're compilling under the advanced window then simply set the compile type to HDR -final or HDR -final -fast. If you're just testing then fast might be a good idea to run and create a quick build version of lighting in your map. When you complete your map fully then go for the final compile but not it takes quite a long time depending on the size,number of lights, and complexity of lightmaps used in your map! | |||
{{note|Dont forget about setting the enviromental light entitys HDR Brightness properties!}} | |||
== '''Running a HDR Map''' == | |||
Now that the compile process has finished in-game open uo your console and buildcubemaps. In order to really get the lighting right you need to build cubemaps twice. Once for LDR and once for HDR. Once building the cubemaps have finished type in mat_hdr_enable 0 in the console to disable HDR and return to LDR. Now simply buildcubemaps again. You're done! The game will return automatically to HDR so theres no more console sommands needed. Through the console however you can change around the exposure levels of the env_tonemap_controller. Here is a list of all HDR commands. | |||
<table> | |||
<tr> | |||
<th>Prefix</th> | |||
<th>Location</th> | |||
</tr> | |||
<tr> | |||
<td><code>mat_autoexposure_min</code></td> | |||
<td>Minimum exposure settings.</td> | |||
</tr> | |||
<tr> | |||
<td><code>mat_autoexposure_max</code></td> | |||
<td>Maximum exposure settings.</td> | |||
</tr> | |||
<tr> | |||
<td><code>mat_hdr_enable 0/1</code></td> | |||
<td>0 Turns off HDR, 1 turns HDR on.</td> | |||
</tr> | |||
<tr> | |||
<td><code>mat_hdr_level 0/1/2</code></td> | |||
<td>Adjusts the overall bright effect of HDR.</td> | |||
</tr> | |||
<tr> | |||
<td>mat_hdr_manual_tonemap_rate 0.000000</td> | |||
<td>Sets the tonemap rate.</td> | |||
</tr> | |||
<tr> | |||
<td>mat_hdr_tonemapscale 0.00000</td> | |||
<td>[[Sets the tonemap scale]]</td> | |||
</tr> | |||
<tr> | |||
<td>mat_hdr_tonemapscaleMax 1-16</td> | |||
<td>Sets the maximum scale</td> | |||
</tr> | |||
<tr> | |||
<td>mat_hdr_overbrightrange</td> | |||
<td>Sets an overide parameter on HDR level for added adjustment.</td> | |||
</tr> | |||
</table> | |||
{{note|When building cubemaps in HDR it might take a bit longer due to the HDR lightmaps. Thats completely normal so just be patient!}} | |||
Revision as of 07:50, 10 July 2007
Advanced HDR
This is a tutorial that will take some time to create but will give a better insight of the effects, modes, and different aspects of HDR through the Source Engine. Also this page is meant as a simple guide on orchastrating HDR effects and implementing them in to your map.
Current games that support HDR
- Half Life 2 Episode 1
- Day of Defeat:Source
- Counter-Strike:Source
- Lost coast
- Now mods support HDR due to the new engine update
So far these are the only games that support HDR.
What is HDR?
As Showcased in Lost Coast as a simple tech demo, HDR is a new lighting method that allows a monitor to go over its ideal brightness or in other words the games color scale to make lighting appear more realistic. In that sense it's now giving the player "Virtual eyes" as it has been put by Valve in the tech demo. Mainly with the aid of an env_tonemap_controller, lighting can be adjusted so when players step into dark non-lit areas, the area will brighten up to allow the player to see better. When the player steps out of that area, he or she walks in to a overly bright light filled area to give the effect that the player's "Virtual eyes" pupils are adjusting to the exposure and large amount of light.
- Here is an example from Half Life 2 Lost coast:
In the first screenshot you can see the player standing outside a dark hallway. Mainly here is where the env_tonemap_controller comes in! It takes care of the auto exposure, minimum and maximum as well as bloom settings for the over-bright effect that you see in the third screenshot. Right now the tonemap controller has its main autoexposure max set to 6 and its minimum exposure set to 2. Also its Bloom scale is set to 1.6.
Now when the player walks into the tunnel he triggers a trigger_once Brush based entity. Its outputs are as follows:
- SetAutoExposureMax-1
- SetAutoExposureMin-.9
- SetAutoBloomScale-1
All these settings cause the tonemap controller to change different parameters and cause the suns brightness and mainly the HDR lighting to be more brighter than before, and keeps the settings at that rate for a while tell the player walks through the next trigger_once.
In the third Screenshot the player walks out of the tunnel and then sees the large amount of light being casted. At this time the players "virtual eyes" are being adjusted, and then finnaly in the final screenshot return back to normal.
The tonemap controller is mainly commanded by a trigger once or even a logic_auto. When the map begins, outputs can be sent to the tonemap controller and at that time the tonemap controller changes the lighting parameters. Also throughout the Lost Coast map there are other many riggers the player walks through that cause the ideal brightness to change and rearrange all the exposure settings around. However if a map does not contain a env_tonemap_controller then realy the HDR effect will be a bit random. Continuesly dimming the screen and brightening it up at random times or even when the player steps into a area thats just a tad brighter than the past one. In other words the HDR settings end up acting funny towards the map and HDR is set to its default settings of 0 on all exposure and bloom parameters.
On a main note though, each map requires different settings even if using the same skybox material. Of course changing the settings and keeping them the same is okay. Mainly though the only reason you might need to change the settings are to really attain or create a certain effect towards the area the player is in currently. Even if it is just for a few seconds. Depending on the amount of over bright effects in your map or even having HDR seem very low still require parameters, so in turn the best idea is really to tinker around with your map till you get just the right setting thats fits and once again if the settings dont seem to fit in a certain area you can always create trigger_once volumes around the areas the player needs to travel into that will change the settings and correct any mistakes, or get the lighting just right. The tonemap controller, however does not add more brightness to the area though, those controlls still need to be set to the current light entity. In fact it just gives lighting the HDR effect or really a brighter glow but as mentioned does not add more brightness or lighting towards the area. Each light entity has its own HDR brightness parameter which must be set as the overall HDR brightness.
Here is a little example of the effects of a tone map controller in a different enviroment:
Vavle implements the env_tonemap_controller to better controll the ideal bright effect of the sun so it's not to overly bright or in other words unrealistic. Also they gave the sun an effect with the existing fog in the map, by changing a few settings and giving a bit of more-than-normal brightness to appear layered by the fog.
If you are a bit foggy on the I/O system.
Creating a HDR map
Although not the simplest thing, HDR isn't a very hard technique to work with however it deals a large amount of time to the compile proccess. In Fact VRAD must run twice. Once for LDR and the second time for HDR. The first thing in creating an HDR map is of course a HDR sky texture. See this page here for a list of skys in HDR as well as ideal parameters for them.
Once you've picked one out open the map menu located on the top right of Hammern then go to map properties. On the properties panel set the skybox material name to the skybox texture name field. Now click apply.
Mainly aside from that HDR maps aren't to hard to create. In fact you need to fill in the HDR brightness field on a light entitys properties panel and thats about it. Mainly because HDR is brighter and adds a glow to the world its wise to set the brightness value a bit lower the the regular LDR brightness. In example if LDR brightness is 100 then HDR should be set to 50. Mainly it really depends though on the lights source and effect that your going for. Mainly though never have both the same. You have to take in to consideration players who dont have HDR capible Video Cards. Therefore the brightness must be eqivelent to that in-game of LDR. Once you're done setting up the values click apply on the properties pannel and well thats it. Now go ahead and run your map. Make sure you have HDR checked in the compile window checked. If you're compilling under the advanced window then simply set the compile type to HDR -final or HDR -final -fast. If you're just testing then fast might be a good idea to run and create a quick build version of lighting in your map. When you complete your map fully then go for the final compile but not it takes quite a long time depending on the size,number of lights, and complexity of lightmaps used in your map!
Running a HDR Map
Now that the compile process has finished in-game open uo your console and buildcubemaps. In order to really get the lighting right you need to build cubemaps twice. Once for LDR and once for HDR. Once building the cubemaps have finished type in mat_hdr_enable 0 in the console to disable HDR and return to LDR. Now simply buildcubemaps again. You're done! The game will return automatically to HDR so theres no more console sommands needed. Through the console however you can change around the exposure levels of the env_tonemap_controller. Here is a list of all HDR commands.
| Prefix | Location |
|---|---|
mat_autoexposure_min |
Minimum exposure settings. |
mat_autoexposure_max |
Maximum exposure settings. |
mat_hdr_enable 0/1 |
0 Turns off HDR, 1 turns HDR on. |
mat_hdr_level 0/1/2 |
Adjusts the overall bright effect of HDR. |
| mat_hdr_manual_tonemap_rate 0.000000 | Sets the tonemap rate. |
| mat_hdr_tonemapscale 0.00000 | Sets the tonemap scale |
| mat_hdr_tonemapscaleMax 1-16 | Sets the maximum scale |
| mat_hdr_overbrightrange | Sets an overide parameter on HDR level for added adjustment. |
