Porting humanoids to Portal 2: Difference between revisions
Jump to navigation
Jump to search
 Note:Some steps detailed underneath are not required but it is still a good idea to follow them. Decompiling, Recompiling, and Porting the materials certainly are, as well as the shader change in Fixing the eyes.
 Note:To actually have the eyes appear correctly it is advised that you combine the pupil and eyeball texture into one single texture.
(Completely revamped the page by adding more info, trimming out unnecessary info, formatting it for a higher quality standard, converting it to the third person, fixing spelling mistakes and updating out of date info.) |
m (cleanup) |
||
| Line 5: | Line 5: | ||
==Decompiling== | ==Decompiling== | ||
# Extract the .mdl, .dx90.vtx, .dx80.vtx (if applicable), and .phy files from the VPK you are porting from, and place them in a handy directory. | # Extract the .mdl, .dx90.vtx, .dx80.vtx (if applicable), and .phy files from the VPK you are porting from, and place them in a handy directory.{{Note|If you are porting humanoids from {{hl2|2}} you will need to also extract the {{Code|preset=2|male_gestures.mdl , male_postures.mdl, male_shared.mdl and male_ss.mdl/female_gestures.mdl , female_postures.mdl, female_shared.mdl and female_ss.mdl}} models otherwise the game '''will''' crash. These just have to be recompiled and the $attachment step can be skipped.}} | ||
# Download [[Crowbar]], if you haven't already, download it by following the links [http://steamcommunity.com/groups/CrowbarTool here.] | # Download [[Crowbar]], if you haven't already, download it by following the links [http://steamcommunity.com/groups/CrowbarTool here.] | ||
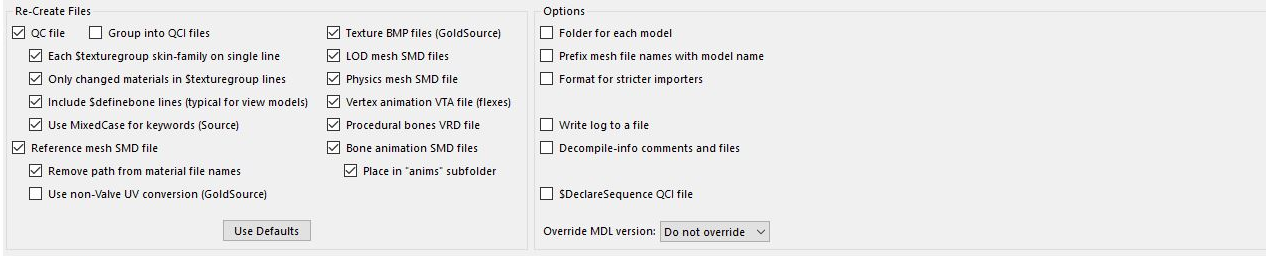
# Open Crowbar's .exe file (you may have to extract the archive first). Open the | # Open Crowbar's .exe file (you may have to extract the archive first). Open the {{Code|preset=3|Decompile}} tab and under {{Code|preset=2|MDL file or folder}} browse to the .mdl of the model you are converting. Under {{Code|preset=2|Output Folder}}, choose a nice clean directory to extract the files to. It is recommended to use the {{Code|preset=2|Full Path}} option, but it's completely up to the user. Under {{Code|preset=2|Options}}, make sure your options are the same as shown in the image below: | ||
[[File:Crowbar decomp settings.png|790px|frame|center| | [[File:Crowbar decomp settings.png|790px|frame|center|Crowbar decompile options as of version 0.74.]] | ||
==Recompiling== | ==Recompiling== | ||
| Line 71: | Line 71: | ||
==Important Notes== | ==Important Notes== | ||
* Everything works except automatic lipsync. You'll have to do it manually. And by "manual" it means adding your own flexes -- the phoneme system is broken entirely in {{portal2|4}}. (After all, why would it be needed?) However, everything else works, including skeletal animation, facial expression animation, gestures, and eye tracking. | * Everything works except automatic lipsync. You'll have to do it manually. And by "manual" it means adding your own flexes -- the phoneme system is broken entirely in {{portal2|4}}. (After all, why would it be needed?) However, everything else works, including skeletal animation, facial expression animation, gestures, and eye tracking. | ||
* '''''Ported human models' eyes will completely bug out UNLESS you set their prop type as "generic_actor"''''' (or maybe another NPC). At first glance, this appears to remove some features like the "SetAnimation" input. However, generic_actor grants to access to using Faceposer to animate and choreograph scenes. It can accomplish everything that can be accomplished with prop_dynamic and more, but takes a bit more effort and work, and requires scenes/scenes.image to be distributed along with your BSP. | * '''''Ported human models' eyes will completely bug out UNLESS you set their prop type as "generic_actor"''''' (or maybe another NPC). At first glance, this appears to remove some features like the "SetAnimation" input. However, generic_actor grants to access to using Faceposer to animate and choreograph scenes. It can accomplish everything that can be accomplished with prop_dynamic and more, but takes a bit more effort and work, and requires scenes/scenes.image to be distributed along with your BSP. | ||
Revision as of 07:16, 27 October 2023

![]() Portal 2, due to numerous and sometimes unknown bugs, will not support the direct (i.e. "drag'n'drop") porting of humans and humanoids, such as those from Half-Life 2.
Portal 2, due to numerous and sometimes unknown bugs, will not support the direct (i.e. "drag'n'drop") porting of humans and humanoids, such as those from Half-Life 2.
By porting these models using this method, the humanoids will crash Hammer, HLMV, and Portal 2 itself. By following this guide, you will be able to successfully port humanoid models to Portal 2.
Decompiling
- Extract the .mdl, .dx90.vtx, .dx80.vtx (if applicable), and .phy files from the VPK you are porting from, and place them in a handy directory.Note:If you are porting humanoids from
 Half-Life 2 you will need to also extract the
 male_gestures.mdl , male_postures.mdl, male_shared.mdl and male_ss.mdl/female_gestures.mdl , female_postures.mdl, female_shared.mdl and female_ss.mdlmodels otherwise the game will crash. These just have to be recompiled and the $attachment step can be skipped. - Download Crowbar, if you haven't already, download it by following the links here.
- Open Crowbar's .exe file (you may have to extract the archive first). Open the
Decompiletab and underMDL file or folderbrowse to the .mdl of the model you are converting. UnderOutput Folder, choose a nice clean directory to extract the files to. It is recommended to use theFull Pathoption, but it's completely up to the user. UnderOptions, make sure your options are the same as shown in the image below:

Crowbar decompile options as of version 0.74.
Recompiling
- Find the .QC file and open it in a text editor and look for the line beginning with $attachment. It should look something like this:
$Attachment "eyes" "ValveBiped.Bip01_Head1" 3.23 -3.49 0.12 rotate 0 -80.1 -90
$Attachment "mouth" "ValveBiped.Bip01_Head1" 0.6 -5.5 0 rotate 0 -80 -90
$Attachment "chest" "ValveBiped.Bip01_Spine2" 5 4 0 rotate 0 90 90
$Attachment "forward" "ValveBiped.forward" 0 0 0 rotate 0 0 0
$Attachment "anim_attachment_RH" "ValveBiped.Anim_Attachment_RH" 0 0 0 rotate -90 -90 0
$Attachment "anim_attachment_LH" "ValveBiped.Anim_Attachment_LH" 0 0 0 rotate -90 -90 0
$Attachment "anim_attachment_head" "ValveBiped.Bip01_Head1" 0 0 0 rotate -90 -90 0
Note: If you see attachments named "EyeRightAttach" and "EyeLeftAttach", proceed to Step 4. - Copy and paste the line that contains "eyes" in this section twice. Change "eyes" to "EyeRightAttach" in the first copy, and to "EyeLeftAttach" in the second. The section should now look something like this.
$Attachment "EyeRightAttach" "ValveBiped.Bip01_Head1" 3.23 -3.49 0.12 rotate 0 -80.1 -90
$Attachment "EyeLeftAttach" "ValveBiped.Bip01_Head1" 3.23 -3.49 0.12 rotate 0 -80.1 -90
$Attachment "eyes" "ValveBiped.Bip01_Head1" 3.23 -3.49 0.12 rotate 0 -80.1 -90
$Attachment "mouth" "ValveBiped.Bip01_Head1" 0.6 -5.5 0 rotate 0 -80 -90
$Attachment "chest" "ValveBiped.Bip01_Spine2" 5 4 0 rotate 0 90 90
$Attachment "forward" "ValveBiped.forward" 0 0 0 rotate 0 0 0
$Attachment "anim_attachment_RH" "ValveBiped.Anim_Attachment_RH" 0 0 0 rotate -90 -90 0
$Attachment "anim_attachment_LH" "ValveBiped.Anim_Attachment_LH" 0 0 0 rotate -90 -90 0
$Attachment "anim_attachment_head" "ValveBiped.Bip01_Head1" 0 0 0 rotate -90 -90 0
- Save and close the QC.
- Open Crowbar and switch to the
Compiletab. UnderQC input, browse to the QC file you just opened and select it. - For
Output Folder, switch toGame's "models" folderNote:For this to work you have to have your games set up properly by going into the Set Up Gamestab - Under the Options section, make sure that
Game that has the model compiler:is set to Portal 2. - Hit Compile!
Porting the materials
- After compiling your model, hit
Use in Viewon the bottom bar of Crowbar. Then click onView. This will open HLMV straight to the model. - If you have not already ported the materials, your model will appear black. Navigate to the
Modeltab and look at theVMTs Loadedsection. The vmt files listed here are the ones you will need to port alongside their corresponding vtf files. Extract them from the original VPK and move them to the corresponding location in Portal 2's directory -- for example, you would place\materials\models\gman\gman_sheet.vmtinC:\Program Files (x86)\Steam\SteamApps\common\Portal 2\portal2\materials\models\gman\gman_sheet.vmt. once again correcting for your Steam install directory. - Hit F5 to refresh HLMV. The model should now be perfectly textured.
Fixing the eyes
This is the step of the porting process that has stayed elusive to most modders.
- Find the vmt files for the eyes by looking at the
VMTs Loadedsection of HLMV again. They will most likely be named eyeball_r.vmt and eyeball_l.vmt. Find them on-disk in your Portal 2 directory and open them. - Replace the contents of the file with this:
EyeRefract
{
$Iris "iris_texture_goes_here"
$AmbientOcclTexture "models/player/chell/gambler_eye_ao"
$Envmap "Engine/eye-reflection-cubemap-"
$CorneaTexture "Engine/eye-cornea"
$EyeballRadius "0.5"
$AmbientOcclColor "[.6 .4 .3]"
$Dilation ".6"
$ParallaxStrength "0.25"
$CorneaBumpStrength ".5"
$halflambert 1
$nodecal 1
$ambientocclusion 1

$RaytraceSphere 1
$SphereTexkillCombo 0

}
Be sure to replace iris_texture_goes_here with the name of the original texture for $iris. Hit F5 to reload the model -- you're done!
Important Notes
- Everything works except automatic lipsync. You'll have to do it manually. And by "manual" it means adding your own flexes -- the phoneme system is broken entirely in
 Portal 2. (After all, why would it be needed?) However, everything else works, including skeletal animation, facial expression animation, gestures, and eye tracking.
 - Ported human models' eyes will completely bug out UNLESS you set their prop type as "generic_actor" (or maybe another NPC). At first glance, this appears to remove some features like the "SetAnimation" input. However, generic_actor grants to access to using Faceposer to animate and choreograph scenes. It can accomplish everything that can be accomplished with prop_dynamic and more, but takes a bit more effort and work, and requires scenes/scenes.image to be distributed along with your BSP.
- Walking animations are very buggy. A generic actor when walking will glitch and visually teleport around. This is probably an issue with the Inverse Kinematics of these models being incompatible with the ones in use in Portal 2.
- If you want to adjust the pupil size of a ported model, you have to manually resize the pupil on the texture in an image-editing program. This is due to the limitations of the EyeRefract shader.
See Also
- Choreography creation for animating the humans
- Portal 2 Level Design P2 level creation home page