Blender Modeling Walkthrough (3.6.1): Difference between revisions
No edit summary |
No edit summary |
||
| Line 42: | Line 42: | ||
|} | |} | ||
== | == Quick Overview == | ||
Now, if you haven't already, open Blender. You should have the default screen, seen below. | Now, if you haven't already, open Blender. You should have the default screen, seen below. | ||
For a brief | For a brief overview, Blender's workspace is divided into different areas called viewports. Each viewport contains a different "Editor Type" that can be changed by clicking on the Editor Type icon. Also, every "Editor Type" has a header that can be relocated to the top or bottom of the window, or be removed entirely by clicking on it with the RMB and unchecking "Show Header". This can be undone by clicking the small down arrow icon that appears at the top-right of the viewport. Blender starts with four viewports open by default: | ||
[[File:Blender_Overview.png|down|800px]] | |||
1. 3D Viewport | |||
2. Outliner | |||
3. Properties | |||
4. Timeline | |||
These will be covered in more detail as we use them. | |||
== Creating a Model == | |||
<WIP> | |||
Revision as of 20:51, 6 August 2023
This tutorial covers creating a model in Blender and exporting it to the Source Engine. The model we will make is a soda can.
This tutorial was created on version 3.6.1 of Blender for Windows. If you still need the old 2.48 version, you can find it here:
Blender Modeling Walkthrough (Outdated)
Tools Used
The tools used for this tutorial are as follows:
Blender for creating a mesh and texture mapping.
Blender Source Tools for exporting the model from Blender.
Crowbar for compiling the model into a .mdl for source games.
VTFEdit for converting textures into VTFs for source games.
| Key Reference | |
|---|---|
| Left Mouse Button | |
| Middle Mouse Button | |
| Right Mouse Button | |
| MW | Mouse Wheel |
| MWUp | Mouse Wheel Up |
| MWDown | Mouse Wheel Down |
| 9 | 9 on the number row |
| Num9 | 9 on the number pad |
Quick Overview
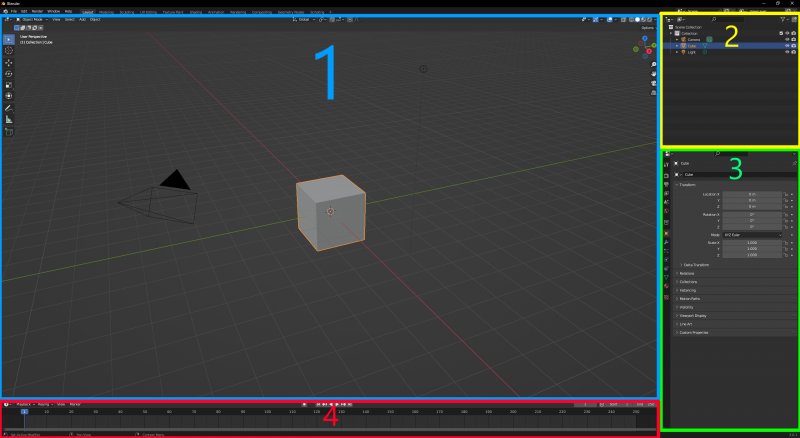
Now, if you haven't already, open Blender. You should have the default screen, seen below.
For a brief overview, Blender's workspace is divided into different areas called viewports. Each viewport contains a different "Editor Type" that can be changed by clicking on the Editor Type icon. Also, every "Editor Type" has a header that can be relocated to the top or bottom of the window, or be removed entirely by clicking on it with the RMB and unchecking "Show Header". This can be undone by clicking the small down arrow icon that appears at the top-right of the viewport. Blender starts with four viewports open by default:
   1. 3D Viewport
   2. Outliner
   3. Properties
   4. Timeline
These will be covered in more detail as we use them.
Creating a Model
<WIP>
