Ko/Diversity Vent: Difference between revisions
< Ko
Jump to navigation
Jump to search
(Created page with "'''다양한 공압식 통풍구'''는 최종게임에서 삭제된 테스트요소입니다. 하지만, 아직 만들 수 있는 도구는 사용할 수 있습니다. 포탈 2 ...") |
No edit summary |
||
| Line 1: | Line 1: | ||
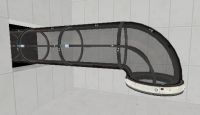
'''다양한 공압식 통풍구'''는 최종게임에서 삭제된 테스트요소입니다. 하지만, 아직 만들 수 있는 도구는 사용할 수 있습니다. 포탈 2 미학 요소의 '''생명 유지에 필요한 통풍 기구''' 시스템의 일부입니다. 애퍼쳐 전반에 걸쳐 객체 분배를 | '''다양한 공압식 통풍구'''는 최종게임에서 삭제된 테스트요소입니다. 하지만, 아직 만들 수 있는 도구는 사용할 수 있습니다. 포탈 2 미학 요소의 '''생명 유지에 필요한 통풍 기구''' 시스템의 일부입니다. 애퍼쳐 전반에 걸쳐 객체 분배를 [[cubes (Portal 2)|큐브]],[[turret (Portal 2)|터렛]], 그리고 [[gel (Portal 2)|젤]]과 같은데에 사용합니다. 또는 테스트 요소를 빨아들일 수 있습니다. | ||
튜브를 통과하는 큐브와 포탑이 애니메이션으로 표시됩니다. | |||
모델 폴더를 살펴보십시오. "props_vac_anim". | |||
[[File:vent1.png|200px|thumb|right| | [[File:vent1.png|200px|thumb|right|튜브]] | ||
== | == 통풍구 만들기 == | ||
{{note| | {{note|이 자습서에서는 3 개의 직선 통풍구와 1 개의 각진 통풍구가 사용됩니다. 찾아보기 ''vactube'' 아래에 ''props_bts'' 더 많은 벤트 옵션.}} | ||
* | * 여러 개 만들기[[prop_static]] 모델 이름이있는 엔티티 ''props_bts\vactube_128_straight_b.mdl''. | ||
* | * 튜브를 정렬 한 다음 다른 [[prop_static]] 모델 이름이있는 엔티티 ''props_bts\vactube_90deg_01.mdl''. 이것은 구부러진 튜브입니다. | ||
* | * 통풍구를 완성하려면 하나 더 [[prop_static]] 모델 이름이있는 엔티티 ''props_bts\vactube_connector.mdl'' | ||
== | == 진공 만들기 == | ||
* | * 직선 튜브의 경우 : 64x64 생성 [[trigger_push]] 엔티티를 브러시하고 Trigger 텍스처로 텍스처링합니다. 직선 튜브 안에 놓고 직선 튜브의 원점과 정렬하여 중앙에 직접 위치하도록합니다. | ||
* | * 브러시 길이를 벤트 튜브만큼 길게 만드십시오. | ||
* | * 곡선 튜브의 경우 : 다른 64x64 만들기 [[trigger_push]] 트리거로 텍스처링 된 브러시 엔티티. 구부러진 튜브 안에 넣고 바닥까지 그리고 직선 튜브의 바닥까지 늘립니다.[[trigger_push]] 실재. 이렇게하면 물리 물체가 직선 튜브로 들어간 다음 사라집니다. | ||
모든 개체 속성에서 [[trigger_push]] 엔티티,, 보장하다 '''Physics Objects''' 플래그가 확인됩니다. 그만큼 '''Speed of Push''' 1500으로 설정해야하며 '''Push Direction''' 튜브의 방향으로 올바르게 설정되어 있습니다. | |||
== | == 진공 처리 된 물체 제거 == | ||
* | * 플레이어가 진공에 의해 운반되는 물체를 보지 못할 수있는 튜브의 반대쪽 끝에 [[trigger_multiple]] 128x128x16 크기의 브러시 엔티티입니다. 이것은 튜브에서 물리 개체를 제거하는 데 사용됩니다. | ||
* | * 에 대한 [[trigger_multiple]] 실재: | ||
::{| class=standard-table | ::{| class=standard-table | ||
! || My Output || Target Entity || Target Input || Parameter || Delay || Only Once | ! || My Output || Target Entity || Target Input || Parameter || Delay || Only Once | ||
| Line 27: | Line 27: | ||
| [[Image:Io11.png]] || OnStartTouch || !activator || Kill || || 0.00 || No | | [[Image:Io11.png]] || OnStartTouch || !activator || Kill || || 0.00 || No | ||
|} | |} | ||
{{Note| | {{Note| 확인하십시오 "physics objects" 트리거 속성에서 플래그를 지정합니다. 선택을 취소 할 수도 있습니다. "client" flag.}} | ||
== | == 마무리 == | ||
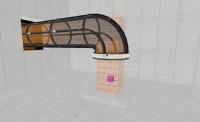
[[File:vent2.png|200px|thumb|right| | [[File:vent2.png|200px|thumb|right|완성 된 벤트]] | ||
* | * 물체가 흡입되는 입구 튜브 바로 아래에 [[info_placement_helper]] 바닥에. 설정 ''Radius'' 64로 설정하고 ''Force placement'' 에. | ||
* | * 위로 [[info_placement_helper]], 입구 튜브 아래에 [[point_push]] 마주 치다, 직면하다 (-90, 0, 0). 조정 '''Radius''' 약 250으로 설정하고 '''Magnitude''' -40까지. 포털을 배치 할 때 먼지가 포털 안으로 빨려 들어가는 효과를 추가합니다. | ||
* | * 통풍구가 열리는 곳에서[[info_particle_system]] 입자 시스템 이름이 아래로 향하도록 (90, 0, 0) broken_tube_suck. 시작 하시겠습니까? yes로 설정되어 있습니다. 이것은 먼지가 포털뿐만 아니라 포털에서도 흡입구로 빨려 들어가는 효과를 추가합니다. | ||
== 외부 링크 == | |||
== | * [http://wiki.p2mods.com/index.php?title=Pneumatic_Diversity_Vent Original tutorial with example map (Portal 2 Mods)] - 부서진 것 같다 | ||
* [http://wiki.p2mods.com/index.php?title=Pneumatic_Diversity_Vent Original tutorial with example map (Portal 2 Mods)] - | |||
[[Category:Portal 2 Level Design:ko]] | [[Category:Portal 2 Level Design:ko]] | ||
[[Category:Portal 2 Tutorials]] | [[Category:Portal 2 Tutorials]] | ||
Revision as of 14:24, 11 August 2020
다양한 공압식 통풍구는 최종게임에서 삭제된 테스트요소입니다. 하지만, 아직 만들 수 있는 도구는 사용할 수 있습니다. 포탈 2 미학 요소의 생명 유지에 필요한 통풍 기구 시스템의 일부입니다. 애퍼쳐 전반에 걸쳐 객체 분배를 큐브,터렛, 그리고 젤과 같은데에 사용합니다. 또는 테스트 요소를 빨아들일 수 있습니다.
튜브를 통과하는 큐브와 포탑이 애니메이션으로 표시됩니다. 모델 폴더를 살펴보십시오. "props_vac_anim".
통풍구 만들기
- 여러 개 만들기prop_static 모델 이름이있는 엔티티 props_bts\vactube_128_straight_b.mdl.
- 튜브를 정렬 한 다음 다른 prop_static 모델 이름이있는 엔티티 props_bts\vactube_90deg_01.mdl. 이것은 구부러진 튜브입니다.
- 통풍구를 완성하려면 하나 더 prop_static 모델 이름이있는 엔티티 props_bts\vactube_connector.mdl
진공 만들기
- 직선 튜브의 경우 : 64x64 생성 trigger_push 엔티티를 브러시하고 Trigger 텍스처로 텍스처링합니다. 직선 튜브 안에 놓고 직선 튜브의 원점과 정렬하여 중앙에 직접 위치하도록합니다.
- 브러시 길이를 벤트 튜브만큼 길게 만드십시오.
- 곡선 튜브의 경우 : 다른 64x64 만들기 trigger_push 트리거로 텍스처링 된 브러시 엔티티. 구부러진 튜브 안에 넣고 바닥까지 그리고 직선 튜브의 바닥까지 늘립니다.trigger_push 실재. 이렇게하면 물리 물체가 직선 튜브로 들어간 다음 사라집니다.
모든 개체 속성에서 trigger_push 엔티티,, 보장하다 Physics Objects 플래그가 확인됩니다. 그만큼 Speed of Push 1500으로 설정해야하며 Push Direction 튜브의 방향으로 올바르게 설정되어 있습니다.
진공 처리 된 물체 제거
- 플레이어가 진공에 의해 운반되는 물체를 보지 못할 수있는 튜브의 반대쪽 끝에 trigger_multiple 128x128x16 크기의 브러시 엔티티입니다. 이것은 튜브에서 물리 개체를 제거하는 데 사용됩니다.
- 에 대한 trigger_multiple 실재:
마무리
- 물체가 흡입되는 입구 튜브 바로 아래에 info_placement_helper 바닥에. 설정 Radius 64로 설정하고 Force placement 에.
- 위로 info_placement_helper, 입구 튜브 아래에 point_push 마주 치다, 직면하다 (-90, 0, 0). 조정 Radius 약 250으로 설정하고 Magnitude -40까지. 포털을 배치 할 때 먼지가 포털 안으로 빨려 들어가는 효과를 추가합니다.
- 통풍구가 열리는 곳에서info_particle_system 입자 시스템 이름이 아래로 향하도록 (90, 0, 0) broken_tube_suck. 시작 하시겠습니까? yes로 설정되어 있습니다. 이것은 먼지가 포털뿐만 아니라 포털에서도 흡입구로 빨려 들어가는 효과를 추가합니다.

