Creating Brush Entities: Difference between revisions
Jump to navigation
Jump to search
TomEdwards (talk | contribs) m (moved Creating Primitives to Creating Brush Entities: Far more descriptive name) |
TomEdwards (talk | contribs) (redone with a door instead of a breakable crate, which is of greater practical use) |
||
| Line 4: | Line 4: | ||
| zh-cn = Creating Primitives:zh-cn}} {{first room menu}} | | zh-cn = Creating Primitives:zh-cn}} {{first room menu}} | ||
We have already [[Basic Construction|created brushes]]. There is another side to them: the '''[[brush entity]]'''. Entities are objects which have behaviors, and which can (usually) be interacted with somehow. | |||
In this example, we will create a brush that acts as a sliding door. When the player touches the brush, it will rise into the air and allow passage. | |||
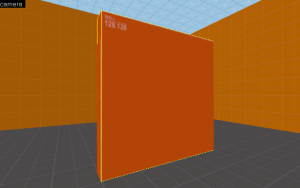
[[File:Door basic.png|thumb|none|A basic [[func_door]] entity.]] | |||
== | == Construction == | ||
# Select the {{hammer block}} and create a new brush. 128x128x16 is a good size, but anything will do. {{tip|If Hammer's grid is too large to get down to 16 units, press {{key|[}} or click '''Smaller Grid''' [[File:Hammer SmallerGrid.png|link=]] scale it down. Never disable snapping unless you really, ''really'' need to!}} | |||
# Move the brush to an entity (also known as "tying" to an entity) using the [[Hammer New Objects Toolbar#toEntity_(Ctrl+T)|toEntity]] button or {{key|Ctrl+T}}:<br />[[File:Hammer toEntityButton.png|border|Hammer toEntity button|link=]] | |||
# This will bring up the [[Hammer Object Properties Dialog|Object Properties]] dialog:<br />[[File:Hammer object properties.png|300px|Object properties dialog]] {{tip|If you need to access the dialog again later, select your brush and press {{key|Alt+Enter}}.}} | |||
# Select [[func_door]] from the "Class" drop-down menu in the top left (you can search by typing into the box) and hit "Apply". | |||
# Near the bottom of the main "Keyvalues" list, find "Move Direction". Either change its value to read <code>-90 0 0</code> or select "Up" from the drop-down list to the left of the black circle. | |||
# Click "Apply" again, then close the Object Properties dialog. | |||
You should now be able to compile your map and see the door working. | |||
== Texturing == | |||
[[File: | Open the [[Hammer Texture Browser|Texture Browser]] and [[Hammer Texture Browser#Filter|filter]] for "door". Choose a material that you like and apply it to your brush as you would normally. You might also want to build a wall that connects the door to the edges of your map. | ||
[[File:Decorated door.jpg|400px|thumb|none|But don't get too carried away!]] | |||
{{Navbar|Applying_Textures|Your First Map|Adding Entities}} | {{Navbar|Applying_Textures|Your First Map|Adding Entities}} | ||
[[Category:Level Design Tutorials]] | [[Category:Level Design Tutorials]] | ||
Revision as of 05:59, 28 August 2009
We have already created brushes. There is another side to them: the brush entity. Entities are objects which have behaviors, and which can (usually) be interacted with somehow.
In this example, we will create a brush that acts as a sliding door. When the player touches the brush, it will rise into the air and allow passage.

A basic func_door entity.
Construction
- Select the Block tool
 and create a new brush. 128x128x16 is a good size, but anything will do.
  Tip:If Hammer's grid is too large to get down to 16 units, press [ or click Smaller Grid
  scale it down. Never disable snapping unless you really, really need to!
 - Move the brush to an entity (also known as "tying" to an entity) using the toEntity button or Ctrl+T:

- This will bring up the Object Properties dialog:
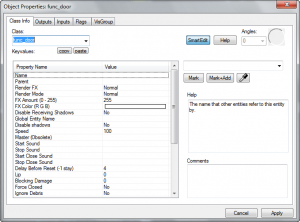 Tip:If you need to access the dialog again later, select your brush and press Alt+Enter.
 - Select func_door from the "Class" drop-down menu in the top left (you can search by typing into the box) and hit "Apply".
- Near the bottom of the main "Keyvalues" list, find "Move Direction". Either change its value to read
-90 0 0or select "Up" from the drop-down list to the left of the black circle. - Click "Apply" again, then close the Object Properties dialog.

You should now be able to compile your map and see the door working.
Texturing
Open the Texture Browser and filter for "door". Choose a material that you like and apply it to your brush as you would normally. You might also want to build a wall that connects the door to the edges of your map.
