|
|
| (111 intermediate revisions by 37 users not shown) |
| Line 1: |
Line 1: |
| [[Category:Programming]]
| | {{LanguageBar}}{{shadertut}} |
| =Overview=
| |
| | |
| This document describes how to author shaders in the Source SDK.
| |
| | |
| '''Note:''' Authoring new shaders is for advanced users. It requires a working knowledge of C++, Microsoft Visual Studio, and some familiarity with DirectX. It also assumes some familiarity with the Source SDK directory layout. This document refers to filenames with shorthand, like:
| |
|
| |
|
| <code>"[Steam]\sourcesdk_content\hl2\mapsrc\X.vmf"</code>
| | This document describes how to author shaders in the Source SDK, for further information on what a shader is and how they can be used, please see [[Shader]]. |
|
| |
|
| Refers to <code>"C:\Program Files\Valve\Steam\steamapps\username\sourcesdk_content\hl2\mapsrc\X.vmf"</code>, if you have installed Steam into <code>"C:\Program Files\Valve\Steam"</code>
| | ==Getting Started== |
|
| |
|
| Every material that is used in Source specifies which shader it uses to render itself. The shader contains the logic and equations to take the source artwork and lighting, and produce the final rendered color for every pixel that the shader is used on. | | Every material that is used in Source specifies which shader it uses to render itself. The shader contains the logic and equations to take the source artwork and lighting, and produce the final rendered color for every pixel that the shader is used on. |
|
| |
|
| The Source SDK fully supports Microsoft DirectX HLSL (High Level Shading Language) and shader assembly languages for writing shaders. We recommend using HLSL whenever possible, and only writing shader assembly as a last resort. | | The Source SDK fully supports Microsoft DirectX [[HLSL]] (High-Level Shading Language) and shader assembly languages for writing shaders. It is recommended to use HLSL whenever possible and to only write shader assembly as a last resort. |
|
| |
|
| =Getting Started=
| | There are a number of external tools required to compile shaders for use in the Source SDK, the following sections detail the tools and provide links for download along with brief instructions on installation and usage. |
|
| |
|
| The Source SDK relies on some external tools to build shaders. This section describes how to download and install the tools you'll need in order to compile shaders. | | The tools used are Perl, the DirectX SDK and make, the following processes, in general, only have to be performed once before the process of compiling shaders can begin. |
|
| |
|
| ==Installing Perl== | | ==Options for Building Shaders== |
| To install Perl, go to the [http://www.perl.com/download.csp#win32 download page] on http://www.perl.com , download, and install Perl.
| | {{important| After the 2013MP SDK got updated with TF2's code, a modified version of SCell555's shader compiler is included by default, more precisely [https://github.com/misyltoad/ShaderCompile2 this] version.}} |
| | ===Option 1 - Perl & DirectX SDK=== |
|
| |
|
| [http://www.activeperl.com ActivePerl] is an excellent Perl installation for Windows. | | ====Perl==== |
| | To install Perl, go to the [https://www.perl.com/download.csp#win32 download page] on https://www.perl.com/, download, and install Perl - a recommended version of Perl for Windows is [https://strawberryperl.com/ Strawberry Perl]. |
|
| |
|
| ==Installing DirectX==
| | The Orange Box SDK also relies on the non-standard Perl package, String::CRC32. If you are using Strawberry Perl, you can install it through the CPAN Client which can be launched from <code><StrawberryPerlInstallDir>\perl\bin\cpan.bat</code> |
| To install the latest DirectX SDK, go to [http://www.microsoft.com/windows/directx Microsoft's DirectX site], download, and install DirectX.
| |
|
| |
|
| ==Copying Files==
| | Enter the following command to install the package: <code>install String::CRC32</code> |
| Now that you have Perl and DirectX installed, you can copy out the required executables so the SDK compilation tools can use them. The table below assumes that you have installed Perl into <code>C:\Perl</code>, DirectX into <code>C:\DXSDK</code>, and your mod's source code directory is in <code>C:\MyMod\src</code>. Replace the directory names as appropriate.
| |
|
| |
|
| | {{note|If you have problems with cpan.bat, try to open PowerShell in <code><StrawberryPerlInstallDir>\perl\bin\</code> and run command: <code>cpan String::CRC32</code>}} |
|
| |
|
| {|
| |
| ! Source File || Destination Directory
| |
| |-
| |
| | C:\Perl\bin\perl.exe || C:\MyMod\src\devtools\bin
| |
| |-
| |
| | C:\Perl\bin\perl58.dll || C:\MyMod\src\devtools\bin
| |
| |-
| |
| | C:\DXSDK\Utilities\fxc.exe || C:\MyMod\src\dx9sdk\Utilities
| |
| |-
| |
| | C:\DXSDK\Utilities\psa.exe || C:\MyMod\src\dx9sdk\Utilities
| |
| |-
| |
| | C:\DXSDK\Utilities\vsa.exe || C:\MyMod\src\dx9sdk\Utilities
| |
| |}
| |
|
| |
|
| Make sure you copy the DXSDK files from a ''more recent'' version of the DXSDK (e.g., "''C:\Program Files\Microsoft DirectX 9.0 SDK (August 2005)\Utilities\Bin\x86''") and not a ''really old'' version that might not even let you compile the shaders.
| | ====DirectX SDK==== |
| | To install the November 2008 DirectX SDK, go to [https://archive.org/details/dxsdk_nov08 https://archive.org/details/dxsdk_nov08], download, and install the DirectX SDK (The old Microsoft link is dead, so we need to use the Wayback Machine). |
|
| |
|
| ==Environment Setup==
| |
| You'll also need to have the '''nmake.exe''' from Microsoft Visual Studio .NET 2003 in your path. If it isn't already in your path, you can run vcvars32.bat (which would be under your VS.NET directory somewhere like C:\Program Files\Microsoft Visual Studio .NET 2003\Vc7\bin).
| |
|
| |
|
| Sometimes VC Vars will not work, so copy the nmake.exe from the above folder to the sdkshaders root ie C:\MyMod\src\sdkshaders
| | {{note|Just having DirectX 9.x installed is '''not''' sufficient, the <code>DirectX SDK</code> must be installed!}} |
| | {{note|'''It is recommended that you use the November 2008 SDK as needed binaries (psa.exe, vsa.exe) have been removed from newer releases.'''}} |
|
| |
|
| =High Level Concepts=
| |
|
| |
|
| | ====Setting The Path==== |
| | With Perl and the DirectX SDK installed, make sure your "Path" environmental variable has been updated appropriately. In Windows, you can check this by right clicking on My Computer -> properties, going to the Advanced tab, and clicking on "Environment Variables". Assuming that Perl is installed into <code>C:\Perl</code>, and DirectX into <code>C:\DXSDK</code>, your "Path" variable should contain both <code>C:\Perl\bin</code> and <code>C:\DXSDK\Utilities\bin\x86</code> in a semicolon delimited list. |
|
| |
|
| The two major pieces of code that have to be written to create a new shader are the HLSL code and the C++ code.
| | By setting up the Environmental Variable in this way, you can update the Perl and DirectX SDK as you please without having to copy files. If for some reason you do not wish to do this, you can simply copy the required files into a different directory and add that to your path instead. |
|
| |
|
| The HLSL code is a C-like language in which you describe what happens at each vertex and each pixel for primitives drawn with your shader. HLSL code is compiled into files that are put under your mod directory's <code>shaders</code> directory. The specifics of HLSL are described in the [http://msdn.microsoft.com/library/default.asp?url=/library/en-us/directx9_c/directx/graphics/programmingguide/hlslshaders/programmablehlslshaders.asp DirectX docs here].
| | {{note|You may need to restart your computer for these changes to the environment to take full effect.}} |
|
| |
|
| The C++ code is compiled into a "shader DLL" that fits the pattern of either <code>game_shader_dx*.dll</code> or <code>game_shader_generic*.dll</code>. The shader DLL goes in your mod's bin directory (the same place where your client.dll and server.dll goes). The C++ code describes the high-level operation of the shader to the Source Engine. It tells the engine things like:
| |
|
| |
|
| * Which textures the shader wants to use (texture names usually come from the .VMT [material] file).
| | ===Option 2 - SCell555's Shader Compiler=== |
| * How many rendering passes the shader will use.
| | To install SCell555's Shader Compile tools, you must download the zip file which they provide with every [https://github.com/SCell555/ShaderCompile/releases/latest release]. |
| * Which HLSL code the shader will use.
| |
| * Which parameters to pass into the HLSL code from the material file.
| |
| * What shader to fallback to if the user's system can't support the shader.
| |
|
| |
|
| Every shader has one C++ class and one or more HLSL files that it uses to render.
| | Once you have downloaded the zip (or .7z) file, open it up and you should see the following folders: |
| | *bin |
| | *headers |
| | *stdshaders |
|
| |
|
| =Quick Start - Sample Shaders=
| |
|
| |
|
| The Source SDK ships with some sample shaders that you can compile and use right away. To compile them and use them in your game:
| | Place the <code>bin</code> folder into the <code>devtools</code> folder. |
|
| |
|
| '''1.''' Install a copy of the source code by running the '''Create a Mod '''from the '''SDK launcher'''. If you've already installed the latest version of the source code, you can skip this step. '''Note:''' In this document, we refer to the mod's source directory as <code>C:\MyMod\src</code> (replace it with yours as appropriate).
| | Place the <code>stdshaders</code> folder into the <code>materialsytem</code> folder. If it asks you to replace the files, say yes. |
|
| |
|
| '''2.''' Open a Windows command prompt, and use cd to change the <code>C:\MyMod\src\sdkshaders</code> directory. Then type:
| | Navigate into the <code>headers</code> folder in the zip. You should see a <code>cshader.h</code> file and a <code>VS2013</code> folder (which also contains another <code>cshader.h</code> file). If you are using Visual Studio 2013 or above, place the <code>cshader.h</code> in the <code>VS2013</code> folder into <code>public\shaderlib</code> and replace it. If you are using a Visual Studio version before 2013, use the {{path|cshader|h}} file that isn't in the <code>VS2013</code> folder instead. |
| <pre>build_sample_shaders.bat -game [mod directory]</pre> | |
| This will compile the sample HLSL code and copy the compiled code into a directory called shaders inside your mod's directory.
| |
|
| |
|
| '''3.''' Open game_shader_generic_sample.vcproj in Visual Studio .NET and build it. This will build the C++ part of each shader into a DLL and it will automatically copy the DLL into your game's bin directory (where your client.dll and server.dll are stored).
| | ==Completing the Setup== |
|
| |
|
| '''4.''' Now you can refer to the new shaders at the top of your material (.VMT) files. For example, you could have a material like this:
| | ====Modify stdshader_dx9_20b.txt==== |
| | Open up {{path|materialsystem/stdshaders/stdshader_dx9_20b|txt}} and comment out all of the lines which compile shaders like so: |
| | <code> |
| | // |
| | // Standard shaders collection |
| | // |
| | // These shaders are compiled as the following shader models: |
| | // _ps20.vcs |
| | // _ps20b.vcs |
| | // _vs20.vcs |
| | // |
| | //example_model_ps20b.fxc |
| | //example_model_vs20.fxc |
| | //SDK_Bloom_ps2x.fxc |
| | //SDK_screenspaceeffect_vs20.fxc |
| | //SDK_bloomadd_ps2x.fxc |
| | </code> |
|
| |
|
| <pre>
| | ====Modify buildepisodicshaders.bat==== |
| "SDK_Lightmap"
| | Open {{path|src\materialsystem\stdshaders\buildepisodicshaders|bat}} and set the GAMEDIR AND SDKBINDIR as instructed. |
| { | |
| "$basetexture" "Brick/brickwall003a"
| |
| "$surfaceprop" "brick"
| |
| } | |
| </pre>
| |
|
| |
|
| '''5.''' The SDK includes some files you can copy into your mod to see how to refer to the sample shaders you just compiled. Note: Using the shaders you just compiled is just like referring to any other shader. See Creating Materials for more information. The relevant sample files are listed below:
| | Inside {{path|buildsdkshaders|bat}}, you might also need to modify the call to vsvars32.bat on line 7 - If you are using Visual Studio 2013 it should point to %VS120COMNTOOLS% instead. |
|
| |
|
| | Note: GAMEDIR AND SDKBINDIR must be kept to the 8.3 directory name standard. |
| | <code> |
| | rem == Set the absolute path to your mod's game directory here == |
| | rem == Note that this path needs does not support long file/directory names == |
| | rem == So instead of a path such as "C:\Program Files\Steam\steamapps\mymod" == |
| | rem == you need to find the 8.3 abbreviation for the directory name using 'dir /x' == |
| | rem == and set the directory to something like C:\PROGRA~2\Steam\steamapps\sourcemods\mymod == |
| | set GAMEDIR= YOUR PATH HERE |
|
| |
|
| {|
| | rem == Set the relative path to SourceSDK\bin\orangebox\bin == |
| ! Filename || Use
| | rem == As above, this path does not support long directory names or spaces == |
| |-
| | rem == e.g. ..\..\..\..\..\PROGRA~2\Steam\steamapps\<USER NAME>\sourcesdk\bin\orangebox\bin == |
| | [steam]\half-life 2\hl2\maps\sdk_shader_samples.bsp || Small map that refers to the shaders
| | set SDKBINDIR= YOUR PATH HERE |
| |-
| | </code> |
| | [steam]\sourcesdk_content\hl2\mapsrc\sdk_shader_samples.vmf || Map source
| |
| |-
| |
| | [steam]\half-life 2\hl2\materials\sdk\sdk_lightmap.vmt || Material sample 1
| |
| |-
| |
| | [steam]\half-life 2\hl2\materials\sdk\sdk_particle.vmt || Material sample 2
| |
| |}
| |
|
| |
|
| '''Note:''' These files are automatically installed by the SDK, but you will need to copy them into the same relative locations in your mod's own folder. For example, if your Steam directory was in <code>C:\Program Files\Valve\Steam</code>, and your mod was called MyMod, you would need to copy:
| | ====Shader Compile==== |
| | [[File:compileshadersmd.png|thumb|Example of a successful compile.]] |
| | Navigate into the {{path|materialsystem\stdshaders}} folder. Then type in the name of the bat file for compiling your shaders; it will probably be {{path|buildepisodicshaders|bat}}. If you did everything correctly, it should compile with no issues. |
| | {{warning|You will encounter errors about <code>D3DVERTEXTEXTURESAMPLER0</code> being undefined when using SCell555's compiler. The fix is to simply remove any references to this definition from <code>register</code> functions in the Vertex Shader files. {{todo|List which files that have <code>register( D3DVERTEXTEXTURESAMPLER0, s0 )</code> in them to make finding the references easier.}} }} |
| | {{warning|SCell's shader compiler doesn't produce any Pixel Shader files below 2.0b, and no Vertex Shader files below 2.0. The stock SDK shaders rely on fallbacks to lower versions of these files and, thus will need to be modified to account for this limitation.}} |
|
| |
|
| <code>C:\Program Files\Valve\Steam\steamapps\username\half-life 2\hl2\materials\sdk\sdk_lightmap.vmt</code>
| | == See also == |
| | * You can get more information about HLSL and shader assembly programming in [https://msdn2.microsoft.com/en-us/library/bb509561.aspx the online MSDN docs]. |
| | * [[:Category:Material System]] -- for more general information on the usage of shaders in materials. |
|
| |
|
| into
| | [[Category:Programming]] |
| | | [[Category:Shaders]] |
| <code>C:\Program Files\Valve\Steam\steamapps\SourceMods\MyMod\materials\sdk\sdk_lightmap.vmt</code>
| |
| | |
| =Anatomy Of Shader DLL Code=
| |
| | |
| A shader DLL should contain one .CPP file for each shader. Inside the .CPP file, a set of macros is used to define the structure of the shader. These macros are listed below. For reference, here is a sample shader's code that you can refer to while reading the macros:
| |
| | |
| <pre>
| |
| #include "BaseVSShader.h"
| |
| | |
| // Note: you have to run buildshaders.bat to generate these files from the FXC code.
| |
| #include "sdk_lightmap_ps20.inc"
| |
| #include "sdk_lightmap_vs20.inc"
| |
| | |
| BEGIN_VS_SHADER( SDK_Lightmap, "Help for SDK_Lightmap" )
| |
| | |
| BEGIN_SHADER_PARAMS
| |
| SHADER_PARAM( BUMPMAP, SHADER_PARAM_TYPE_TEXTURE, "shadertest/BaseTexture", "base texture" )
| |
| SHADER_PARAM( BUMPFRAME, SHADER_PARAM_TYPE_INTEGER, "0", "frame number for $bumpmap" )
| |
| END_SHADER_PARAMS
| |
| | |
| // Set up anything that is necessary to make decisions in SHADER_FALLBACK.
| |
| SHADER_INIT_PARAMS()
| |
| {
| |
| if( !params[BUMPFRAME]->IsDefined() )
| |
| {
| |
| params[BUMPFRAME]->SetIntValue( 0 );
| |
| }
| |
| }
| |
| | |
| SHADER_FALLBACK
| |
| {
| |
| return 0;
| |
| }
| |
| | |
| // Note: You can create member functions inside the class definition.
| |
| int SomeMemberFunction()
| |
| {
| |
| return 0;
| |
| }
| |
| | |
| SHADER_INIT
| |
| {
| |
| LoadTexture( BASETEXTURE );
| |
| }
| |
| | |
| SHADER_DRAW
| |
| {
| |
| SHADOW_STATE
| |
| {
| |
| // Enable the texture for base texture and lightmap.
| |
| pShaderShadow->EnableTexture( SHADER_TEXTURE_STAGE0, true );
| |
| pShaderShadow->EnableTexture( SHADER_TEXTURE_STAGE1, true );
| |
| | |
| sdk_lightmap_vs20_Static_Index vshIndex;
| |
| pShaderShadow->SetVertexShader( "sdk_lightmap_vs20", vshIndex.GetIndex() );
| |
| | |
| sdk_lightmap_ps20_Static_Index pshIndex;
| |
| pShaderShadow->SetPixelShader( "sdk_lightmap_ps20", pshIndex.GetIndex() );
| |
| | |
| DefaultFog();
| |
| }
| |
| DYNAMIC_STATE
| |
| {
| |
| BindTexture( SHADER_TEXTURE_STAGE0, BASETEXTURE, FRAME );
| |
| pShaderAPI->BindLightmap( SHADER_TEXTURE_STAGE1 );
| |
| }
| |
| Draw();
| |
| }
| |
| END_SHADER
| |
| </pre>
| |
| | |
| <pre>BEGIN_VS_SHADER( [shader name], [help string] ) / END_SHADER</pre>
| |
| | |
| <blockquote>
| |
| This macro defines the name of the shader, as referenced in .VMT files. It expands to a class definition, so you can create member functions inside.
| |
| </blockquote>
| |
| | |
| <pre>BEGIN_SHADER_PARAMS / END_SHADER_PARAMS</pre>
| |
| | |
| <blockquote>
| |
| These macros define the section in which your material parameters are defined. Briefly, the material parameters are the variables that your shader can read out of a .vmt file.
| |
| </blockquote>
| |
| | |
| <pre>SHADER_PARAM( [param name], [param type], [default value], [help string] )</pre>
| |
| | |
| <blockquote>
| |
| | |
| Each of these defines a parameter in your shader, and the parameter values are specified inside .VMT files. Any code you write in your shader can refer to the values of these parameters (as specified in the .VMT file) by referring to params[param name] (which will be of type IMaterialVar).
| |
| | |
| There are a number of default shader parameters that are automatically present in any shader. See Default Shader Parameters for a list of these.
| |
| | |
| For example, you could have a SHADER_PARAM like this:
| |
| | |
| <pre>SHADER_PARAM( LIGHT_COLOR, SHADER_PARAM_TYPE_VEC3, "1 0 0", "This is the directional light color." )</pre>
| |
| | |
| and a .VMT material file like this:
| |
| | |
| <pre>
| |
| "(your shader name here - whatever was in BEGIN_VS_SHADER)"
| |
| {
| |
| "$light_color" "0 0 1"
| |
| }
| |
| </pre>
| |
| | |
| and then you could write <code>params[LIGHT_COLOR]->GetVecValue()</code> anywhere in your shader code to use the color.
| |
| | |
| See <code>src\public\materialsystem\IMaterialVar.h</code> for the IMaterialVar interface, and see <code>src\public\materialsystem\IMaterialSystem.h - ShaderParamType_t</code> - for a list of the parameter types that are supported.
| |
| | |
| </blockquote>
| |
| | |
| <pre>SHADER_INIT_PARAMS</pre>
| |
| The code inside this block is called right after the values for the parameters are loaded from the .vmt file. It gives the shader a chance to validate and clamp the incoming parameters, and to set default values for them if needed.
| |
| | |
| <pre>SHADER_FALLBACK</pre>
| |
| The code inside this block detects what DirectX version the user is running (using <code>g_pHardwareConfig</code>, and based on the DirectX version and what material parameters are specified, the shader can decide to use another shader to render the current material.
| |
| | |
| <blockquote>
| |
| This is useful if you have a high-end shader that makes use of the very latest HLSL version. If a user with an older DirectX 7 compatible machine were to try to run your shader, it wouldn't work because their machine couldn't support it. In that case, you would return the name of a "lesser" shader that will run on the person's machine.
| |
| | |
| '''Note:''' Sometimes, a material may go through a chain of <code>SHADER_FALLBACK</code>until it finds one that will support it. If all the versions of <code>LightmappedGeneric</code> were compiled into one shader DLL, and a user with a DirectX 6 video card were to use a <code>LightmappedGeneric</code> shader, it would call them in this sequence:
| |
| | |
| <code>LightmappedGeneric -> LightmappedGeneric_DX8 -> LightmappedGeneric_DX6</code>
| |
| </blockquote>
| |
| | |
| <pre>SHADER_INIT</pre>
| |
| The code in this block loads the shader's textures, bumpmaps, and cubemaps, and initializes its shader flags. Briefly, textures can be loaded with LoadTexture, bumpmaps with LoadBumpMap, and cubemaps with LoadCubeMap.
| |
| | |
| <pre>SHADER_DRAW</pre>
| |
| The code inside the SHADER_DRAW block contains all the state settings.
| |
| | |
| | |
| <pre>SHADOW_STATE and DYNAMIC_STATE</pre>
| |
| These macros always are specified one after the other, and they both are responsible for configuring all the rendering parameters for your shader. See Shadow And Dynamic State for more information.
| |
| | |
| =Shadow And Dynamic State=
| |
| The meat and potatoes of a shader is inside <code>SHADOW_STATE</code> and <code>DYNAMIC_STATE</code> blocks. Both blocks are responsible for specifying all the rendering parameters necessary to render the shader. The difference between the two is that shadow state is only called '''once per material''', so it can not change dynamically. Dynamic state is called every time something with a specific material is rendered, so it can change its parameters over time. The material system makes a distinction between the two for optimization purposes.
| |
| | |
| Note that each <code>SHADOW_STATE/DYNAMIC_STATE</code> pair is always followed by a Draw() call. Each <code>SHADOW_STATE/DYNAMIC_STATE/Draw()</code> sequence represents one rendering pass for your shader. You can use multiple rendering passes to achieve blending effects or to use more textures than you otherwise would be able to.
| |
| | |
| ==Shadow State==
| |
| | |
| Most shadow state code uses <code>pShaderShadow</code> (of type <code>IShaderShadow</code>) to set its state. For a comprehensive list of the things pShaderShadow supports, look at<code> IShaderShadow</code> in <code>src\public\materialsystem\ishaderapi.h</code>. The table below summarizes the primary things done the <code>SHADOW_STATE</code> block.
| |
| | |
| {|
| |
| ! Specification || Description
| |
| |-
| |
| | pShaderShadow-> EnableTexture || For each texture that you want to use in your shader, you need to enable that texture in shadow state. Each texture stage corresponds to a sampler inside your pixel shader's .FXC file (SHADER_TEXTURE_STAGE0 corresponds to sampler 0, and so on..)
| |
| |-
| |
| | pShaderShadow-> SetVertexShader pShaderShadow-> SetPixelShader || This is where you specify which .FXC (or .VSH/.PSH if you're using shader assembly) files your shader will use for its vertex shader and pixel shader. Usually, you'll have one .FXC file associated with each shader C++ class, but sometimes you'll want to choose a different .FXC file, and this call gives you the flexibility to do so. See Combo Variables for a description of the second parameter to these functions.
| |
| |-
| |
| | pShaderShadow-> VertexShaderVertexFormat || This call specifies which vertex components your .FXC code needs in order to operate.
| |
| | |
| The first parameter is a combination of the VertexFormatFlags_t flags listed in src\public\materialsystem\imaterial.h. These correspond roughly with the functions in CMeshBuilder (see src\public\materialsystem\imesh.h) used to specify vertex data.
| |
| | |
| The second and third parameters specify how many texture coordinates your shader uses. The second parameter says how many texture coordinates you use, and the (optional) third parameter specifies how many components you'll use per texture coordinate (if you pass NULL for this parameter, then it will assume 2 components per texture coordinate). This also corresponds with your CMeshBuilder::TexCoordXXX calls. For example, if you need a 2D texture coordinate and also a 3D one, the code drawing the primitives would look like this:
| |
| <pre>
| |
| meshBuilder.TexCoord2f( 0, s, t );
| |
| meshBuilder.TexCoord3f( 1, x, y, z );
| |
| </pre>
| |
| Then your call to VertexShaderVertexFormat would look like this:
| |
| <pre>
| |
| int vertexFlags = VERTEX_COLOR | VERTEX_POSITION;
| |
| int texCoordDimensions = { 2, 3 };
| |
| int numTexCoords = 2;
| |
| pShaderShadow->VertexShaderVertexFormat( vertexFlags, numTexCoords, texCoordDimensions, 0, 0 );
| |
| </pre>
| |
| The fourth parameter to VertexShaderVertexFormat specifies the number of bone weights. For skinned models, this should be set to 3. For all other shaders, it can be left at 0.
| |
| | |
| The last parameter specifies a user data size, and can be either 0 or 4. It corresponds to the data passed into CMeshBuilder::UserData, and can be accessed inside the VS_INPUT structure in your vertex shader like this:
| |
| <pre>
| |
| float4 vUserData : TANGENT;
| |
| </pre>
| |
| |-
| |
| | DefaultFog DisableFog || These functions control how your shader uses fogging.
| |
| |-
| |
| | pShaderShadow-> EnableBlending pShaderShadow-> BlendFunc || These functions control how your shader blends with the background (ie: translucency effects). By default, blending is disabled, so whatever your shader draws is opaque. You can use these to turn on translucency and different blending modes. When you enable translucency, all pixels produced by your shader go through this equation:
| |
| <pre>
| |
| [output color] = [your shader's output color] * SRC_FACTOR + [the destination pixel's current color] * DEST_FACTOR
| |
| </pre>
| |
| The two parameters to BlendFunc specify what SRC_FACTOR and DEST_FACTOR are. They are of typeShaderBlendFactor_t (see src\public\materialsystem\ishaderapi.h). The most common way to use translucency is standard alpha blending, where the alpha inside your texture specifies how opaque your texture is (an alpha of 1 means fully opaque and an alpha of 0 means fully translucent). In that case, you would want the equation to be:
| |
| <pre>
| |
| [output color] = [texture color] * [texture alpha] + [destination pixel's color] * [1 - texture alpha]
| |
| </pre>
| |
| and the code to produce that would be:
| |
| <pre>
| |
| pShaderShadow->EnableBlending( true );
| |
| pShaderShadow->BlendFunc( SHADER_BLEND_SRC_ALPHA, SHADER_BLEND_ONE_MINUS_SRC_ALPHA );
| |
| </pre>
| |
| Note that SHADER_BLEND_SRC_ALPHA refers to the alpha produced by your pixel shader, which can be any value you want. Sometimes it's as simple as the alpha that was in one of the textures.
| |
| |-
| |
| | pShaderShadow-> EnableDepthWrites || This function specifies whether your shader writes to the Z buffer or not. Usually, translucent things do not write to the Z buffer, because if they did and something tried to draw behind them, it would get masked out by the Z buffer.
| |
| | |
| |}
| |
| | |
| ==Dynamic State==
| |
| Code inside the DYNAMIC_STATE block specifies rendering parameters like the SHADOW_STATE block does, but the parameters that it sets are things that are allowed to change over time. The table below lists the most common categories of things that are done inside a DYNAMIC_STATE block. For the complete list, look at the IShaderDynamicAPI class in src\public\materialsystem\ishaderapi.h.
| |
| | |
| {|
| |
| ! Specification || Description
| |
| |-
| |
| | BindTexture
| |
| pShaderAPI->BindLightmap
| |
| BindWhite
| |
| BindBlack
| |
| BindGrey
| |
| ||
| |
| These functions all tell which textures are bound to which texture samplers. They all take a parameter of type TextureStage_t, which tells which texture stage (or sampler in the pixel shader) you want the specified texture assigned to.
| |
| | |
| BindTexture takes a second parameter that tells which texture to assign to the texture stage. The variable is one of your shader parameters (of type SHADER_PARAM_TYPE_TEXTURE). BindTexture also takes an optional third parameter which is another shader parameter that tells which frame of the texture you want to bind (if the texture has multiple frames built into it).
| |
| |-
| |
| | pShaderAPI->SetVertexShaderConstant
| |
| pShaderAPI->SetPixelShaderConstant
| |
| ||
| |
| These functions are used to set the vertex and pixel shader constants.
| |
| |-
| |
| | SetVertexShaderTextureTransform
| |
| SetVertexShaderTextureScaledTransform
| |
| ||
| |
| SetVertexShaderTextureTransform dumps a texture transform into two vertex shader constants, starting at the one you specify in the first parameter. The second parameter specifies the texture transform, which should be specified in one of your shader parameters (of type SHADER_PARAM_TYPE_MATRIX).
| |
| | |
| The two vertex shader constants are setup with a 2x2 rotation/scaling matrix on the left, and the translation on the right:
| |
| <pre>
| |
| constant 1: [rot] [rot] 0 [u translation]
| |
| constant 2: [rot] [rot] 0 [v translation]
| |
| </pre>
| |
| As an example, the code below would bind the default shader parameter called BASETEXTURETRANSFORM:
| |
| <pre>
| |
| SetVertexShaderTextureTransform( VERTEX_SHADER_SHADER_SPECIFIC_CONST_0, BASETEXTURETRANSFORM );
| |
| </pre>
| |
| Then, your .FXC code would use it like this:
| |
| <pre>
| |
| const float4 cBaseTexCoordTransform[2] : register( SHADER_SPECIFIC_CONST_0 );
| |
| baseTexCoord.x = dot( i.texCoord, cBaseTexCoordTransform[0] ) + cBaseTexCoordTransform[0].w;
| |
| baseTexCoord.y = dot( i.texCoord, cBaseTexCoordTransform[1] ) + cBaseTexCoordTransform[1].w;
| |
| </pre>
| |
| SetVertexShaderTextureScaledTransform is just like SetVertexShaderTextureTransform, but it takes a third parameter of type SHADER_PARAM_TYPE_FLOAT, which is a scaling factor for the matrix.
| |
| |-
| |
| | pShaderAPI->SetVertexShaderIndex
| |
| pShaderAPI->SetPixelShaderIndex
| |
| ||
| |
| These functions are used to set the values of the dynamic combo variables that your shader supports. The values passed to these functions come from the classes in your shader include file.
| |
| |}
| |
| | |
| =Combo Variables=
| |
| The second parameter to IShaderShadow::SetVertexShader and IShaderShadow::SetPixelShader is the shader index, which is how the Source engine allows you to have conditionals inside your shaders. HLSL currently does not support branching code. It supports if() statements, but only for static conditionals (usually based on #defines - things that can't change after the shader has been compiled).
| |
| | |
| Without dynamic if() statements in shaders, it's very easy to wind up having to hand-code every variation of a shader, and you can end up with a lot of manual labor. For example, if you have a shader that has an option to multiply the color from a third texture after it multiplies the base texture and lightmap, you'd have to copy the contents of your pixel shader into a separate .FXC file, add the code to multiply the third texture, and choose that file with pShaderShadow->SetPixelShader. That's with 1 option. With 10 orthogonal options, you'd have 2^10 (1024) shader files you'd have to manage.
| |
| | |
| To simulate dynamic conditionals in HLSL code, the Source engine uses a special syntax in its .FXC files to denote combo variables which can be different across different executions of the same .FXC file. Under the hood, the engine does the dirty work of precompiling 2^n variations of the .FXC file, each with different #defines used for the if() statements.
| |
| | |
| To make a combo variable, add a line like this to the top of your .FXC file:
| |
| | |
| <pre>
| |
| // STATIC: "VERTEXCOLOR" "0..1"
| |
| </pre>
| |
| | |
| or this:
| |
| | |
| <pre>
| |
| // DYNAMIC: "VERTEXCOLOR" "0..1"
| |
| </pre>
| |
| | |
| where VERTEXCOLOR is replaced with the name of the variable. Use STATIC whenever possible - static combo variables can only be set once per material (at load time). The values of the static combo variables are set inside the SHADOW_STATE block in your shader's C++ class.
| |
| | |
| If you need to dynamically change the value of the combo variables (based on a proxy), use DYNAMIC. The values of DYNAMIC combo variables are set inside the DYNAMIC_STATE part of your shader's C++ class.
| |
| | |
| Note: The '0..1' part following the shader can be any range of values (like '5..10'). Be aware that the number of permutations (and thus memory usage and runtime overhead) rapidly increases as you add more possible dynamic shader variable values. For example, these lines:
| |
| | |
| <pre>
| |
| // STATIC: "STATIC_VAR_1" "0..1"
| |
| // STATIC: "STATIC_VAR_2" "0..1"
| |
| // STATIC: "STATIC_VAR_3" "0..1"
| |
| // STATIC: "STATIC_VAR_4" "0..1"
| |
| </pre>
| |
| | |
| would cause 16 different versions of your .FXC file to be compiled (2^4 or one for each possible combination of valid values).
| |
| | |
| This, however:
| |
| | |
| <pre>
| |
| // STATIC: "STATIC_VAR_1" "0..9"
| |
| // STATIC: "STATIC_VAR_2" "0..9"
| |
| // STATIC: "STATIC_VAR_3" "0..9"
| |
| // STATIC: "STATIC_VAR_4" "0..9"
| |
| </pre>
| |
| | |
| would cause 10,000 (10^4) different versions of your .FXC file to be compiled, which will not only take a long time to compile, it will also eat up lots of memory. You can use SKIP statements to optimize this.
| |
| | |
| ==Important - shader include files==
| |
| When you compile your .FXC code, a file called fxctmp9\[FXC filename].inc is created. This file contains classes that you use to access the combo variables. For an example, if you look at src\sdkshaders\sdk_lightmap.cpp, it has this include statement at the top:
| |
| | |
| <pre>
| |
| #include "sdk_lightmap_vs20.inc"
| |
| </pre>
| |
| | |
| That include file defines two classes. One is for the combo variables inside a SHADOW_STATE block (combo variables denoted with // STATIC in the .FXC file), and the other is for combo variables specified inside a DYNAMIC_STATE block (denoted with // DYNAMIC inside the .FXC file).
| |
| | |
| The names of the two classes defined inside a shader include (.inc) file are [shader name]_Static_Index and [shader name]_Dynamic_Index. To tie this all together, let's say you were writing a vertex shader in a file called MyVertexShader.fxc, and it had some STATIC and DYNAMIC combo variables at the top of your .FXC file that looked like this:
| |
| | |
| <pre>
| |
| // STATIC: "STATIC_VAR_1" "0..1"
| |
| // STATIC: "STATIC_VAR_2" "0..1"
| |
| | |
| // DYNAMIC: "DYNAMIC_VAR_1" "0..1"
| |
| // DYNAMIC: "DYNAMIC_VAR_2" "0..1"
| |
| </pre>
| |
| | |
| Then, at the top of your .cpp file for your shader, you would have this line:
| |
| <pre>
| |
| #include "MyVertexShader.inc"
| |
| </pre>
| |
| | |
| Then, inside your SHADOW_STATE block, where you would say pShaderShadow->SetVertexShader, you would write this code:
| |
| | |
| <pre>
| |
| MyVertexShader_Static_Index vshIndex;
| |
| | |
| vshIndex.SetSTATIC_VAR_1( 0 or 1 );
| |
| vshIndex.SetSTATIC_VAR_2( 0 or 1 );
| |
| pShaderShadow->SetVertexShader( "MyVertexShader", vshIndex.GetIndex() );
| |
| </pre>
| |
| | |
| and inside your DYNAMIC_STATE block, you would write this code.
| |
| | |
| <pre>
| |
| MyVertexShader_Dynamic_Index vshIndex;
| |
| | |
| vshIndex.SetDYNAMIC_VAR_1( 0 or 1 );
| |
| vshIndex.SetDYNAMIC_VAR_2( 0 or 1 );
| |
| pShaderAPI->SetVertexShaderIndex( vshIndex.GetIndex() );
| |
| </pre>
| |
| | |
| ==SKIP Statements==
| |
| | |
| SKIP statements can be used to tell Source's shader compiler about values of combo variables that will never be used. For example, if you had 3 combo variables:
| |
| | |
| <pre>
| |
| // STATIC: "STATIC_VAR_1" "0..1"
| |
| // STATIC: "STATIC_VAR_2" "0..1"
| |
| // STATIC: "STATIC_VAR_3" "0..1"
| |
| </pre>
| |
| | |
| but you knew that STATIC_VAR_1 and STATIC_VAR_2 could never both have a value of 1 at the same time, you would add a SKIP statement like this:
| |
| | |
| <pre>
| |
| // SKIP: $STATIC_VAR_1 && STATIC_VAR_2
| |
| </pre>
| |
| | |
| Then the compiler wouldn't have to bother compiling and storing the two extra combinations of variables.
| |
| | |
| Valve's LightmappedGeneric shader saves thousands of unnecessary versions of its .FXC file by using SKIP statements.
| |
| | |
| =Default Shader Parameters=
| |
| In addition to the SHADER_PARAM definitions in your shader's C++ file, there are a bunch of parameters that are automatically defined because they are so common. For example, most shaders have a 'main texture' that they use, so there is a shader parameter called BASETEXTURE. The list of default shader parameters is:
| |
| | |
| {|
| |
| ! Name || Parameter Type || Default value
| |
| |-
| |
| | COLOR || SHADER_PARAM_TYPE_COLOR || [1 1 1]
| |
| |-
| |
| | ALPHA || SHADER_PARAM_TYPE_FLOAT || 1.0
| |
| |-
| |
| | BASETEXTURE || SHADER_PARAM_TYPE_TEXTURE || shadertest/BaseTexture
| |
| |-
| |
| | FRAME || SHADER_PARAM_TYPE_INTEGER || 0
| |
| |-
| |
| | BASETEXTURETRANSFORM || SHADER_PARAM_TYPE_MATRIX || center .5 .5 scale 1 1 rotate 0 translate 0 0
| |
| |}
| |
| | |
| =Compiling .FXC Files=
| |
| To compile .FXC files, list them in a text file (one per line), then run src\materialsystem\stdshaders\BuildShaders.bat on the text file. It will go process your .FXC code and compile all the combinations into your mod's directory. The syntax of the BuildShaders.bat command line is:
| |
| | |
| <pre>
| |
| BuildShaders.bat [text filename] -game [mod directory] -source [source directory]
| |
| </pre>
| |
| | |
| Example:
| |
| | |
| <pre>
| |
| BuildShaders.bat MyShaders.txt -game C:\Steam\SteamApps\SourceMods\MyMod -source C:\MyMod\Src
| |
| </pre>
| |
| | |
| <blockquote>
| |
| '''Note:''' The text file that lists the .FXC files should be in the same directory as your shader DLL source code, because your shader DLL source code will need to refer to files that are generated by BuildShaders.bat.
| |
| | |
| Before building your shader DLL, you need to run BuildShaders.bat, so it can generate include files that your shader DLL will need.
| |
| </blockquote>
| |
| | |
| You can look in src\sdkshaders\build_sample_shaders.bat for an example of how it's setup. sdk_shaders.txt specifies all the .FXC files, all the source code for the shader DLL is in the same directory, and the .INC files are placed in the fxctmp9 directory. After BuildShaders.bat runs, you can look in the fxctmp9 directory to see the include files generated by the shader compiler.
| |
| | |
| Important note: shader have to be named something like for example xxxxxxxx_ps20.fxc or xxxxxxxxx_ps11.fxc
| |
| | |
| =To Be Continued...=
| |
| The remainder of this document is not complete yet. Keep watching it for updates.
| |
| | |
| | |
| =For More Information=
| |
| You can get more information about HLSL and shader assembly programming in [http://msdn.microsoft.com/library/default.asp?url=/library/en-us/directx9_c/directx/graphics/programmingguide/hlslshaders/programmablehlslshaders.asp the online MSDN docs].
| |
| | |
| There are more documents describing how the material system works under the '''Material System''' section of the Source SDK Documentation Index.
| |
This document describes how to author shaders in the Source SDK, for further information on what a shader is and how they can be used, please see Shader.
Getting Started
Every material that is used in Source specifies which shader it uses to render itself. The shader contains the logic and equations to take the source artwork and lighting, and produce the final rendered color for every pixel that the shader is used on.
The Source SDK fully supports Microsoft DirectX HLSL (High-Level Shading Language) and shader assembly languages for writing shaders. It is recommended to use HLSL whenever possible and to only write shader assembly as a last resort.
There are a number of external tools required to compile shaders for use in the Source SDK, the following sections detail the tools and provide links for download along with brief instructions on installation and usage.
The tools used are Perl, the DirectX SDK and make, the following processes, in general, only have to be performed once before the process of compiling shaders can begin.
Options for Building Shaders
 Important: After the 2013MP SDK got updated with TF2's code, a modified version of SCell555's shader compiler is included by default, more precisely this version.
Option 1 - Perl & DirectX SDK
Perl
To install Perl, go to the download page on https://www.perl.com/, download, and install Perl - a recommended version of Perl for Windows is Strawberry Perl.
The Orange Box SDK also relies on the non-standard Perl package, String::CRC32. If you are using Strawberry Perl, you can install it through the CPAN Client which can be launched from <StrawberryPerlInstallDir>\perl\bin\cpan.bat
Enter the following command to install the package: install String::CRC32
 Note:If you have problems with cpan.bat, try to open PowerShell in
 <StrawberryPerlInstallDir>\perl\bin\ and run command: cpan String::CRC32
DirectX SDK
To install the November 2008 DirectX SDK, go to https://archive.org/details/dxsdk_nov08, download, and install the DirectX SDK (The old Microsoft link is dead, so we need to use the Wayback Machine).
Note:Just having DirectX 9.x installed is not sufficient, the DirectX SDK must be installed!
Note:It is recommended that you use the November 2008 SDK as needed binaries (psa.exe, vsa.exe) have been removed from newer releases.
Setting The Path
With Perl and the DirectX SDK installed, make sure your "Path" environmental variable has been updated appropriately. In Windows, you can check this by right clicking on My Computer -> properties, going to the Advanced tab, and clicking on "Environment Variables". Assuming that Perl is installed into C:\Perl, and DirectX into C:\DXSDK, your "Path" variable should contain both C:\Perl\bin and C:\DXSDK\Utilities\bin\x86 in a semicolon delimited list.
By setting up the Environmental Variable in this way, you can update the Perl and DirectX SDK as you please without having to copy files. If for some reason you do not wish to do this, you can simply copy the required files into a different directory and add that to your path instead.
Note:You may need to restart your computer for these changes to the environment to take full effect.
Option 2 - SCell555's Shader Compiler
To install SCell555's Shader Compile tools, you must download the zip file which they provide with every release.
Once you have downloaded the zip (or .7z) file, open it up and you should see the following folders:
Place the bin folder into the devtools folder.
Place the stdshaders folder into the materialsytem folder. If it asks you to replace the files, say yes.
Navigate into the headers folder in the zip. You should see a cshader.h file and a VS2013 folder (which also contains another cshader.h file). If you are using Visual Studio 2013 or above, place the cshader.h in the VS2013 folder into public\shaderlib and replace it. If you are using a Visual Studio version before 2013, use the 
cshader.h file that isn't in the VS2013 folder instead.
Completing the Setup
Modify stdshader_dx9_20b.txt
Open up 
materialsystem/stdshaders/stdshader_dx9_20b.txt and comment out all of the lines which compile shaders like so:
//
// Standard shaders collection
//
//  These shaders are compiled as the following shader models:
//        _ps20.vcs
//        _ps20b.vcs
//        _vs20.vcs
//
//example_model_ps20b.fxc
//example_model_vs20.fxc
//SDK_Bloom_ps2x.fxc
//SDK_screenspaceeffect_vs20.fxc
//SDK_bloomadd_ps2x.fxc
Modify buildepisodicshaders.bat
Open 
src\materialsystem\stdshaders\buildepisodicshaders.bat and set the GAMEDIR AND SDKBINDIR as instructed.
Inside buildsdkshaders.bat, you might also need to modify the call to vsvars32.bat on line 7 - If you are using Visual Studio 2013 it should point to %VS120COMNTOOLS% instead.
Note: GAMEDIR AND SDKBINDIR must be kept to the 8.3 directory name standard.
rem == Set the absolute path to your mod's game directory here ==
rem == Note that this path needs does not support long file/directory names ==
rem == So instead of a path such as "C:\Program Files\Steam\steamapps\mymod" ==
rem == you need to find the 8.3 abbreviation for the directory name using 'dir /x' ==
rem == and set the directory to something like C:\PROGRA~2\Steam\steamapps\sourcemods\mymod ==
set GAMEDIR= YOUR PATH HERE
rem == Set the relative path to SourceSDK\bin\orangebox\bin ==
rem == As above, this path does not support long directory names or spaces ==
rem == e.g. ..\..\..\..\..\PROGRA~2\Steam\steamapps\<USER NAME>\sourcesdk\bin\orangebox\bin ==
set SDKBINDIR= YOUR PATH HERE
Shader Compile
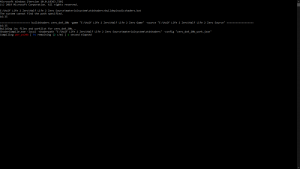
Example of a successful compile.
Navigate into the 
materialsystem\stdshaders folder. Then type in the name of the bat file for compiling your shaders; it will probably be buildepisodicshaders.bat. If you did everything correctly, it should compile with no issues.
 Warning:You will encounter errors about
 D3DVERTEXTEXTURESAMPLER0 being undefined when using SCell555's compiler. The fix is to simply remove any references to this definition from register functions in the Vertex Shader files. Todo: List which files that have register( D3DVERTEXTEXTURESAMPLER0, s0 ) in them to make finding the references easier.
Warning:SCell's shader compiler doesn't produce any Pixel Shader files below 2.0b, and no Vertex Shader files below 2.0. The stock SDK shaders rely on fallbacks to lower versions of these files and, thus will need to be modified to account for this limitation.
See also
