Blowout Doors: Difference between revisions
Jump to navigation
Jump to search


RabidMonkey (talk | contribs) |
Le Glaconus (talk | contribs) (removed pov + formatting) |
||
| (23 intermediate revisions by 9 users not shown) | |||
| Line 1: | Line 1: | ||
{{ | {{languageBar}} | ||
This tutorial details how to create a normal door which, when triggered, becomes a physical object and is blown out from the door frame. | |||
==Construction== | |||
===The Door=== | |||
[[File:Blowout1.jpg|thumb|200px|right|Fig. 1]] | |||
[[File:Blowout2.jpg|thumb|200px|right|Fig. 2]] | |||
# Create a door as needed. See [[Doors]]. | |||
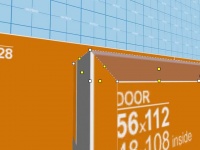
# Once the door has been created, build a door frame. To do this, use three brushes to create an outline of the door. For ideal performance, use [[vertex manipulation]] to slot the pieces of the frame together, as in fig. 1. | |||
:{{note|This will either have a very negligible or no performance benefit, it is safe to ignore this instruction.}} | |||
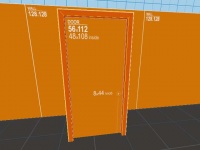
# Once the frame is complete, select all the pieces, press {{key|Ctrl|T}} to tie them to an entity, and select {{ent|func_brush}} from the list. Then select ''Never Solid'' in the <code>Solidity</code> field. The door and its frame should now be exactly like in fig. 2. | |||
== | ===Transformation=== | ||
In order to transform the door to a physically simulated version, the {{ent|phys_convert}} entity is used. | |||
Place this entity near to the door and set the following values: | |||
* <code>Name</code>: <code>door_converter</code> | |||
* <code>Entity to convert</code>: <code>door</code> | |||
===The Explosion=== | |||
To create the 'blowout' effect, two explosion entities need to be created. To do so, follow these steps: | |||
# Place an {{ent|env_explosion}} entity on whichever side the door should be blown from. If it is placed behind the door, the door will blow towards the player. Name this entity <code>door_explosion</code>. | |||
# To create the movement of the door, place an {{ent|env_physexplosion}} entity in the same place as the {{ent|env_explosion}}. This entity should also be named <code>door_explosion</code>. | |||
:{{tip|The arrows and shift key can be used together to duplicate an entity in the exact same position as another one.}} | |||
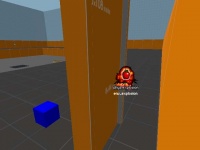
# The setup should now be similar to the setup in fig. 3. | |||
[[File:Blowout3.jpg|thumb|200px|right|Fig. 3]] | |||
===Triggering the Effect=== | |||
Place a {{ent|logic_relay}} entity near to the door and name it <code>relay_door_blow</code>. Check the "Only trigger once" flag in the '''Flags''' tab. Switch to the '''Outputs''' tab and add two new records: | |||
:{| border=1 cellpadding="2" cellspacing="1" | |||
|- align=left style="background:#DCDCDC; color:black" | |||
! | |||
! My Output > !! Target Entity !! Target Input !! Parameter !! Delay !! Only Once | |||
|- | |||
| [[File:Io11.png]] || OnTrigger || door_converter || ConvertTarget || || 0 || No | |||
|- | |||
| [[File:Io11.png]] || OnTrigger || door_explosion || Explode || || 0.05 || No | |||
|} | |||
== | |||
OnTrigger | |||
To trigger the effect, trigger <code>relay_door_blow</code>, preferably with an entity that can only trigger once (e.g. with a {{ent|trigger_once}}). | |||
[[Category:Physics]] | |||
[[Category:Level Design]] | [[Category:Level Design]] | ||
[[Category: | [[Category:Tutorials]] | ||
Latest revision as of 16:26, 22 May 2025
This tutorial details how to create a normal door which, when triggered, becomes a physical object and is blown out from the door frame.
Construction
The Door
- Create a door as needed. See Doors.
- Once the door has been created, build a door frame. To do this, use three brushes to create an outline of the door. For ideal performance, use vertex manipulation to slot the pieces of the frame together, as in fig. 1.
 Note:This will either have a very negligible or no performance benefit, it is safe to ignore this instruction.
- Once the frame is complete, select all the pieces, press Ctrl+T to tie them to an entity, and select func_brush from the list. Then select Never Solid in the
Solidityfield. The door and its frame should now be exactly like in fig. 2.
Transformation
In order to transform the door to a physically simulated version, the phys_convert entity is used.
Place this entity near to the door and set the following values:
Name:door_converterEntity to convert:door
The Explosion
To create the 'blowout' effect, two explosion entities need to be created. To do so, follow these steps:
- Place an env_explosion entity on whichever side the door should be blown from. If it is placed behind the door, the door will blow towards the player. Name this entity
door_explosion. - To create the movement of the door, place an env_physexplosion entity in the same place as the env_explosion. This entity should also be named
door_explosion.
 Tip:The arrows and shift key can be used together to duplicate an entity in the exact same position as another one.
- The setup should now be similar to the setup in fig. 3.
Triggering the Effect
Place a logic_relay entity near to the door and name it relay_door_blow. Check the "Only trigger once" flag in the Flags tab. Switch to the Outputs tab and add two new records:
My Output > Target Entity Target Input Parameter Delay Only Once 
OnTrigger door_converter ConvertTarget 0 No 
OnTrigger door_explosion Explode 0.05 No
To trigger the effect, trigger relay_door_blow, preferably with an entity that can only trigger once (e.g. with a trigger_once).


