Creating a Curved Hallway: Difference between revisions
Jump to navigation
Jump to search
 Note:It is recommended that you familiarize yourself with the Hammer Arch Properties page before continuing.
m (Flavor? What was I thinking -- added TOC) |
m (Nesciuse moved page Creating a Curved Hallway/en to Creating a Curved Hallway without leaving a redirect: Move en subpage to basepage) |
||
| (8 intermediate revisions by 7 users not shown) | |||
| Line 1: | Line 1: | ||
{{LanguageBar}} | |||
__TOC__ | __TOC__ | ||
The Hammer [[Hammer Arch Properties|Arch tool]] can create smooth room transitions and break up an otherwise "blocky" design. This tutorial will cover an easy curved hallway. | The Hammer [[Hammer Arch Properties|Arch tool]] can create smooth room transitions and break up an otherwise "blocky" design. This tutorial will cover an easy curved hallway. | ||
{{note|It is recommended that you familiarize yourself with the [[Hammer Arch Properties]] page before continuing.}} | {{note|It is recommended that you familiarize yourself with the [[Hammer Arch Properties]] page before continuing.}} | ||
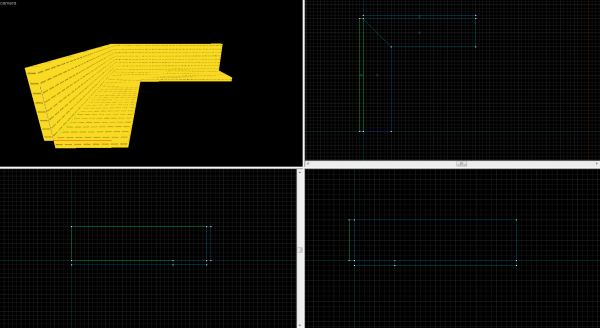
:In this example, there are two sets of brushes. Two 16-unit wide walls measuring 512 units in length meet at a corner (irrelevant; the corner is [[Clipping|clipped]] to retain the brush length.) The floor matches the length and is 128 units wide.[[ | :In this example, there are two sets of brushes. Two 16-unit wide walls measuring 512 units in length meet at a corner (irrelevant; the corner is [[Clipping|clipped]] to retain the brush length.) The floor matches the length and is 128 units wide.[[File:curvedhalls1.png|thumb|600px|center|Disregard the clipped corner.]] | ||
= Standard curve = | = Standard curve = | ||
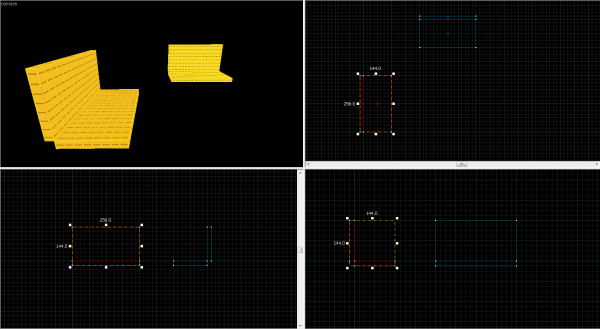
# Clip both brushes in half at their central point using their helpers (X) and remove the corners. This will leave the brushes measuring 256 units in length.[[ | # Clip both brushes in half at their central point using their helpers (X) and remove the corners. This will leave the brushes measuring 256 units in length.[[File:curvedhalls2.png|thumb|600px|center|Clipped both sets. (The width of 144 is including the width of the floor plus the wall: 128 + 16)]] | ||
# Press {{key|Shift | # Press {{key|Shift|B}} or select the {{hammer block}}, and select ''arch'' from the Objects drop-down box in the Objects bar. | ||
# While one of the walls are selected, begin dragging from one outermost corner to the other outermost corner.[[ | # While one of the walls are selected, begin dragging from one outermost corner to the other outermost corner.[[File:curvedhalls3.png|thumb|800px|center|The selection box should appear like this.]] | ||
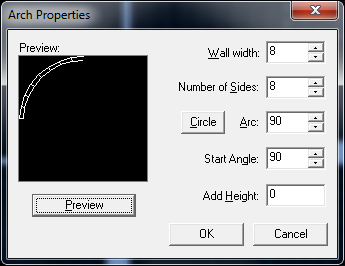
# Press {{key|Enter}} to open the Arch Properties window.[[ | # Press {{key|Enter}} to open the Arch Properties window.[[File:curvedhalls4.png|thumb|400px|center|Change the values to the ones seen here.]] | ||
# Change ''Wall Width'' to '''half''' the width of the walls (if the walls are 16 units wide, enter 8). Change ''Number of Sides'' accordingly: large numbers = smoother, yet many brushes; smaller numbers = blocky, yet fewer brushes. Change ''Arc'' to 90, as this is only a 90 degree hallway. Change ''Start Angle'' to 90. This determines where the arch will begin. Leave ''Add Height'' alone for now. Click ''Preview'' to see the result of the input. | # Change ''Wall Width'' to '''half''' the width of the walls (if the walls are 16 units wide, enter 8). Change ''Number of Sides'' accordingly: large numbers = smoother, yet many brushes; smaller numbers = blocky, yet fewer brushes. Change ''Arc'' to 90, as this is only a 90 degree hallway. Change ''Start Angle'' to 90. This determines where the arch will begin. Leave ''Add Height'' alone for now. Click ''Preview'' to see the result of the input. | ||
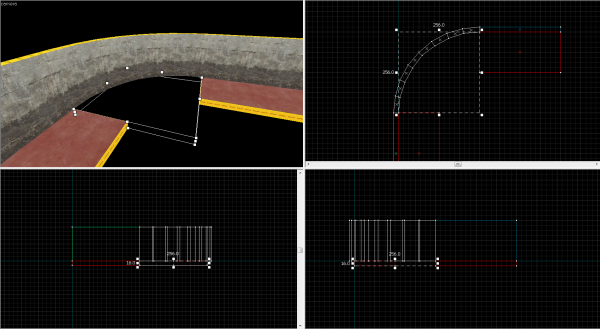
# Press {{key|Enter}} to create the wall. It will be created nearby, so click and drag the curved wall and place it into position.[[ | # Press {{key|Enter}} to create the wall. It will be created nearby, so click and drag the curved wall and place it into position.[[File:curvedhalls5.png|thumb|800px|center|A curved outer wall with texture.]] | ||
# Now move on to the floor. Follow the same steps as above, selecting a floor with {{key|Shift | # Now move on to the floor. Follow the same steps as above, selecting a floor with {{key|Shift|S}} or selecting the {{hammer select}}, then the block tool. Click and drag starting at the outermost corners[[File:curvedhalls6.png|thumb|600px|center]] | ||
# Press {{key|Enter}} to open the Arch Properties window again.[[ | # Press {{key|Enter}} to open the Arch Properties window again.[[File:curvedhalls7.png|thumb|400px|center|Change the values to the ones seen here.]] | ||
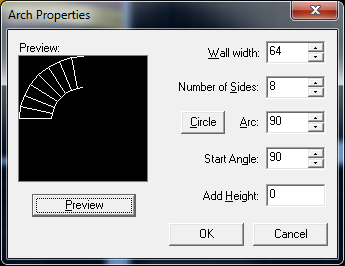
# Change ''Wall Width'' to '''half''' the width of the floor (128 units wide: 128 / 2 = 64). | # Change ''Wall Width'' to '''half''' the width of the floor (128 units wide: 128 / 2 = 64). | ||
# Press {{key|Enter}} to create the floor and drag it into position.[[ | # Press {{key|Enter}} to create the floor and drag it into position.[[File:curvedhalls8.png|thumb|600px|center|A curved floor with texture.]] | ||
# Now move on to the inner curved wall. To make it easier, select one wall and, while holding {{key|Shift}}, drag and drop it on the other side of the floor to create a new wall. Then follow the same steps as above.[[ | # Now move on to the inner curved wall. To make it easier, select one wall and, while holding {{key|Shift}}, drag and drop it on the other side of the floor to create a new wall. Then follow the same steps as above.[[File:curvedhalls9.png|thumb|800px|center]][[File:curvedhalls10.png|thumb|400px|center|Change the values to the ones seen here.]] | ||
# Press {{key|Enter}} to create the inner wall and drag it into position. | # Press {{key|Enter}} to create the inner wall and drag it into position. | ||
# To make things easier, select the curved floor and, while holding {{key|Shift}}, move it up to and drop it to create the curved ceiling.[[ | # To make things easier, select the curved floor and, while holding {{key|Shift}}, move it up to and drop it to create the curved ceiling.[[File:curvedhalls11.png|thumb|600px|center|The finished product with textures.]] | ||
= Elevated curve = | = Elevated curve = | ||
| Line 29: | Line 28: | ||
# Press {{key|Enter}} to open the Arch Properties window. | # Press {{key|Enter}} to open the Arch Properties window. | ||
# Change ''Wall Width'' to 8 and ''Add Height'' should be -16. Using a negative value tells the Arch tool to go in a downward direction. | # Change ''Wall Width'' to 8 and ''Add Height'' should be -16. Using a negative value tells the Arch tool to go in a downward direction. | ||
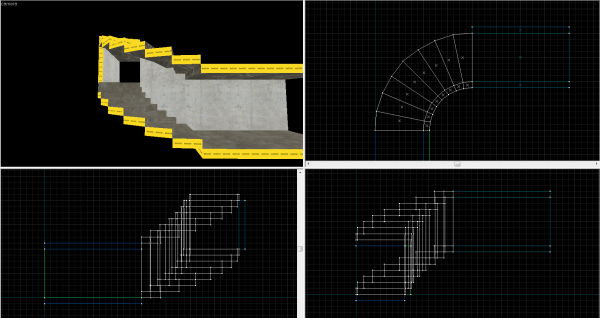
[[File:curvedhalls12.png|thumb|600px|center|An elevated curved hallway. The wall texture was changed to a seamless concrete material to make the transitioned walls appear smoother. The outer wall is hidden to show the finished product.]] | |||
[[ | |||
[[Category:Level Design Tutorials]] | [[Category:Level Design]] | ||
[[Category:Tutorials]] | |||
Latest revision as of 06:03, 12 July 2024
The Hammer Arch tool can create smooth room transitions and break up an otherwise "blocky" design. This tutorial will cover an easy curved hallway.
- In this example, there are two sets of brushes. Two 16-unit wide walls measuring 512 units in length meet at a corner (irrelevant; the corner is clipped to retain the brush length.) The floor matches the length and is 128 units wide.
Standard curve
- Clip both brushes in half at their central point using their helpers (X) and remove the corners. This will leave the brushes measuring 256 units in length.
- Press ⇧ Shift+B or select the Block tool
 , and select arch from the Objects drop-down box in the Objects bar.
 - While one of the walls are selected, begin dragging from one outermost corner to the other outermost corner.
- Press ↵ Enter to open the Arch Properties window.
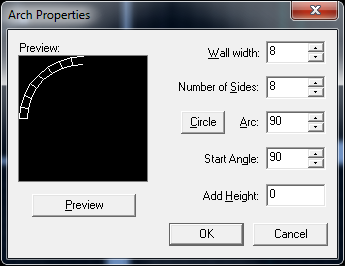
- Change Wall Width to half the width of the walls (if the walls are 16 units wide, enter 8). Change Number of Sides accordingly: large numbers = smoother, yet many brushes; smaller numbers = blocky, yet fewer brushes. Change Arc to 90, as this is only a 90 degree hallway. Change Start Angle to 90. This determines where the arch will begin. Leave Add Height alone for now. Click Preview to see the result of the input.
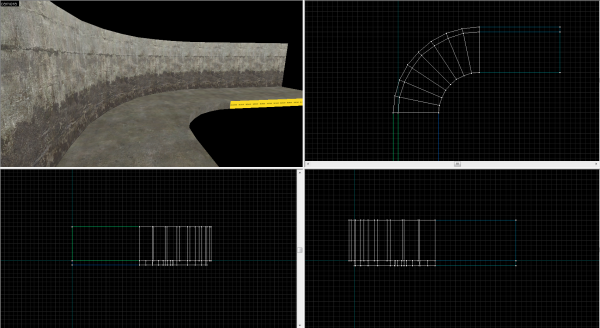
- Press ↵ Enter to create the wall. It will be created nearby, so click and drag the curved wall and place it into position.
- Now move on to the floor. Follow the same steps as above, selecting a floor with ⇧ Shift+S or selecting the Selection tool
 , then the block tool. Click and drag starting at the outermost corners
 - Press ↵ Enter to open the Arch Properties window again.
- Change Wall Width to half the width of the floor (128 units wide: 128 / 2 = 64).
- Press ↵ Enter to create the floor and drag it into position.
- Now move on to the inner curved wall. To make it easier, select one wall and, while holding ⇧ Shift, drag and drop it on the other side of the floor to create a new wall. Then follow the same steps as above.
- Press ↵ Enter to create the inner wall and drag it into position.
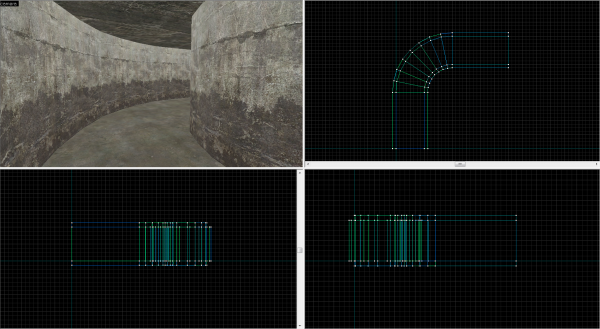
- To make things easier, select the curved floor and, while holding ⇧ Shift, move it up to and drop it to create the curved ceiling.
Elevated curve
- Begin with step 1 of the Standard curve tutorial above. Halve the brushes at 256 units in length. In this tutorial, the top right set of brushes will be elevated (Z-axis) 128 units.
- Select the outer wall of the top right set of brushes and, same as before--yet opposite direction, drag from the outermost corner of the upper wall to the outermost corner of the lower wall.
- Press ↵ Enter to open the Arch Properties window.
- Change Wall Width to 8 and Add Height should be -16. Using a negative value tells the Arch tool to go in a downward direction.
