Itemtest: Difference between revisions
No edit summary |
No edit summary |
||
| (28 intermediate revisions by 15 users not shown) | |||
| Line 1: | Line 1: | ||
{{LanguageBar}} | |||
{{TF2 topicon}} | |||
'''Itemtest''' is a utility for easily compiling a standard .obj and .[[TGA|tga]] file into a format that can be published to the steam workshop. | |||
It automatically generates a .zip archive containing .[[MDL|mdl]], .[[VTF|vtf]] .[[vmt]], .[[dmx]] and .[[qc]] files. | |||
It's possible for the creator of the model to sell their item on the Steam workshop. | |||
[[ | {{note|At this time only [[Team Fortress 2]] supports the Itemtest Tool.}} | ||
{{Bug|If you run this without TF2 installed and run episode 2 or any ep2 based game the flashlight instead will be replaced with a [] square. The only to resolve this is to restart your computer, the cause of this bug is unknown.}} {{confirm|if this is really the cause and solution to this issue}} | |||
[[ | To get it on your machine, you must first install and run the [[Source SDK]] from the tools section in your Steam library. See [[SDK Installation]] for more details. | ||
==Itemtest Editor== | == Itemtest Editor == | ||
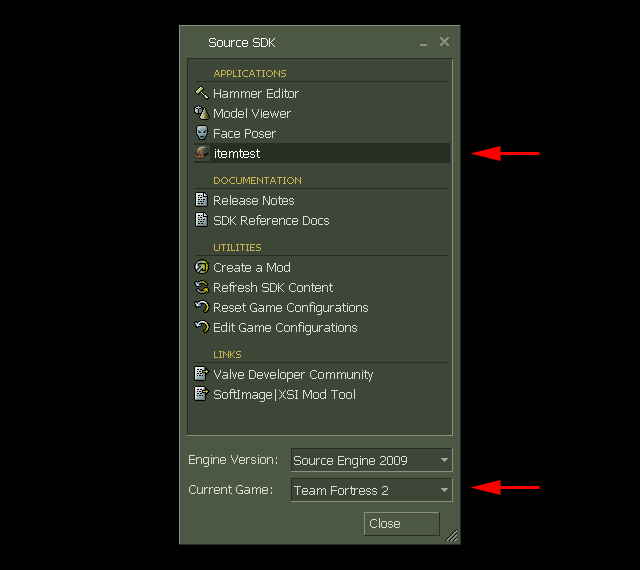
This brings up the SDK application launcher. You should see itemtest in the list. Be sure to set the current game the installed game you wish to submit your item to. For this example we'll assume Team Fortress 2. | |||
[[File:itemtest_image_01.png|bottom|640px]] | |||
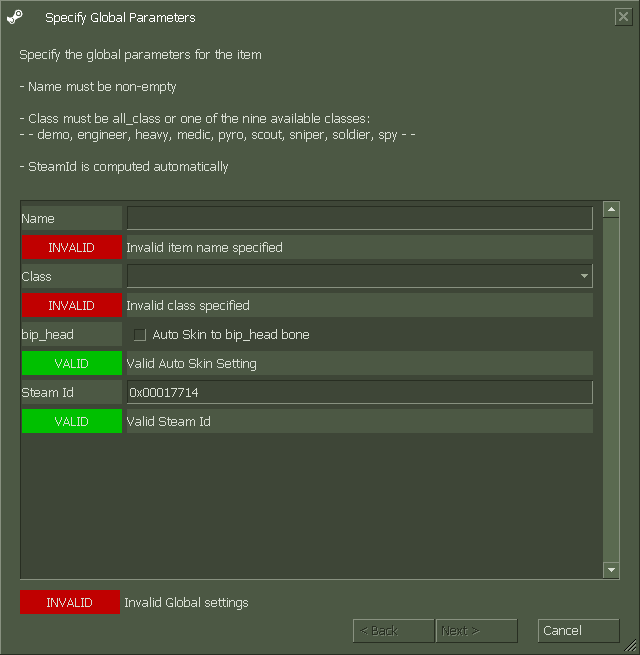
When the item test first launches, there are a series of empty forms to fill out. A red box mean that form is invalid. | |||
[[File:itemtest_image_02.png|bottom|640px]] | |||
[[ | |||
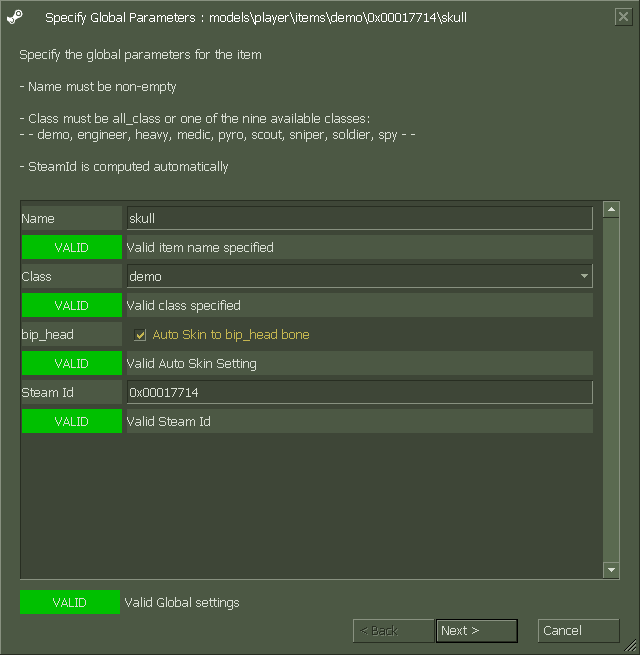
Set the item a name, this will be the asset name the game uses. | Set the item a name, this will be the asset name the game uses. | ||
| Line 27: | Line 26: | ||
You will not be able to press next if one of the forms is invalid. | You will not be able to press next if one of the forms is invalid. | ||
[[ | [[File:itemtest_image_03.png|bottom|640px]] | ||
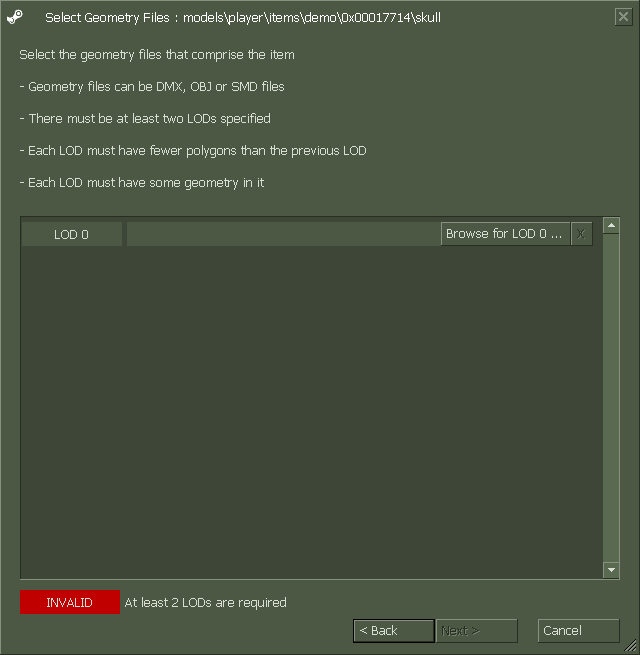
Select the Geometry files. | Select the Geometry files. | ||
Click the "browse for lod0" button. This will bring up a file browser for you to browse to the location of your .obj 3d model file. "lod0" is the model that will be seen when you are close up to the character. | Click the "browse for lod0" button. This will bring up a file browser for you to browse to the location of your .obj 3d model file. "lod0" is the model that will be seen when you are close up to the character. | ||
[[ | [[File:itemtest_image_04.png|bottom|640px]] | ||
Even though you have selected your model, the forms are still invalid, this is because you MUST create at least one level of detail. | Even though you have selected your model, the forms are still invalid, this is because you MUST create at least one level of detail. [[LOD Models]] are a low resolution version of your model (lod1) to be seen from a distance. This model must be less polygons than lod0 and use the same texture (we usually remove at least half the polygons of lod0). | ||
Once all forms are valid, click next | Once all forms are valid, click next. | ||
[[ | [[File:itemtest_image_05.png|bottom|640px]] | ||
Select the Texture files. | Select the Texture files. | ||
Set | Set whether the item is a primary, secondary or melee weapon. Hats are primary. | ||
[[ | [[File:itemtest_image_06.png|bottom|640px]] | ||
Choose the texture you want for the color of your model. | Choose the texture you want for the color of your model. Your model must have at least a color texture. | ||
Optionally you may choose a normal map. If so then set how you would like those alpha textures to be used (specular, paintable, nothing, etc.) | |||
Once all forms are valid, click next. | |||
[[ | [[File:itemtest_image_07.png|bottom|640px]] | ||
To compile your model press the compile button! | To compile your model press the compile button! | ||
[[ | [[File:itemtest_image_08.png|bottom|640px]] | ||
If you have done everything right, the items should have compiled. It's a good idea to press the " | If you have done everything right, the items should have compiled. It's a good idea to press the "Dismiss and Continue button" and check that your model has compiled properly. | ||
Press the "Launch HLMV" button. | Press the "Launch HLMV" button. | ||
[[ | [[File:itemtest_image_09.png|bottom|640px]] | ||
Your model is almost ready to publish! | Your model is almost ready to publish! | ||
To find the .zip you will be publishing and testing in the itemtest map, press "Explore to the models directory" button. It's a good idea to copy the path so you can use it from the in game publishing tool* | To find the .zip you will be publishing and testing in the itemtest map, press "Explore to the models directory" button. It's a good idea to copy the path so you can use it from the in-game publishing tool* | ||
* | *You'll need this location later... | ||
It's also a good idea to save a snapshot of your model from HLMV at this point. | It's also a good idea to save a snapshot of your model from HLMV at this point. You'll want to upload it when you publish. | ||
Now it's time to launch Team Fortress 2 and see what your item looks like in the game!! | Now it's time to launch Team Fortress 2 and see what your item looks like in the game!! | ||
To do this, press the "Steam Workshop" button in the main | To do this, press the "Steam Workshop" button in the main Team Fortress 2 menu. | ||
[[ | [[File:Itemtest_image_9.1.jpg|bottom|640px]] | ||
Press the "Load Test Map" button to enter the game in itemtest mode. | Press the "Load Test Map" button to enter the game in itemtest mode. | ||
[[ | [[File:Itemtest_image_9.2.jpg|bottom|640px]] | ||
[[ | [[File:Itemtest_image_9.3.jpg|bottom|640px]] | ||
Once you are in the itemtest map, press the f7 key to bring up the item testing menu. | Once you are in the itemtest map, press the f7 key to bring up the item testing menu. | ||
[[ | [[File:Itemtest_image_9.4.jpg|bottom|640px]] | ||
Select the class and type of item you wish to equip. | Select the class and type of item you wish to equip. Click the add button on the headgear row. | ||
[[ | [[File:Itemtest_image_9.5.jpg|bottom|640px]] | ||
Click the browse button and select your compiled .mdl file. | Click the browse button and select your compiled .mdl file. | ||
*... | *...Remember when I said you'll need this location later? | ||
[[ | [[File:Itemtest_image_9.6.jpg|bottom|640px]] | ||
Choose the equip options for your item, be sure to hide intersecting parts of the characters if needed. | Choose the equip options for your item, be sure to hide intersecting parts of the characters if needed. | ||
[[ | [[File:Itemtest_image_9.7.jpg|bottom|640px]] | ||
Now you're finally ready to see the item in-game!! But only on your local machine at this point, press the "Apply Test Items" button. | |||
[[File:Itemtest_image_9.8.jpg|bottom|640px]] | |||
Once you're happy with how it looks on the character, press the "Steam Workshop" button. | |||
[[File:itemtest_image_10.png|bottom|640px]] | |||
Title will be the name the item has in the store and in the | Title will be the name the item has in the store and in the Steam workshop. | ||
Description is a short sentence that makes people want to buy your item. | Description is a short sentence that makes people want to buy your item. | ||
Browse for a preview image that will be seen in the store (snapshots from HLMV are common) | Browse for a preview image that will be seen in the store (snapshots from HLMV are common) | ||
Browse for the .zip file that itemtest created. | Browse for the .zip file that itemtest created. | ||
When you are ready for the world to see your item, push the publish button! | When you are ready for the world to see your item, push the publish button! | ||
[[ | [[File:itemtest_image_11.png|bottom|640px]] | ||
Good luck! Tell your friends about your submission to help it get Valve's attention for consideration in the store! | |||
== External links == | |||
* [http://steamcommunity.com/workshop Steam Workshop site] | |||
[[Category:Team Fortress 2]] | |||
[[Category:Modeling]] | |||
[[Category:Tools]] | |||
Latest revision as of 07:47, 7 September 2024
Itemtest is a utility for easily compiling a standard .obj and .tga file into a format that can be published to the steam workshop. It automatically generates a .zip archive containing .mdl, .vtf .vmt, .dmx and .qc files. It's possible for the creator of the model to sell their item on the Steam workshop.
To get it on your machine, you must first install and run the Source SDK from the tools section in your Steam library. See SDK Installation for more details.
Itemtest Editor
This brings up the SDK application launcher. You should see itemtest in the list. Be sure to set the current game the installed game you wish to submit your item to. For this example we'll assume Team Fortress 2.
When the item test first launches, there are a series of empty forms to fill out. A red box mean that form is invalid.
Set the item a name, this will be the asset name the game uses. Choose which class the item will be for, i.e. pyro. If it is a hat, check the box to skin it to the head bone. Once all the forms are valid, press next. You will not be able to press next if one of the forms is invalid.
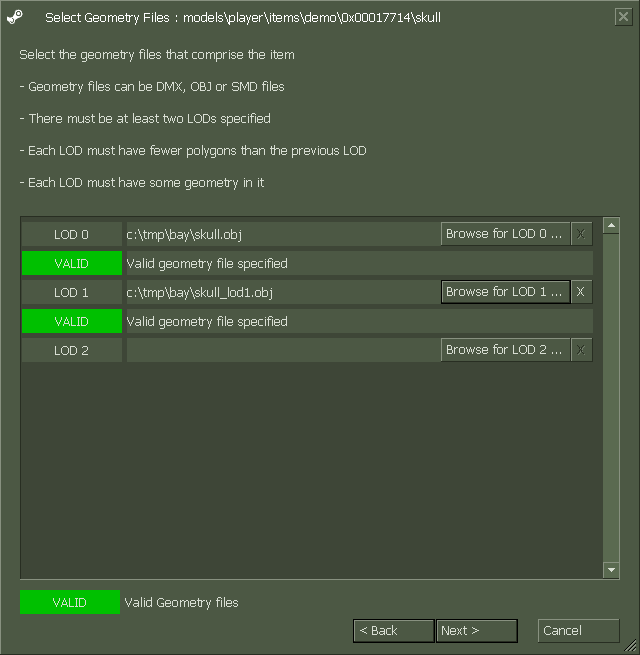
Select the Geometry files. Click the "browse for lod0" button. This will bring up a file browser for you to browse to the location of your .obj 3d model file. "lod0" is the model that will be seen when you are close up to the character.
Even though you have selected your model, the forms are still invalid, this is because you MUST create at least one level of detail. LOD Models are a low resolution version of your model (lod1) to be seen from a distance. This model must be less polygons than lod0 and use the same texture (we usually remove at least half the polygons of lod0).
Once all forms are valid, click next.
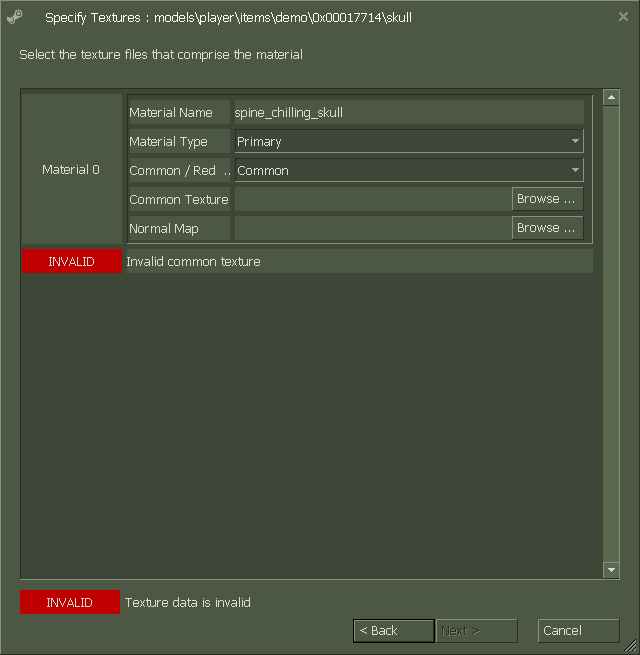
Select the Texture files. Set whether the item is a primary, secondary or melee weapon. Hats are primary.
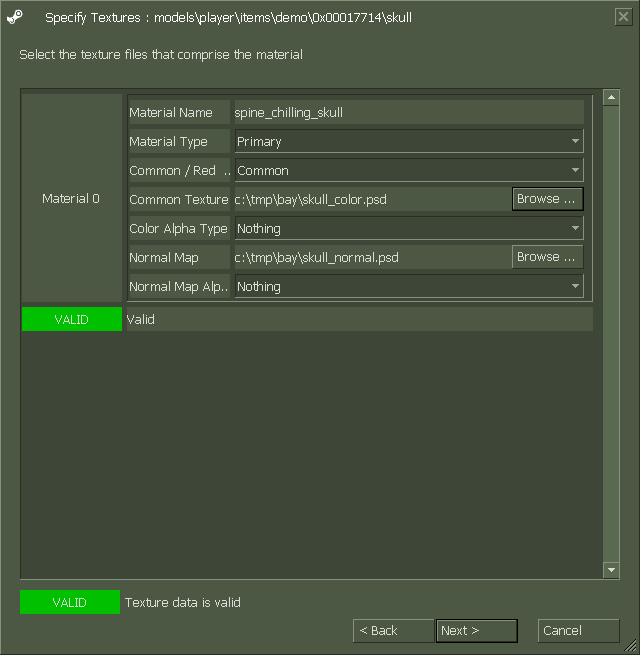
Choose the texture you want for the color of your model. Your model must have at least a color texture. Optionally you may choose a normal map. If so then set how you would like those alpha textures to be used (specular, paintable, nothing, etc.) Once all forms are valid, click next.
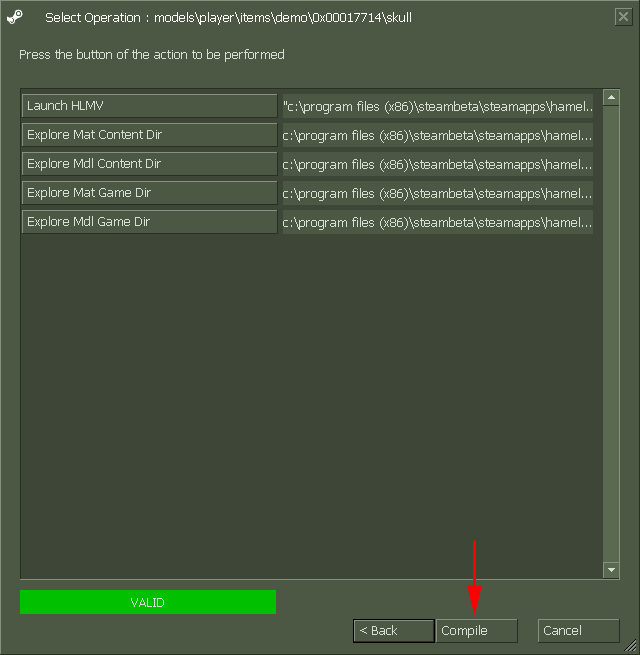
To compile your model press the compile button!
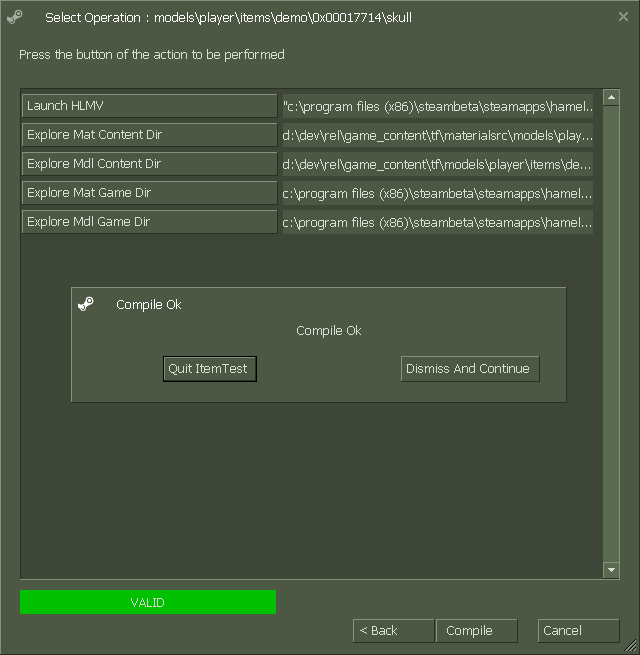
If you have done everything right, the items should have compiled. It's a good idea to press the "Dismiss and Continue button" and check that your model has compiled properly. Press the "Launch HLMV" button.
Your model is almost ready to publish!
To find the .zip you will be publishing and testing in the itemtest map, press "Explore to the models directory" button. It's a good idea to copy the path so you can use it from the in-game publishing tool*
- You'll need this location later...
It's also a good idea to save a snapshot of your model from HLMV at this point. You'll want to upload it when you publish.
Now it's time to launch Team Fortress 2 and see what your item looks like in the game!!
To do this, press the "Steam Workshop" button in the main Team Fortress 2 menu.
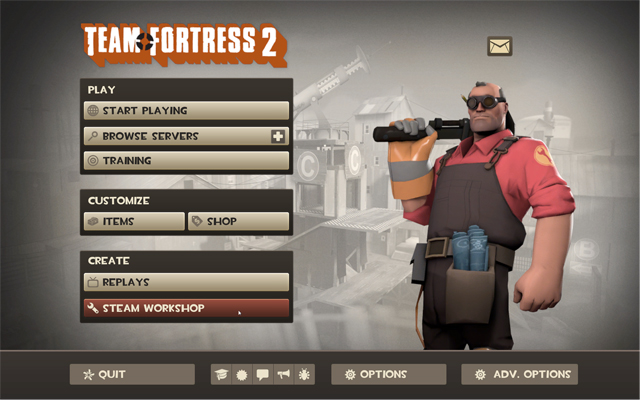
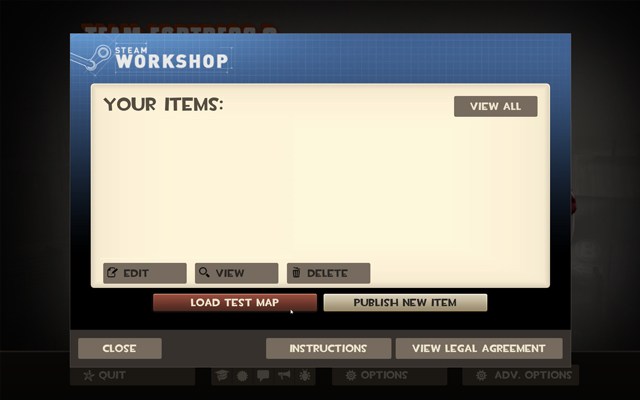
Press the "Load Test Map" button to enter the game in itemtest mode.
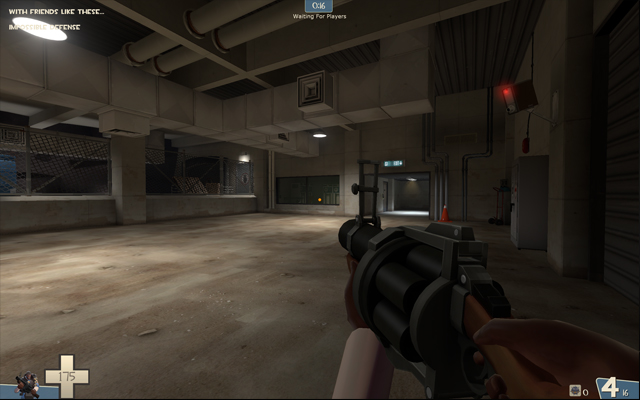
Once you are in the itemtest map, press the f7 key to bring up the item testing menu.
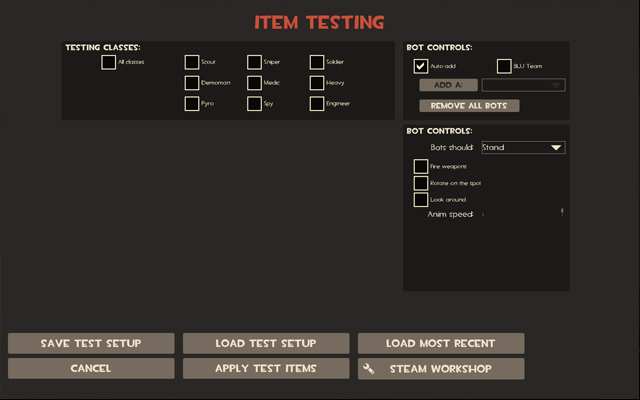
Select the class and type of item you wish to equip. Click the add button on the headgear row.
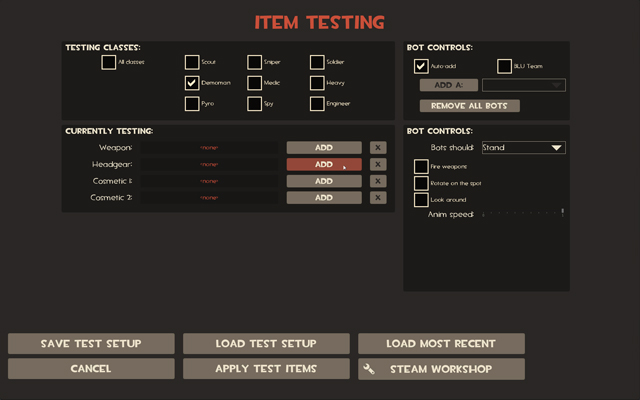
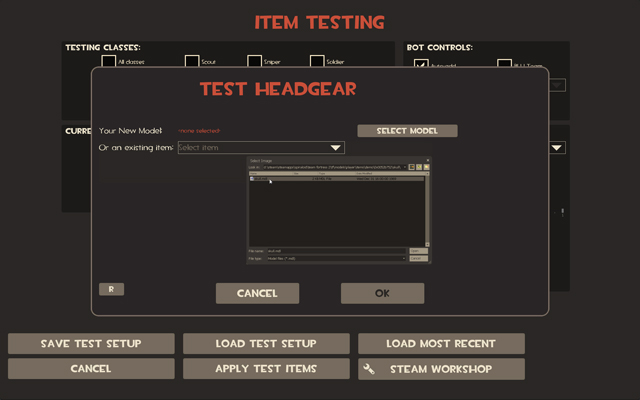
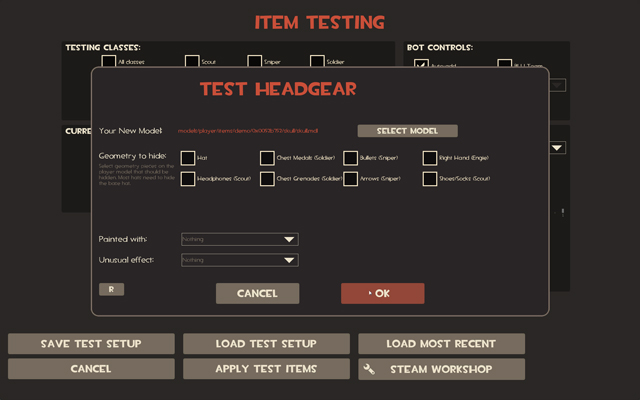
Click the browse button and select your compiled .mdl file.
- ...Remember when I said you'll need this location later?
Choose the equip options for your item, be sure to hide intersecting parts of the characters if needed.
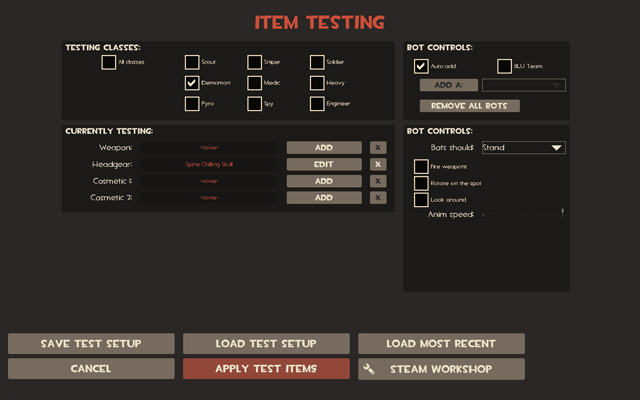
Now you're finally ready to see the item in-game!! But only on your local machine at this point, press the "Apply Test Items" button.
Once you're happy with how it looks on the character, press the "Steam Workshop" button.
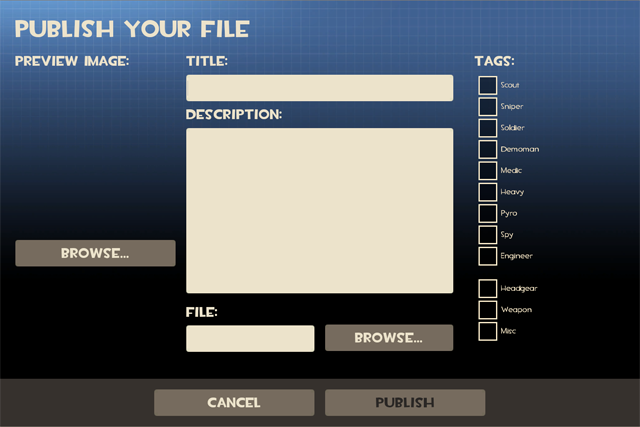
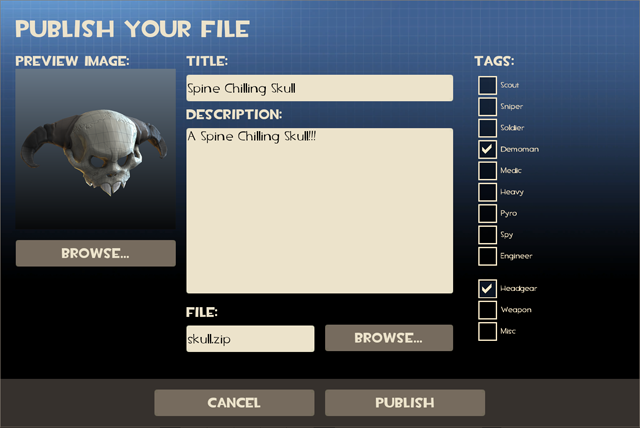
Title will be the name the item has in the store and in the Steam workshop. Description is a short sentence that makes people want to buy your item. Browse for a preview image that will be seen in the store (snapshots from HLMV are common) Browse for the .zip file that itemtest created. When you are ready for the world to see your item, push the publish button!
Good luck! Tell your friends about your submission to help it get Valve's attention for consideration in the store!
