Rendering In VR
Video tutorial:
For the full guide, see the following video: https://www.youtube.com/watch?v=dres21tAHrA The following steps are a breakdown and compendium to the video:
Guide
SFM Setup:
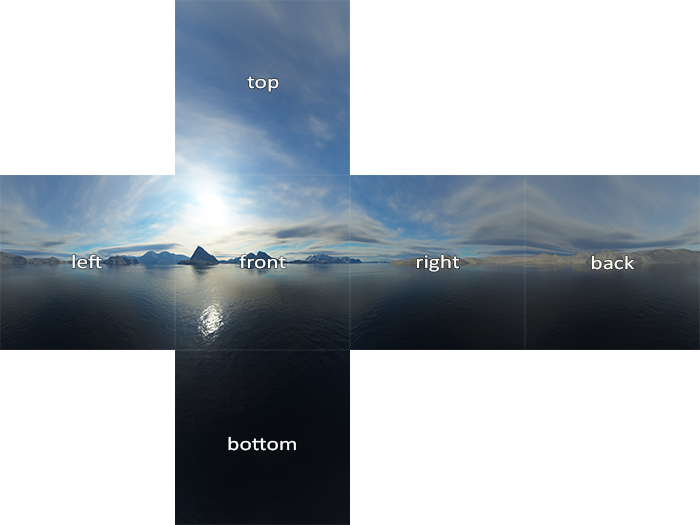
- Create a camera, right-click on the FOV slider, and change the range maximum to 106.25
- Set the FOV to maximum
- Set each of the rotional values to 0 (It will still show a garbled mess of numbers, but that's okay)
- Name this camera Cam_Front
- Duplicate the camera, and change the last rotation value to 90
- Rename the camera to Cam_Right
- Repeat this process until you have a front, back, left, right, up, down camera.
- Create a small prop of some kind, and parent the cameras to it, then zero out their position values to snap them in to place. This is the same procedure you'd use to put a hat on a character.
- Lock the cameras position to the objects position. So now this object will act as a "root controller" for all of your cameras.
- Lock your cameras, so you can't accidentally move them.
- Now you're free to move the camera prop wherever you like. It's advised to not rotate the camera on the rolling axis.
- When you're done, you'll need to render out EACH camera. For ease of use, put them in folders named "Left, Right, Up, Down, Front, Back"
Optional: Enable stereoscopic mode in the rendering box to get a seperate file for the left/right eyes (File > Export > Movie > More Options > Layoff Settings Tab > Render Stereoscopic). Do not use the side/side option. From my experimenting using a VR headset, the convergence/depth is fine as is and doesn't need tweaking. So just enable this option and that's alls you need to do for now.
1:1 Image aspect ratio setup:
- The images need to be cropped to a 1:1 aspect ratio. Use your favorite video software to do this. Such as Davinchi Resolve, which is free. You want to export to a 1:1 aspect ratio file (eg: 2048x2048px) and have the sides cropped off for each camera view.
Optional: If you're comfortable with Blender, you may be able to skip this step and instead re-UV the cube to have 1:1 UVs. I haven't tested this yet myself, but I assume it's a workable solution to avoid having to re-render 1:1 videos.
Equirectangular Setup (360 video):
Now we need to convert the separate images into a equirectangular image (a 360 image). I recommend using the pre-made Blender file as shown in the video tutorial, that way you will avoid seams. Otherwise, you can use a software to stitch the separate views into a Cubemap such as Adobe After Effects and then convert that to a equirectangular, but doing it that way may produce seams, especially in 3D videos.
3D Video:
It's recommended you also make the video 3D. Users with 3D displays, Google cardboard, mobile headsets, 3D glasses, or VR headsets, will be able to see your video in 3D. Users without it, or using their mobile phones in regular mode, will only see the Left eye image. So there's no downside to doing this.
- Make sure you actually rendered each camera with the 3D option enabled. (File > Export > Movie > More Options > Layoff Settings Tab > Render Stereoscopic)
- Follow the above steps to produce both a left and a right eye image/video.
- Using your favorite video editing software, create a canvas that is the same height as the width of your equirectangular video, to make a square video. Eg: 4096x4096px.
- Place the left eye image on the top of the canvas, and the right eye image on the bottom.
- Render the video, it's recommended to render it in H265 codec, with a very high or maximum variable bitrate.
Metadata:
The video needs to have metadata assigned to it to tell Youtube/Video players what kind of video it is.
- Download and run the following tool: https://github.com/google/spatial-media/releases/tag/v2.1
- Run the tool, open your video using it, and check "My video is spherical (360)". If you made a 3D video, also check the "My video is stereoscopic 3D (top/bottom layout).
- Click Inject metadata to save your video.
Previewing your video:
Use the following free software to preview your VR video without having to use a headset: http://www.kolor.com/gopro-vr-player/download/ Optional: Upload it to YouTube as a PRIVATE video (Don't want to spoil it for your fans!) and use your mobile phone and/or VR headset to look around the virtual world once it's uploaded.