State Machine Nodes:ru
This page either contains information that is only partially or incorrectly translated, or there isn't a translation yet.
If this page cannot be translated for some reason, or is left untranslated for an extended period of time after this notice is posted, the page should be requested to be deleted.
Also, please make sure the article tries to comply with the alternate languages guide.
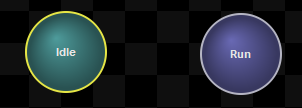
State machines are the primary means of controlling animations in the graph. They allow users to create logic that changes which branch of the graph is active based on multiple settings passed in from the game and from within the graph itself. Double-click on a State Machine node to open the State Machine editor.
States
Each state in the State Machine corresponds to an input plug on the state machine node.
Create new states from the right-click menu in the state machine editor.
State Properties
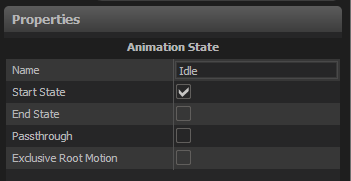
- Start State: Each state machine must have exactly one state set as the start state. This is state that is active when the node is first run or when the node is reset.
- End State: Indicates a state represents a logical end to the action that the state machine is controlling. If the child node of the current state is "finished" (for example a non-looping animation clip has reached the end), and the current state is an End state, then the state machine is also considered "finished". This will allow state machines further up the graph hierarchy to check whether their child node is "finished" even if that node is also a state machine.
- Passthrough: Normally when a state becomes the current state of the state machine it waits until the next update before it checks to see if it can transition to another state. If the Passthrough option is enabled, then the state will check its transitions right away without waiting for the next update.
- Exclusive Root Motion: Normally when control passes from one state to another, the animation and root motion of the child nodes are cross-fade blended from the old state to the new state. Enabling the Exclusive Root Motion option will cause the state machine to use 100% of the new state's root motion without blending, even while the animations are still blended.
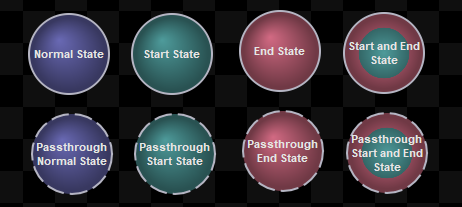
Note that states can be any combination of Start, End, and Passthrough
State Tags
AnimTags can be placed on states just as they can on animations. There are several options for when the tags are activated:
- While Current: The tag is active the entire time the state is active. Listeners will receive a Tag Started notification when the state becomes active, and a Tag Ended notification when the state is no long active
- On Enter: The tag is active only for the update that the state first becomes active
- On Exit: The tag is active only during the update the state exits.
- On Enter and Exit: The tag fires when the state is entered and exited, but not in between
Caution!
Since state machines can be at multiple levels in the graph hierarchy, it is possible that a state machine can enter a state but not exit it cleanly because a state machine higher up the hierarchy switched away from it. When this happens, any tags set to fire when the state exits will not get fired.
For this reason, it is best to use the "While Current" option, because the system will take care of notifying listeners that the tag is no longer active, even if the state machine that made the tag active is no longer part of the active branch of the graph.
Transition Order
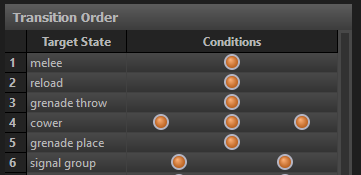
This section lists all of the transitions leaving the selected state, and allows the user to specify their order. This is important because states will check each transition to other states in order, and take the first one where all the conditions are met. Transitions at the bottom of the list may be valid for the state to choose, but if one higher in the list is also valid the later ones will never be checked.
Click and drag on the name of the target state to change the order of a transition.
Transitions
Transitions define which states can jump to which other states, and the settings for blending from one state to another. To create a transition, right-click and drag from the source state to the target state. To change target states, click on the arrow and drag it to the new target.
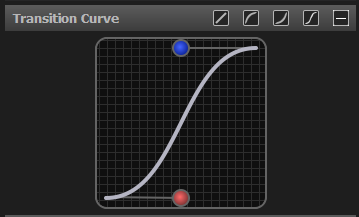
When blending from one state to another use the Transition Curve UI to optionally define a curve for the blend. Use the buttons to select a common curve shape or drag the blue and red handles to manually adjust the shape of the curve.
Conditions
Conditions are small pieces of logic that compare the values of one setting to another. If all the comparisons of all the conditions for a transition are true, then the transition is activated and the State Machine changes states.
With a transition selected, click the plus button ![]() in the Conditions section of the transition's properties in the Property Editor panel to display the list of available condition types and add one to the transition. Transitions can have 0 or more conditions.
in the Conditions section of the transition's properties in the Property Editor panel to display the list of available condition types and add one to the transition. Transitions can have 0 or more conditions.
Conditions all have 3 sections:
- The first section is the specific thing you want to compare. This is usually the name of a value from elsewhere in the graph. For example it could be a parameter, the desired movement speed, or whether or not the character has a valid path.
- The second section is the comparison operation to perform. The choices here depend on the type of value that is being compared, but can be any of these:
- == "Equals"
- != "Does Not Equal"
- < "Is Less Than"
- > "Is Greater Than"
- <= "Is Less Than or Equal To"
- >= "Is GreaterThan or Equal To"
- The third section is the value to test against. In most cases this is a specific value set by the user, but it can also be another variable value defined in the graph.
To change a value within each section, just click on it to reveal a dropdown of the options.
