Creating Flex VTA files with 3D Studio Max
This tutorial will show you how to export face flex data from 3D Studio Max as a VTA file. It is mostly centred around the VTA exporter created by Wunderboy but with some details on using Cannonfodder's exporter for older versions of 3D Studio Max.
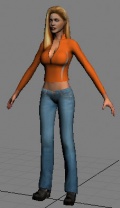
For this tutorial we are going to be using the Candy character model from the game Dinohunters. This model is based on the standard HL2 female skeleton rig and uses the basic 35 facial shapekeys.
Getting Started
To make face flexes in 3DS Max we need to create a number of morph targets. Before you start it is best practice to complete your model so that it's ready to go into your game. This means that you've finished the modelling, UVW mapping, rigging and done a test export and compile to ensure you are happy with the results.
Create the morph targets
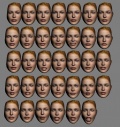
Each face flex expression that you see in HLMV or faceposer is a combination of individual facial shapekeys. This are mixed and combined via QC commands when you compile your model. The Candy model uses the 35 standard shapekeys defined by Valve for humanoid faces.
To create a shapekey, you need to clone the mesh of your model that makes up the face. You should make a full copy and not an instance or reference. Name it something useful (such as 01_blink) to make it easy to recognise when using the modifier.
Now you have your copy, you should edit the mesh by moving the vertices so that the facial expression represents your target shapekey.
Repeat this process until you have created as many shapekeys as you need. In this case we have 34 copies and the default face mesh representing the reference shapekey.
Creating the flex animation
A VTA file stores the position of every vertex in a mesh for frame 0 (the reference frame) and from then on any changes in their position per frame. When compiling we access each shapekey by its frame number in the VTA file. The next step is to apply our shapekeys to our reference mesh and assign them to the correct frame.
Select the original mesh which you created your morph targets from and add a Morpher modifier to the top of the stack. Next, press the Load Multiple Targets... button and select all of the morph targets you made. This will load them all into the modifier ready to be applied.
Next, we need to set our animation range to equal the number of shapekeys we have. In this case we set our animation to 35 frames with 0 being the first frame and 34 the last.
Frame 0 is our reference frame so we should move the frame slider across to frame 1 ready to set our first shape key. Turn on Auto Key mode so that we are in animation mode.
In the Morpher modifier channel list, press the arrows so that our first shapekey, 01_blink has the value 100.0. This tells Max to apply 100% of that shapekey for this frame. You'll notice that the value select arrows have a small red border now and that a grey box has appeared under the frame slider indicating that a keyframe has been set.
Next, move to frame 2 and repeat the process. This time adjust the shapekey 02_eye top up so that it has a value of 100.00. You'll notice that 01_blink is still at 100.0; reduce this value back down to 0.0 for this frame.
The important next step here is to remove any tweening that has occurred between frames. If you now move the frame slider back to frame 1 you'll see that 02_eye top up has a value of 50.0. This is because Max is trying to tween the value up to 100.0 on frame 2 from it's original value of 0.0 on frame 0. You should correct this by making sure that 02_eye top up has a value of 0.0 on every frame except frame 2 which is the frame for which it applies.
Repeat the above process for each frame, setting the value for your morph target to 100.0 for it's corresponding frame. When you are done, dolly along the frame slider and check that for each frame that a morph target has a value of 0.0 or 100.0. Anything else means that two or more morph targets have been mixed which will result in a bad flex animation.
Character Facial Animation Shapekey Set should be your guide for every standard flex, their frame order and name.
Exporting the VTA
Now that your shapekeys and morph targets are done, you can write out the VTA file.
Wunderboy's VTA Exporter
- Un-hide and select all of your bones and the base mesh to which the Morpher modifier applied.
- From the File menu choose Export Selected.
- Choose the "Source Vertex Animation (VTA)" file format and choose a filename and destination.
- Choose a sub-range of the animation to export (optional).
- Press O.K.
Cannonfodder's VTA Exporter
- Unhide all of your bones used by the base mesh.
- Delete everything in your scene except the bones and the base mesh to which the Morpher modifier applied. If you don't then your VTA will contain vertex data for all meshes in your scene.
- From the File menu choose Export.
- Choose the "Valve VTA (VTA)" file format and choose a filename and destination.
You should now have a VTA file ready to go for your character.
Using the VTA
How to incorporate this flexes into your character is a little out of scope for this article but here is a quick overview.
A good place to look for reference is the sample male character in the sourcesdk_content\hl2\modelsrc\humans_sdk\Male_sdk folder of the SDK. This is a standard HL2 NPC which uses the 34 standard shapekeys.
If you look at the QC file (Male_06_sdk.qc) You'll notice the following:
$model male_06 "male_06_reference.smd"{
	eyeball righteye "ValveBiped.Bip01_Head1" -1.2711 -4.2197 67.5593 "eyeball_r" 1 4 "pupil_r" 0.63
	eyeball lefteye "ValveBiped.Bip01_Head1" 1.3572 -4.2197 67.5514 "eyeball_l" 1 -4 "pupil_l" 0.63

	eyelid  upper_right "male_06_expressions" lowerer 1 -0.2621 neutral 0 0.1287 raiser 2 0.2467 split 0.1 eyeball righteye
	eyelid  lower_right "male_06_expressions" lowerer 3 -0.3409 neutral 0 -0.2156 raiser 4 -0.0736 split 0.1 eyeball righteye
	eyelid  upper_left "male_06_expressions" lowerer 1 -0.2621 neutral 0 0.1287 raiser 2 0.2467 split -0.1 eyeball lefteye
	eyelid  lower_left "male_06_expressions" lowerer 3 -0.3409 neutral 0 -0.2156 raiser 4 -0.0736 split -0.1 eyeball lefteye

	mouth 0 "mouth" "ValveBiped.Bip01_Head1" 0 1 0     // mouth illumination

	flexfile "male_06_expressions" {
		$include "../standardflex_xsi.qci"
	}

	$include "../facerules_xsi.qci"
	$include "../bodyrules_xsi.qci"
}
The parts we are interested in is the flexfile defintion. This tells us the name of our VTA files (male_06_expressions.vta) and to include the standard flexes defintion file, standardflex_xsi.qci.
The standard flex file defines each shapekey with a name and what frame of the VTA it uses, for example:
defaultflex frame 20		// baseline mouth closed expression
flex "AU42" frame 5		// eyes	half_closed
The second inclusion is of facerules_xsi.qci which is what sets up our flex controllers and combine shapekeys to create those specific flexes.
For the most part, using these two files from the Source SDK will get you up and running the quickest as they define a set of standard flexes used by most characters in the HL2 world. This will make drop-in replacement of characters much easier.
Eye set-up is covered in the article Eye Position Set-up.
External links
- Wunderboy's VTA Exporter - VTA Exporter for 3D Studio Max 9,2008-2012,2017-2018.
- Cannonfodder's VTA Exporter - VTA Exporter for 3D Studio Max 5, 6, 7 & 8.
- Wall Worm VTA - Wall Worm exports VTA files using Wunderboy or WW VTA tools in 3ds Max 9 through 3ds Max 2013 .


