Payload Design Theory
This article will cover the gameplay side of creating a payload map: what elements are used where and how to make the map fun and balanced for both teams.
Introduction
The TF2 Design Theory article gives a good description of how a payload map is unique:
"Payload has many similarities to CP assault, but also some subtle differences. The biggest is that the objective area doesn't leap from one area to another as it does in CP: the bomb trundles steadily, meaning that attackers can't ninja cap the next point before the defenders are ready. This removes the temptation some players feel to defend a locked point 'just in case'."
The article also makes the point that the bomb is a clear focal point at all times: the Blu team will attempt to push the bomb towards the checkpoints, while the Red team will move their defence in order to combat where the bomb is at any given time. Generall, it will be the centre of conflict between the two teams.
The Payload Track
Because of the linear nature of a Payload map, the route that your bomb track takes will be where the majority of combat will happen and the main route that players take. Since this route is largely predictable, the areas surrounding the track will need to provide possibilities for different classes to function.
Checkpoints
Checkpoints should generally be considered similar to control points: they will be the hotspots for combat. In Badwater Basin, Valve have used each checkpoint along the bomb's path as the focal point for the Red team, using the surrounding geometry to allow advantages for different classes.
Checkpoint 1
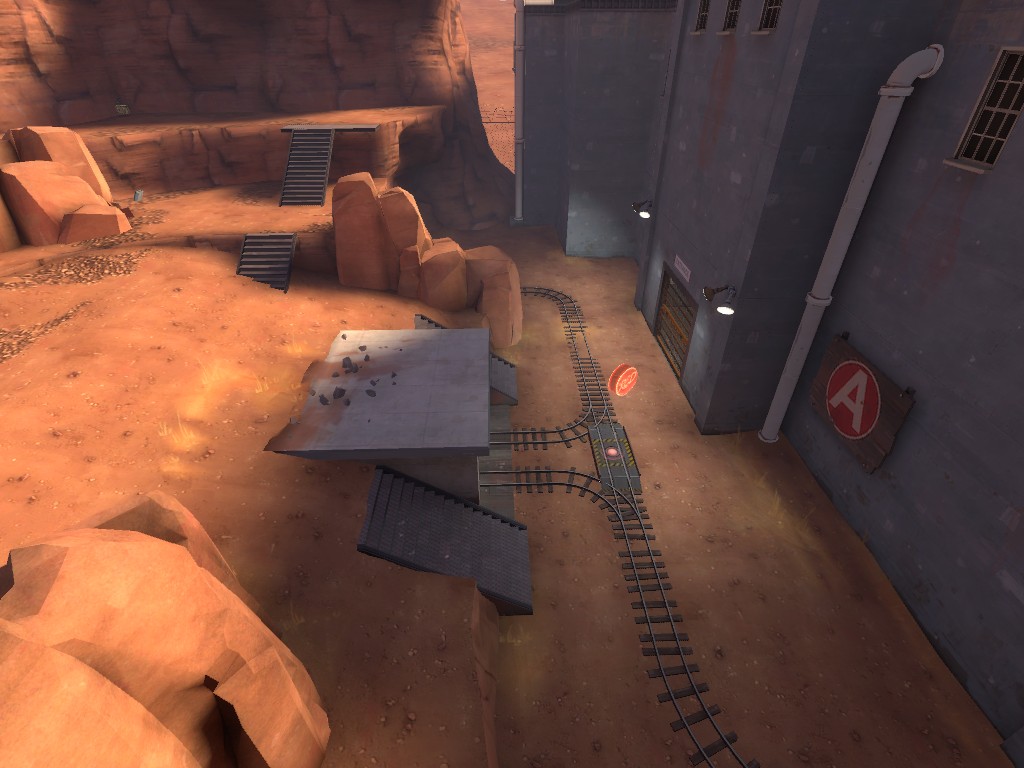
In the screenshot, we can see that the checkpoint has been placed directly in front of the enclosed space of the doorway, allowing Red engineers to build sentry nests there in order to protect the checkpoint. There are also raised cliffs and some health/ammo pickups to allow both teams to launch assaults from above (if there are still Red players present on the cliffs at this point).
Generally, Blu have the largest space from which to attack; while they can use the whole width of the cliff tops, any Red players are limited to entering the combat arena from the "corridor" on the right. Teleports can be used to transport Red players, for example, into the enclosed doorway area in the side of the cliff, but once destroyed it is difficult for these to be rebuilt.
Checkpoint 2
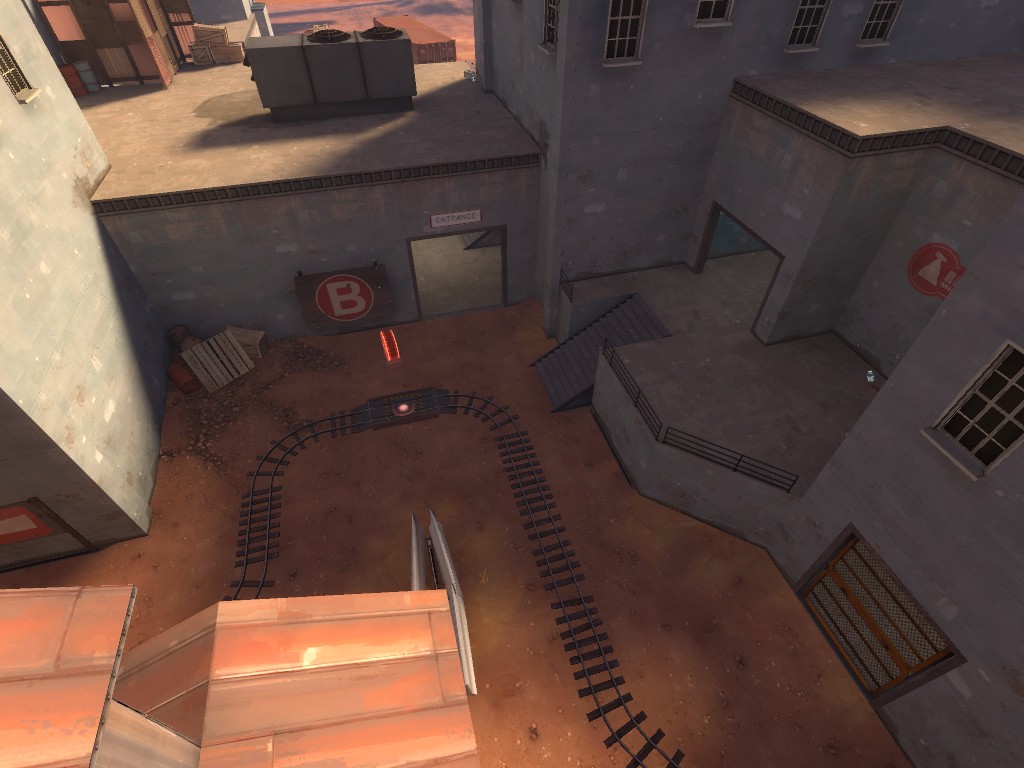
The most significant aspect of this next checkpoint is the roof space that Red can use to their advantage. To combat this, there is a large section of space behind the rooftop to allow Blu players to destroy sentry nests in order to move the cart forwards. In normal matches, the bomb cart is usually pushed up to the point where it is level with the corner of the wall on the left; just out of sentry range, the cart can be left here while players concentrate on removing Red's presence from the area before continuing on to capture the checkpoint.
Checkpoint 3
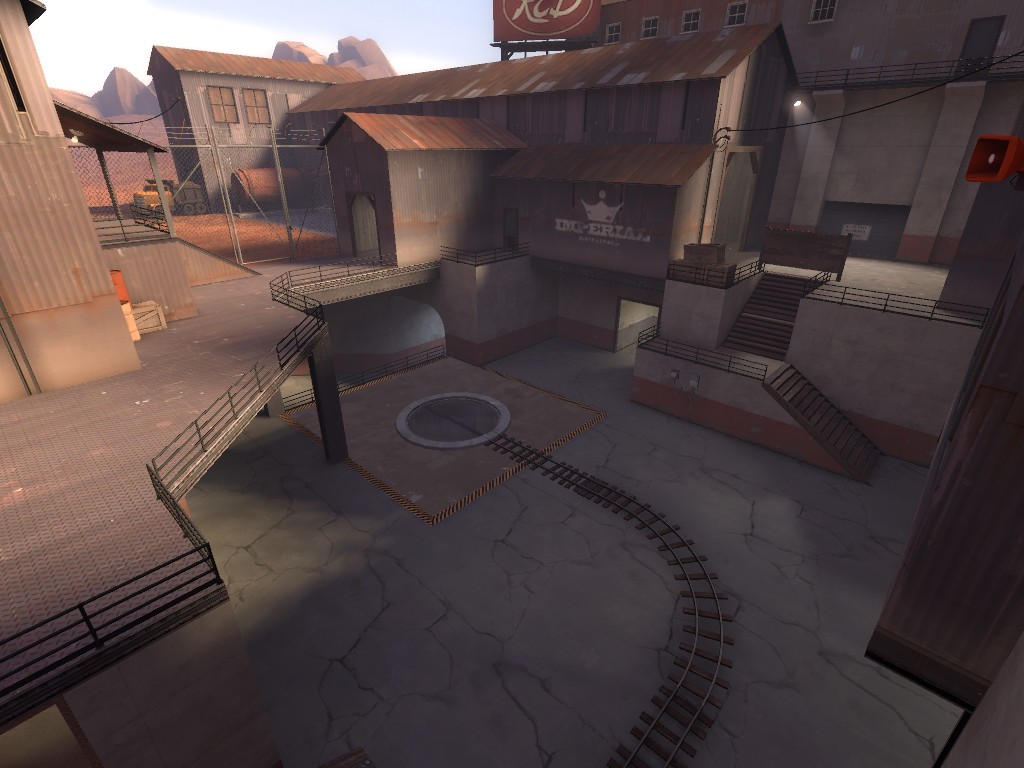
This checkpoint is just at the point where it is visible to enemies around the corner. The surrounding walkways and raised vantage points allow both teams to build up sentry nests, meaning that combat is very much focussed between the far top right corner and the opening of the tunnel at the bottom on the screenshot. In this scenario the bomb cart commonly stops just before the checkpoint, where the Blu team have to concentrate on taking out any enemy sentries on the left and right in order to proceed to capture it.
Check Point 4 (Terminus)
In-Between
Between checkpoints, the surroundings are generally simple and allow for nothing more than player vs. player combat. Generally, if there are several Blu players around the cart, they should not encounter great difficulty in moving forwards. Deviations from the main track, such as flanking routes, should stick to the areas surrounding checkpoints and should not channel combat too much towards these "between" areas, otherwise Blu may find it very difficult to progress.
Differences From Control Point Gameplay
Unlike in control point maps, a straight-off choke point can cause serious difficulty for the Blu team. In a control point game, the primary focus is for each team to push through the other's line of defence in order to capture the control point: Warpath is a good example of where this mechanic is very successful.
However, in a Payload game the situation is subtley different: the Blu team not only have to break through Red's defences but also have to push the cart further to the desired checkpoint in order to control the area. This is substantially more difficult than simply capturing a control point, since it requires that the Red team be continually held at bay for the cart to progress. The more players attacking Red, the less there are to move the cart, meaning that it is very difficult for these two continuous objectives to be achieved concurrently. Adding to this imbalance is that, unlike control point games where Red would also be aiming to capture Blu's point, in Payload their one and only focus is their defence; effectively, half of Blu's team would need to be pushing the cart, and the other half holding off the entirety of the Red team for a prolonged amount of time, for Blu to be successful.
For these reasons, choke points often imbalance a Payload match dramatically in Red's favour. Following Valve's example from above, choke points and other combat-intensifying mechanics should only be employed just before, or ideally right on top of, a checkpoint, and should be balanced to ensure that Blu has a fair chance of succeeding. Obviously, the final checkpoint can be a little more in favour of Red but should not be impossible to breach.


