Ru/Decals
Template:Otherlang2 Когда игрок стреляет из своего оружия в стену на стене остается след, который называется декаль (decals). Легче всего представить это как невидимы объект, который прикреплен к поверхности. Плакаты, дырки от пуль, буквы на стенах могут быть созданы с помощью декалей. Декали "прилепают" к объектам, на которые они помещены. К примеру декаль на лестнице каскадом спроецируется вниз, а не будет висеть в воздухе. Вы можете так же использовать декали для нанесения трафаретных букв на стены, чтобы помечать какие-то места на вашей карте.
Создать декаль не сложно: это обычный материал, у которого есть alpha-канал и который использует DecalModulate.
До того как читать дальше эту статью рекомендуем вам ознакомится со статьей про создание материалов.
Обычные декали
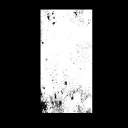
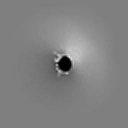
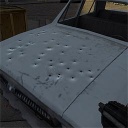
Самый популярный тип декалей - это декали которые выглядят как нанесенное через трафарет изображение. Ниже вы можете увидеть исходное изображение, его alpha-канал и финальный вид декали в игре:
Параметры материала
Настройки материала для декали должны выглядеть как-то так:
LightmappedGeneric
{
	$basetexture	decals\mydecal
	$decal		1
	$decalscale	0.1
	$translucent	1

	$modelmaterial decals\mydecal_model
}
$decal <bool>- Помечает материал как декаль. Без этой метки декаль нельзя будет прикрепить к объекту и спроецировать на него.
$decalscale <float>- Параметр, который отвечает за разрешение декали. По умолчанию 1 пиксель изображения принимается за один дюйм в игре. Если исходная текстура декали 128 пикселей по ширине, то ее ширина в игре при настройке
$decalscale 0.1будет 12.8 дюймов в игре.  Совет:Декаль не может быть отображена с большим разрешением, чем поверхность к которой она прикреплена. Оверлеи могут, но они больше нагружают процессор.
$translucent <bool>- Смотрите
$translucent. $modelmaterial <material>- Материал
VertexLitGenericкоторый будет применяться к моделям $decalfadeduration <float>- Время исчезновения декали. Требует
$vertexcolor. $decalfadetime <float>- Задержка перед исчезновением декали
$decalsecondpass- Нужно сделать: ??
Декали на моделях
VertexLitGeneric или DecalModulate. LightmappedGeneric будет работать только с брашами.Hammer
- Декали могут быть помещены на браши в Hammer-е с помощью инструментов оверлеев или декалей. Эти декали будут отображаться сразу после загрузки карты.
- Объект info_projecteddecal может быть использован для проецирования декали на любые браши или модели.
C++
Decals can be created in on the client with C_BaseEntity::AddDecal(). Internally this calls AddStudioDecal() or AddBrushModelDecal() depending on whether the entity has a brush or model. Parameters for these functions:
void C_BaseEntity::AddDecal( const Vector& rayStart, const Vector& rayEnd, const Vector& decalCenter,
				int hitbox, int decalIndex, bool doTrace, trace_t& tr, int maxLODToDecal );

void C_BaseEntity::AddBrushModelDecal( const Ray_t& ray, const Vector& decalCenter,
				int decalIndex, bool doTrace, trace_t& tr );

void C_BaseEntity::AddStudioDecal( const Ray_t& ray, int hitbox, int decalIndex,
				bool doTrace, trace_t& tr, int maxLODToDecal );
This can be achieved on the server with engine->StaticDecal:
void IVEngineServer::StaticDecal( const Vector &originInEntitySpace, int decalIndex, int entityIndex, int modelIndex, bool lowpriority );
Decal indices can be obtained by calling decalsystem->GetDecalIndexForName or UTIL_PrecacheDecal():
int IDecalEmitterSystem::GetDecalIndexForName( char const *decalname ); // Valid decalnames are defined in scripts/decals_subrect.txt
int UTIL_PrecacheDecal( const char *filename, bool preload );
Using modulation
For decals intended to mimic the look of pock marks or dents in a surface, the DecalModulate (a.k.a. mod2x) shader is especially suitable: it lightens destination pixels for every source pixel that is over mid-range gray (128) and darkens any destination pixels for every source pixel that is below mid-range gray. This effect can be used to give the impression of depth when applied to a surface.
To begin, create a source image whose color channel will be used for the modulation's source values. Again, light values will lighten pixels they're drawn over, while dark values will darken the destination pixels. Mid-gray values will be treated as translucent.
Next, create an alpha channel that defines a mask for the decal. Because modulation cannot have an exact middle value currently, the mask is necessary to prevent "bordering" from occurring around the decal.
Finally, you must create a material that uses the DecalModulate shader. Neither $translucent nor $decal are needed this time.


