User:Brandished/List Test: Difference between revisions
Jump to navigation
Jump to search
Brandished (talk | contribs) m (→Sample List 3) |
Brandished (talk | contribs) (→Articles ideas / Works in progress: cp layout wip) |
||
| Line 346: | Line 346: | ||
: '''AVI (XVID)''' | : '''AVI (XVID)''' | ||
:: [http://www.interlopers.net/tutorials/video Video Tutorials] | :: [http://www.interlopers.net/tutorials/video Video Tutorials] | ||
=== Setting the Cap Point Layout === | |||
This is mostly true for the cap layout section in the master control point. | |||
If this was the cap point layout for your map: | |||
0 = Red's Final Control Point | |||
1 = Neutral Center Control Point | |||
2 = Blue's Final Control Point | |||
typing: | |||
<0 1 2> | |||
for the cap layout would give you this in game: | |||
:[[image:Cp_guide_01.jpg]] | |||
and typing: | |||
<0 2,1> | |||
for the cap layout would give you this in game: | |||
:[[image:Cp_guide_02.jpg]] | |||
But if this is what you wanted: | |||
:[[image:Cp_guide_03.jpg]] | |||
You would have to type | |||
< 1,0 2> | |||
for the cap layout | |||
Thats: | |||
:[[image:Cp_guide_04.gif]] | |||
Revision as of 12:13, 6 October 2008
Table Layout Tests
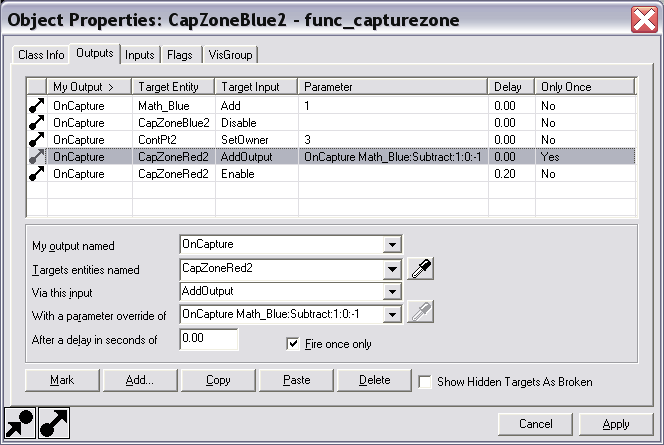
Sample Outputs Table Reference
Sample Outputs Table 1a
HTML:
| My Output Named | Target Entity | Target Input | Parameter | Delay | Only Once | |
|---|---|---|---|---|---|---|
| OnCapture | Math_Blue | Add | 1 | 0.00 | No | |
| OnCapture | CapZoneBlue2 | Disable | - | 0.00 | No |
WiKi:
| My Output Named | Target Entity | Target Input | Parameter | Delay | Only Once | |
|---|---|---|---|---|---|---|
| OnCapture | Math_Blue | Add | 1 | 0.00 | No | |
| OnCapture | CapZoneBlue2 | Disable | - | 0.00 | No |
Sample Outputs Table 1b
HTML:
| My Output Named | Target Entity | Target Input | Parameter | Delay | Only Once | |
|---|---|---|---|---|---|---|
| OnCapture | Math_Blue | Add | 1 | 0.00 | No | |
| OnCapture | CapZoneBlue2 | Disable | - | 0.00 | No |
WiKi:
| My Output Named | Target Entity | Target Input | Parameter | Delay | Only Once | |
|---|---|---|---|---|---|---|
| OnCapture | Math_Blue | Add | 1 | 0.00 | No | |
| OnCapture | CapZoneBlue2 | Disable | - | 0.00 | No |
| Image:Io11.png | |
| Image:Io12.png | |
| Image:Io21.png | |
| Image:Io22.png |
Sample Outputs Table 2a
| My Output Named | OnCapture | OnCapture |
|---|---|---|
| Target Entity | Math_Blue | CapZoneBlue2 |
| Target Input | Add | Disable |
| Parameter | 1 | - |
| Delay | 0.00 | 0.00 |
| Only Once | No | No |
Sample Outputs Table 2b
| My Output Named | OnCapture | OnCapture |
|---|---|---|
| Target Entity | Math_Blue | CapZoneBlue2 |
| Target Input | Add | Disable |
| Parameter | 1 | - |
| Delay | 0.00 | 0.00 |
| Only Once | No | No |
List Tests
Sample List 1
- Bruce Eckel's Thinking in C++ 2nd Edition
- C++ for you
- Programmer's Heaven
- CoderSource.net: C++ Programming Tutorials
- The Code Project
- MSDN: Getting Started with Visual C++
- LearnCpp.com
- Xoax.net C++ Video Tutorials
- Learn C++ Programming
- Cprogramming.com
- cplusplus.com
- wikibooks: C++ Programming
- An introduction to C, by Tom Torfs
Sample List 2
- python.org
- wikibooks: Python
- A Beginner's Python Tutorial
- Instant Python
- Dive Into Python
- Python in 10 minutes
- A Byte of Python
Sample List 3
Articles ideas / Works in progress
Source Level Design - Video Tutorials
RenStrike
- vimeo
Big Lou
Vaatrad
- YouTube
- Source Mapping Tutorial 1 - Your First Map
- Source Mapping Tutorial 2 - A Few Tips
- Source Mapping Tutorial 3 - Basic Sky
- Source Mapping Tutorial 4 - Objectives and Tips on Spawns
- Source Mapping Tutorial 5 - Brushes
- Source Mapping Tutorial 6 - Textures and Decals
- Source Mapping Tutorial 7 - Stairs and Ladders
- Source Mapping Tutorial 8 - GUNS!
- Source Mapping Tutorial 9 - Water, Glass and Teleporters
- Source Mapping Tutorial 10 - Doors
- Source Mapping Tutorial 11 - Props
Brandished
- Flash/HTML
- Making a 5 Control Point Map
Interlopers.net
- AVI (XVID)
Setting the Cap Point Layout
This is mostly true for the cap layout section in the master control point.
If this was the cap point layout for your map:
 0 = Red's Final Control Point
 1 = Neutral Center Control Point
 2 = Blue's Final Control Point
typing:
<0 1 2>
for the cap layout would give you this in game:
and typing:
<0 2,1>
for the cap layout would give you this in game:
But if this is what you wanted:
You would have to type
< 1,0 2>
for the cap layout
Thats:
