Igniting entities: Difference between revisions
No edit summary |
No edit summary |
||
| Line 4: | Line 4: | ||
== Igniting Entities == | == Igniting Entities == | ||
This tutorial uses an env_entity_igniter to light compatible entities on fire. | This tutorial uses an env_entity_igniter to light compatible entities on fire. | ||
=== The Fiery Tool === | |||
First make a stick, (long, thin brush) tie it to a [[func_physbox]] (ctrl-t). | First make a stick, (long, thin brush) tie it to a [[func_physbox]] (ctrl-t). | ||
I use a physbox so that our fire tool is like a "torch" you move with the [[Weapon_physcannon|Gravity Gun]] and +USE key | |||
{{entity-kvalue-start|[[func_physbox]]}} | {{entity-kvalue-start|[[func_physbox]]}} | ||
{{entity-kvalue|Name|physbox_pole| The name that other entities refer to this entity by.}} | {{entity-kvalue|Name|physbox_pole| The name that other entities refer to this entity by.}} | ||
| Line 11: | Line 13: | ||
The Prop Data was no set because it applies health, and we don't want our stick to break. You may also want to set the spawnflag "Only Break on Trigger", so that it will not break unless told to. | The Prop Data was no set because it applies health, and we don't want our stick to break. You may also want to set the spawnflag "Only Break on Trigger", so that it will not break unless told to. | ||
You may also want to set the "preferred carry angles" so the the stick always points the same way while being carried, something like (-5, 0, 90) is a good place to start. | You may also want to set the "preferred carry angles" so the the stick always points the same way while being carried, something like (-5, 0, 90) is a good place to start. | ||
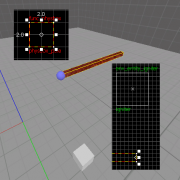
[[Image: | [[Image:BitMage_pole_origin.PNG|thumb|180px|It should look like this]]After you've created your physbox, you'll want to move the origin to end of the stick, because that's where the fire will sit once it is caught alight. The origin is a little circle in the 2D views, and a blue orb in the 3D views (only visible when the physbox is elected). | ||
After you've created your physbox, you'll want to move the origin to end of the stick, because that's where the fire will sit once it is caught alight. The origin is a little circle in the 2D views, and a blue orb in the 3D views (only visible when the physbox is elected). | {{Tip|If you can't see it, go to View->Show Helpers}} | ||
{{Tip|If can't see it, go to View->Show Helpers}} | |||
Next, make the [[env_entity_igniter]], this can be placed anywhere on the map. | Next, make the [[env_entity_igniter]], this can be placed anywhere on the map. | ||
| Line 20: | Line 29: | ||
{{entity-kvalue|Entity to ignite|[[Targetname#Keywords|!activator]]| Name of the entity to catch on fire.}} | {{entity-kvalue|Entity to ignite|[[Targetname#Keywords|!activator]]| Name of the entity to catch on fire.}} | ||
{{entity-kvalue-end}} | {{entity-kvalue-end}} | ||
<br> | |||
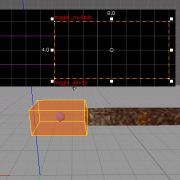
The next entity we will need a is a [[trigger_multiple]]. put it on end of the pole, like an extension (or a fire). | |||
{{entity-kvalue-start|[[trigger_multiple]]}} | |||
{{entity-kvalue|Name|trigger_igniter| The name that other entities refer to this entity by.}} | |||
{{entity-kvalue|Parent|physbox_pole| The name of this entity's parent in the movement hierarchy. Entities with parents move with their parent.}} | |||
{{entity-kvalue|Start Disabled|Yes|}} | |||
{{entity-kvalue-end}}[[Image:BitMage_trigger_igniter.PNG|thumb|180px|It should look like this]] | |||
Make sure you set the trigger's spawnflags correctly I suggest checking the "everything (except physics debris)" and the "physics debris" box. ; ) | |||
The outputs of the trigger should be as followed: | |||
{| | |||
|+'''"trigger_igniter" Outputs''' | |||
! || My Output || Target Entity || Target Input || Parameter || Delay || Only Once | |||
|- | |||
| {{IO11}} || OnStartTouch || igniter || Ignite || <none> || 0.00 || No | |||
|} | |||
[[ | Setting the [[env_entity_igniter]]'s target to "[[Targetname#Keywords|!activator]]" will make it ignite what ever triggers our [[trigger_multiple]]. | ||
However, our trigger starts disabled, and out stick is not fire yet, hmm... | |||
=== | === The Source Fire === | ||
{{Tip|This step is for added realism, complexity, and because I can. You can skip it, by adding a [[env_fire|fire]] or a [[env_sprite|sprite]] to end of your stick, and starting the trigger enabled.}} | |||
Make an [[env_fire]] entity somewhere on your map. Make sure set its spawnflags to your liking; I recommend at least "Start On" and "Infinite Duration". | |||
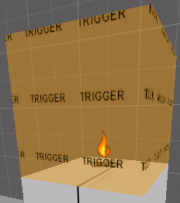
Then make another [[trigger_multiple]] around the fire. | |||
Make this trigger '''exactly''' like the one on your stick: | |||
{| | |||
|+'''Trigger Outputs''' | |||
! || My Output || Target Entity || Target Input || Parameter || Delay || Only Once | |||
|- | |||
| {{IO11}} || OnStartTouch || igniter || Ignite || <none> || 0.00 || No | |||
|} | |||
This will cause our stick (and more) to ignite, but not enable its own ignition trigger, so continue reading... | |||
==== The spread ==== | |||
[[Image:BitMage_fire_big.PNG|thumb|180px|It should look like this]] | |||
The simplest thing to do is to have our pole enable the trigger when damaged, like this: | |||
{| | |||
|+'''"physbox_pole" Outputs''' | |||
! || My Output || Target Entity || Target Input || Parameter || Delay || Only Once | |||
|- | |||
| {{IO11}} || OnHealthChanged || trigger_igniter || Enable || <none> || 0.00 || No | |||
|- | |||
| {{IO11}} || OnHealthChanged || trigger_igniter || Disable || <none> || 10.00 || No | |||
|} | |||
This way, when the pole is damaged, it enables the trigger (and lets you burn more things) for 10 seconds, which is the default flame lifetime set by the [[env_entity_igniter]]. | |||
Unfortunately, now the pole will enable the trigger when it takes damage in any way! | |||
To fix this we will use a [[filter_damage_type]] | |||
{{entity-kvalue-start|[[filter_damage_type]]}} | |||
{{entity-kvalue|Name|filter_burn| The name that other entities refer to this entity by.}} | |||
{{entity-kvalue|Filter mode|Allow entities that match criteria| If set to Allow, only entities who match the criteria will pass the filter.}} | |||
{{entity-kvalue|Damage type|BURN| The damage type to filter by.}} | |||
{{entity-kvalue-end}} | |||
'''Make sure you set "physbox_pole"'s keyvalue "damage filter" to "filter_burn".''' | |||
=== Victims === | |||
*physbox | |||
*npc | |||
*func_breakable | |||
*prop | |||
==== A note about NPC's ==== | |||
*reaction | |||
*relationships | |||
*path nodes | |||
* | |||
* | |||
* | |||
== Conclusion == | |||
Don't forget to make a player start, a gravgun, and other things like a suit (or maybe a healthcharger). | |||
Your finished map should look like this: | |||
{|border="0" align="left" style="background:transparent" cellpadding="0" cellspacing="0" | {|border="0" align="left" style="background:transparent" cellpadding="0" cellspacing="0" | ||
| Line 85: | Line 112: | ||
== Wrap up == | == Wrap up == | ||
Feel free to play around see what works, hopefully this article have stimulated your imagination. | |||
* [http:// | * [http://students.cup.edu/rox8872/fire_map.zip The example used in this tutorial.] | ||
<h2> Credits </h2> | <h2> Credits </h2> | ||
Revision as of 14:58, 21 March 2008
Someone is currently in the process of editing this article. In order to prevent edit conflicts, please refrain from making edits until the other editor is done. This should not take more than 24 hours.
Igniting Entities
This tutorial uses an env_entity_igniter to light compatible entities on fire.
The Fiery Tool
First make a stick, (long, thin brush) tie it to a func_physbox (ctrl-t). I use a physbox so that our fire tool is like a "torch" you move with the Gravity Gun and +USE key
| Class: func_physbox | ||
| Keyvalues | Comments | |
| Name | physbox_pole | The name that other entities refer to this entity by. |
| Prop Data | None | If set, it will override this entity's health and damage taken from various weapons. |
The Prop Data was no set because it applies health, and we don't want our stick to break. You may also want to set the spawnflag "Only Break on Trigger", so that it will not break unless told to. You may also want to set the "preferred carry angles" so the the stick always points the same way while being carried, something like (-5, 0, 90) is a good place to start.
After you've created your physbox, you'll want to move the origin to end of the stick, because that's where the fire will sit once it is caught alight. The origin is a little circle in the 2D views, and a blue orb in the 3D views (only visible when the physbox is elected).
Next, make the env_entity_igniter, this can be placed anywhere on the map.
| Class: env_entity_igniter | ||
| Keyvalues | Comments | |
| Name | igniter | The name that other entities refer to this entity by. |
| Entity to ignite | !activator | Name of the entity to catch on fire. |
The next entity we will need a is a trigger_multiple. put it on end of the pole, like an extension (or a fire).
| Class: trigger_multiple | ||
| Keyvalues | Comments | |
| Name | trigger_igniter | The name that other entities refer to this entity by. |
| Parent | physbox_pole | The name of this entity's parent in the movement hierarchy. Entities with parents move with their parent. |
| Start Disabled | Yes | |
Make sure you set the trigger's spawnflags correctly I suggest checking the "everything (except physics debris)" and the "physics debris" box. ; )
The outputs of the trigger should be as followed:
| My Output | Target Entity | Target Input | Parameter | Delay | Only Once | |
|---|---|---|---|---|---|---|
| OnStartTouch | igniter | Ignite | <none> | 0.00 | No |
Setting the env_entity_igniter's target to "!activator" will make it ignite what ever triggers our trigger_multiple.
However, our trigger starts disabled, and out stick is not fire yet, hmm...
The Source Fire
Make an env_fire entity somewhere on your map. Make sure set its spawnflags to your liking; I recommend at least "Start On" and "Infinite Duration". Then make another trigger_multiple around the fire. Make this trigger exactly like the one on your stick:
| My Output | Target Entity | Target Input | Parameter | Delay | Only Once | |
|---|---|---|---|---|---|---|
| OnStartTouch | igniter | Ignite | <none> | 0.00 | No |
This will cause our stick (and more) to ignite, but not enable its own ignition trigger, so continue reading...
The spread
The simplest thing to do is to have our pole enable the trigger when damaged, like this:
| My Output | Target Entity | Target Input | Parameter | Delay | Only Once | |
|---|---|---|---|---|---|---|
| OnHealthChanged | trigger_igniter | Enable | <none> | 0.00 | No | |
| OnHealthChanged | trigger_igniter | Disable | <none> | 10.00 | No |
This way, when the pole is damaged, it enables the trigger (and lets you burn more things) for 10 seconds, which is the default flame lifetime set by the env_entity_igniter. Unfortunately, now the pole will enable the trigger when it takes damage in any way! To fix this we will use a filter_damage_type
| Class: filter_damage_type | ||
| Keyvalues | Comments | |
| Name | filter_burn | The name that other entities refer to this entity by. |
| Filter mode | Allow entities that match criteria | If set to Allow, only entities who match the criteria will pass the filter. |
| Damage type | BURN | The damage type to filter by. |
Make sure you set "physbox_pole"'s keyvalue "damage filter" to "filter_burn".
Victims
- physbox
- npc
- func_breakable
- prop
A note about NPC's
- reaction
- relationships
- path nodes
Conclusion
Don't forget to make a player start, a gravgun, and other things like a suit (or maybe a healthcharger).
Your finished map should look like this:
Wrap up
Feel free to play around see what works, hopefully this article have stimulated your imagination.
Credits
- The tutorial was created by Bit Mage 14:37, 21 Mar 2008 (EST)
