Zh/Source 2/Docs/Modeling/Exporting a mesh from Blender: Difference between revisions
| Line 37: | Line 37: | ||
[[File:Blender shading smooth.png]] | [[File:Blender shading smooth.png]] | ||
== | == 材质建立 == | ||
=== | === 加入两种不同的材质 === | ||
首先,将渲染器切换到 Blender 内置中的 Cycles。这不是创建材质所必需的 - 但是,由于 Blender Renderer 已从 Blender 2.8 中删除,您应该将其切换到 Cycles,以便您在更新到新的 Blender 版本时可以继续无缝地处理旧道具. | |||
| Line 45: | Line 47: | ||
我们将创建两种不同的材质,一种红色和一种蓝色。导航到“属性”中的“材料”选项卡,然后单击“新建”以创建新材料。 | |||
| Line 51: | Line 54: | ||
单击 + 图标创建一个新的空材质槽。选择此插槽并再次按下新的大按钮以创建第二个材质。将材质重命名为红色和蓝色。 | |||
| Line 57: | Line 61: | ||
您在此处输入的材质名称与 Hammer 使用的材质名称无关或关联。但为了保持一致性,建议使用与引擎中相同的材料名称。 | |||
=== Material properties === | === Material properties === | ||
Hammer | Hammer 无法读取材料,除非您向它们添加一个所谓的自定义属性,该属性指向 Hammer 中使用的正确材料名称和路径。 | ||
选择红色材质。对于本教程,我们将假设您已使用 Hammer 的材质编辑器在项目的“materials/models/props_items”文件夹中创建了一个名为 red.vmt 的材质。如果你没有,那也很好。完成本教程后,您可以创建材料。本文的结论中有一个链接可以帮助您这样做。 | |||
材料菜单中有一个自定义属性类别。如果您看不到其中的大添加按钮,请单击自定义属性文本以将其展开。确保选择了红色材质,然后单击“添加”按钮。将创建一个属性名称属性和属性值为 1 的新属性。单击“编辑”按钮并将名称更改为 FBX_vmatPath,将值更改为 materials/models/props_items/red。 | |||
{{Note| | {{Note|确保使用正确的大小写拼写 FBX_vmatPath。此属性区分大小写,如果大小写错误,则无法正确导出。.}} | ||
| Line 80: | Line 85: | ||
[[File:Blender material color.png]] | [[File:Blender material color.png]] | ||
== Mesh export == | == Mesh export == | ||
Revision as of 17:29, 11 July 2021
简介
本教程解释了如何将一个模型从 Blender 导出到 Source 2。虽然 懂得 blender 基础操作对理解此文章很有帮助,但如果你是新手遵循教程指引也能轻松完成导入工作。您将学习如何为您的模型设置正确的缩放比例、如何以 Hammer 可读的方式分配材质以及导出时使用的设置。
如果你的电脑上没有Blender这款软件, 你可以在 ![]() blender.org/download 官方网站上免费下载.
blender.org/download 官方网站上免费下载.
Blender是一款开源,免费的建模软件,您可以在Steam或官方网站上获取或对源码进行自编译后使用
单位设置
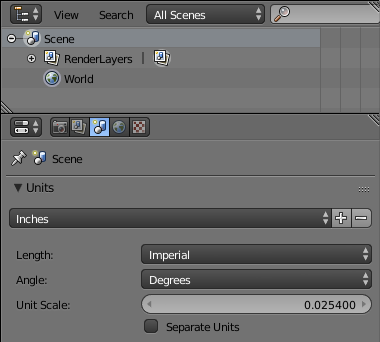
在开始处理网格之前,请确保正确设置 Blender 的场景选项中参数正确无误。为此,请切换到“属性”菜单中的“场景”选项卡,然后选择“英寸”预设或将长度设置为“无”。
网格比例和方向
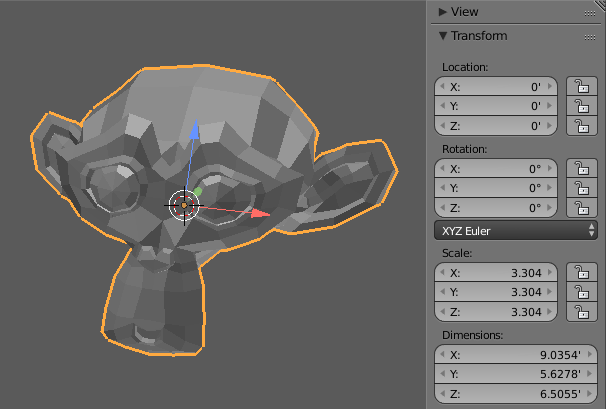
我们将使用默认的 Suzanne 猴头作为本教程的示例道具。按 Shift+A → Mesh → Monkey 将其添加到您的场景中。您可以通过按 N 打开 3D 视口的右侧菜单并查看“变换”类别中的尺寸来检查尺寸。在本教程中,我们将放大 Suzanne,直到 Z 尺寸大约为 6.5 英尺或 78 英寸/通用单位。为此,请按 S 并将光标从猴头上移开以将其放大。用鼠标左键确认。
通过按 Ctrl+A → 旋转和缩放来应用网格的缩放。养成在将网格导出到 Hammer 之前始终应用缩放和旋转的习惯。
你的网格应该在 Blender 中朝南,以便与 Hammer 的坐标正确对齐,猴子头默认这样做。
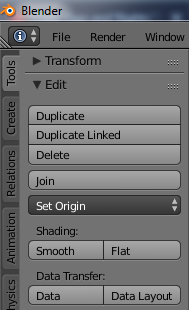
使用 T 打开 3D 视口的左侧菜单,然后单击“平滑”将 Suzanne 更改为平滑着色。
材质建立
加入两种不同的材质
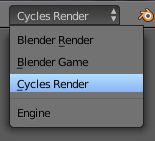
首先,将渲染器切换到 Blender 内置中的 Cycles。这不是创建材质所必需的 - 但是,由于 Blender Renderer 已从 Blender 2.8 中删除,您应该将其切换到 Cycles,以便您在更新到新的 Blender 版本时可以继续无缝地处理旧道具.
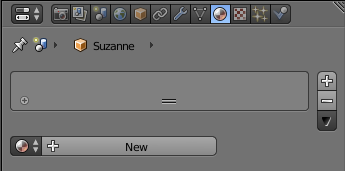
我们将创建两种不同的材质,一种红色和一种蓝色。导航到“属性”中的“材料”选项卡,然后单击“新建”以创建新材料。
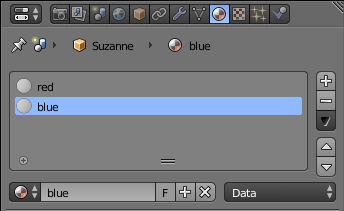
单击 + 图标创建一个新的空材质槽。选择此插槽并再次按下新的大按钮以创建第二个材质。将材质重命名为红色和蓝色。
您在此处输入的材质名称与 Hammer 使用的材质名称无关或关联。但为了保持一致性,建议使用与引擎中相同的材料名称。
Material properties
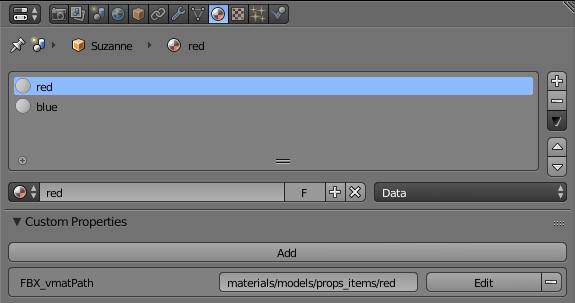
Hammer 无法读取材料,除非您向它们添加一个所谓的自定义属性,该属性指向 Hammer 中使用的正确材料名称和路径。
选择红色材质。对于本教程,我们将假设您已使用 Hammer 的材质编辑器在项目的“materials/models/props_items”文件夹中创建了一个名为 red.vmt 的材质。如果你没有,那也很好。完成本教程后,您可以创建材料。本文的结论中有一个链接可以帮助您这样做。
材料菜单中有一个自定义属性类别。如果您看不到其中的大添加按钮,请单击自定义属性文本以将其展开。确保选择了红色材质,然后单击“添加”按钮。将创建一个属性名称属性和属性值为 1 的新属性。单击“编辑”按钮并将名称更改为 FBX_vmatPath,将值更改为 materials/models/props_items/red。
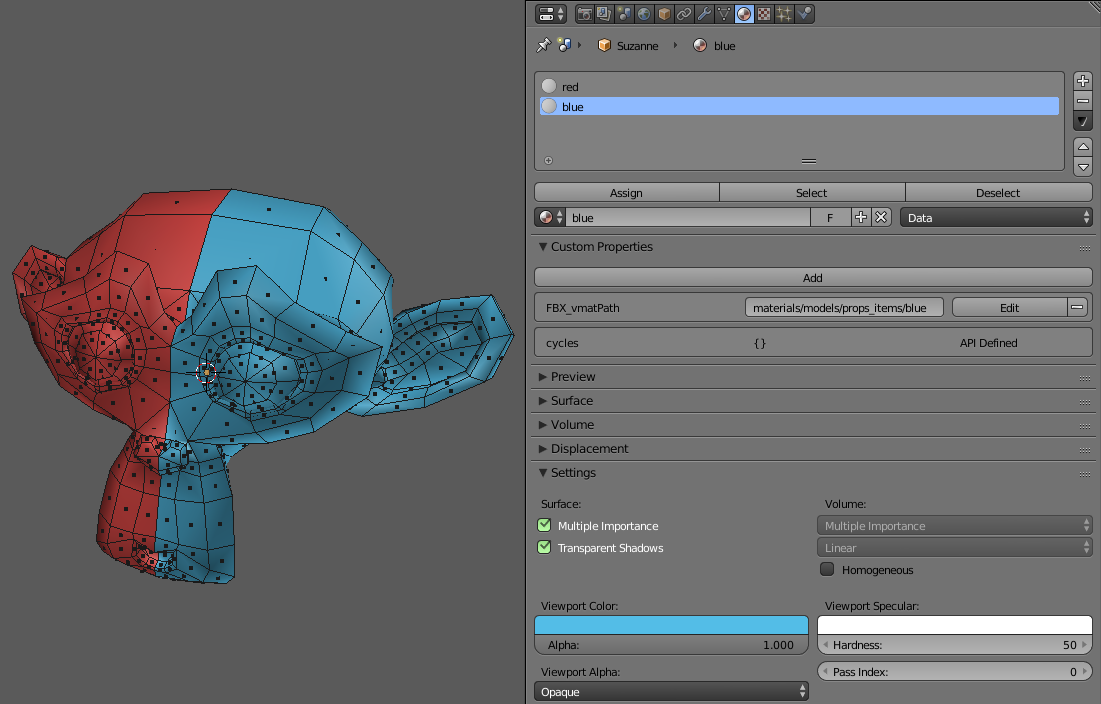
Repeat the same steps for the blue material, but change the value to materials/models/props_items/blue.
Assigning materials
Choose a Viewport Color in the Settings category of both materials. Switch to Edit Mode by pressing Tab and assign the two materials to different faces by using the Assign button in the material editor.
Mesh export
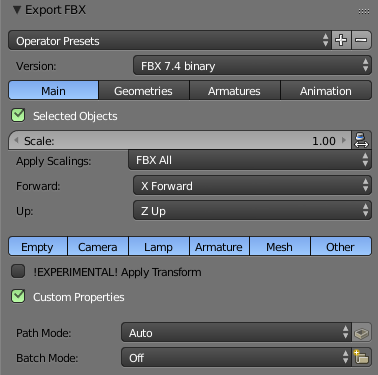
Click on File → Export → FBX to export you mesh as FBX. For this tutorial we’ll assume that you project has a models\props_items\fbx\ folder.
| Selected Objects | Tick this box if your scene contains more than one prop. Make sure to select the right prop before opening the export dialogue. |
| Apply Scalings | Choose FBX All. |
| Forward / Up | This does not seem to affect the mesh’s orientation in Hammer. For the sake of consistency with Hammer’s coordination system it’s set to X Forward and Z Up. |
| Custom Properties | Make sure to tick this box or your materials will not be recognized in Hammer. |
You can safely ignore the tabs Geometries, Armatures and Animation for regular props. Enter a prop name in the upper toolbar and click on Export FBX in the upper right to export your mesh.
If you'd like to save your settings as a preset, click on the + button to the right side of the Operator Presets list and enter a name. You can select the new preset by clicking on the Operator Presets button. Remember to always select the preset before exporting in a new Blender session, as the selected preset is reset when Blender is closed.
Conclusion
With your FBX exported to the right folder you're ready to import your prop into Hammer. Check out the Model Editor tutorial to find out how. If you need help creating your materials, the material creation tutorials will help you getting started.
