Ko/TF2/Team-Specific Barriers: Difference between revisions
(Created page with "func_respawnroomvisualizer 엔티티는 리스폰 지점으로부터 스폰지점에 있는 사람들을 죽이는 플레이어들을 쫓아 내는데 사용되는 팀 전용...") |
|||
| Line 7: | Line 7: | ||
이 강좌에서는, 우리는 블루 팀 플레이어들을 쫓아낼 레드 팀을 위한 팀-전용 방어막을 만들어 볼겁니다. 당신은 func_respawnroom이 당신의 맵어딘가에 Team은 Red로 되어있는지 고유한 이름은 설정되어 있는지 계속 진행하기전에 확인해주시기 바랍니다. | 이 강좌에서는, 우리는 블루 팀 플레이어들을 쫓아낼 레드 팀을 위한 팀-전용 방어막을 만들어 볼겁니다. 당신은 func_respawnroom이 당신의 맵어딘가에 Team은 Red로 되어있는지 고유한 이름은 설정되어 있는지 계속 진행하기전에 확인해주시기 바랍니다. | ||
첫째로, | 첫째로, <tt>tools/toolsnodraw</tt> 텍스쳐가 발린 [[func_respawnroomvisualizer]] [[Entity_Creation#Brush-based_entity_creation|brush-based entity]] 엔티티를 스폰 지점의 출입구에 만들어주세요. 이것은 방어막의 역할을 할겁니다. 이것의 Associated Respawn Room 설정을 당신의 레드 팀의 func_respawnroom 이름으로 설정해주십시요. | ||
Next, using the texture application tool (Shift+A), select the face of the func_respawnroomvisualizer brush that faces away from your respawn room. Set it's material to <tt>overlays/no_entry</tt>. You may also want to align it to "fit" to center it on the brush. | Next, using the texture application tool (Shift+A), select the face of the func_respawnroomvisualizer brush that faces away from your respawn room. Set it's material to <tt>overlays/no_entry</tt>. You may also want to align it to "fit" to center it on the brush. | ||
Revision as of 07:16, 2 December 2013
func_respawnroomvisualizer 엔티티는 리스폰 지점으로부터 스폰지점에 있는 사람들을 죽이는 플레이어들을 쫓아 내는데 사용되는 팀 전용 보호막을 만듭니다, 하지만 당신은 한팀에게 당신이 원하는 어딘가에 접근을 제한하는데 사용할수도 있습니다. 이 방어막은 보통 같은 팀에게는 보이지 않고, 적팀에게는 보입니다. 이것은 적팀의 움직임과 폭발물들 둘다 제한할 것입니다.
강좌 - 리스폰 지점 방어막
팀-전용 보호막들은 func_respawnroomvisualizer 와 brush-based entity와 그리고 어느 팀에게 허용할지를 알려주는 func_respawnroom로 만들어집니다.
이 강좌에서는, 우리는 블루 팀 플레이어들을 쫓아낼 레드 팀을 위한 팀-전용 방어막을 만들어 볼겁니다. 당신은 func_respawnroom이 당신의 맵어딘가에 Team은 Red로 되어있는지 고유한 이름은 설정되어 있는지 계속 진행하기전에 확인해주시기 바랍니다.
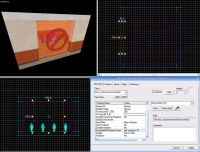
첫째로, tools/toolsnodraw 텍스쳐가 발린 func_respawnroomvisualizer brush-based entity 엔티티를 스폰 지점의 출입구에 만들어주세요. 이것은 방어막의 역할을 할겁니다. 이것의 Associated Respawn Room 설정을 당신의 레드 팀의 func_respawnroom 이름으로 설정해주십시요.
Next, using the texture application tool (Shift+A), select the face of the func_respawnroomvisualizer brush that faces away from your respawn room. Set it's material to overlays/no_entry. You may also want to align it to "fit" to center it on the brush.
You should now have a barrier that will stop the Blue team, but not the Red team!
Download the demo map here: Download Here
Design Theory
Materials
You can assign a visible material to one or more sides of the func_respawnroomvisualizer brush to make it visible to the enemy team. Usually, the overlay/no_entry material is used. You may be able to achieve other effects by using various materials. Not all materials will fade over distance like overlay/no_entry does, resulting in a solid wall that only exists for one team!
