Complimentary Victory Lift: Difference between revisions
(Undo revision 151575 by Pranavwright (Talk) Spam) |
mNo edit summary |
||
| Line 1: | Line 1: | ||
== Introduction == | == Introduction == | ||
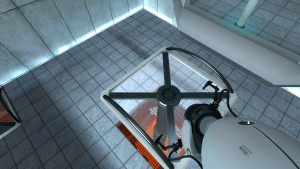
[[{{ns:6}}:VictoryLift.jpg|thumb|300px|A Complimentary Victory Lift in the game]] | [[{{ns:6}}:VictoryLift.jpg|thumb|300px|A Complimentary Victory Lift in the game]] | ||
In this tutorial you will learn how to make a Complimentary Victory Lift in the Hammer Editor. | In this tutorial you will learn how to make a Complimentary Victory Lift in the Hammer Editor. | ||
Revision as of 11:17, 5 May 2012
Introduction
In this tutorial you will learn how to make a Complimentary Victory Lift in the Hammer Editor.
The piston
First thing to do is to make the func_door.
You can use mini_piston_inside.mdl or you can copy the fake piston from the example map provided with Portal.
I'm using the fake piston for the tutorial, you may want to use the clipping tool to cut the fake piston to the appropriate size. If you're using the model piston, then simply parent it to a func_door brush that is an appropriate size.
Place your piston where you want it and give it the following parameters:
Property Name Value Name victory_lift Delay Before Reset 0 Speed 25 Move Direction (Use the top view to set this parameter) or Up or Down
Platform
Now you need something to stand on. Create a prop_dynamic and set its World Model to lift_platform.mdl or light_rail_platform.mdl and place it at the top of your piston.
Give the model the following parameters:
Property Name Value Name victory_lift_model Parent victory_lift World Model lift_platform.mdl or light_rail_platform.mdl
Make sure to uncheck the Touch opens Flag.
Glass
You'll notice there is no glass to stand on, so go ahead and make a 116L x 116W x 2H block and texture it with glass/glasswindow_frosted_004 and place it where it should be. Set your grid size to 2 for easy placement.
The trigger
This tutorial assumes you have moderate knowledge of I/O's. Add the Outputs to those which apply.
Area trigger
Encase the desired area with a brush textured with the trigger texture. Tie it to a trigger_multiple and add the following outputs:
Button trigger
Add these outputs to the buttons' door:
Switch Trigger
Add these outputs to the trigger on the switch:
And now your Complimentary Victory Lift is done! Just compile and test for errors!
