Ru/Level Design Introduction (Portal 2)/Getting Started: Difference between revisions
(Create nontranslated version) |
No edit summary |
||
| Line 1: | Line 1: | ||
{{DISPLAYTITLE:Level Design Introduction/Getting Started (Portal 2)}}__NOTOC__{{Portal 2 level intro menu}} | {{DISPLAYTITLE:Level Design Introduction/Getting Started (Portal 2)}} | ||
{{Finishtranslation:ru}} | |||
__NOTOC__{{Portal 2 level intro menu}} | |||
Первым шагом вам потребуется запустить Hammer, редактор карт для Portal 2 и других игр на движке Source. | |||
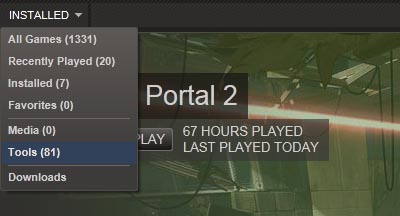
Откройте окно '''Steam''', откройте вкладку '''Инструменты''' и дважды щелкните на '''Portal 2 Authoring Tools'''. | |||
Если вы впервые запускаете средство разработки, то придется подождать какое-о время, пока оно загрузится и установится. | |||
[[Image:P2_SDK00.jpg|thumb|left|500px]]{{clr-left}} | [[Image:P2_SDK00.jpg|thumb|left|500px]]{{clr-left}} | ||
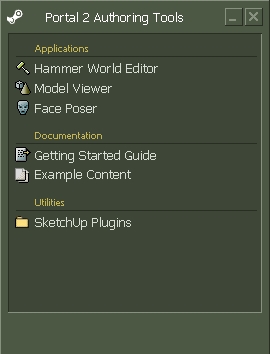
Дважды щелкните '''Hammer World Editor''', чтобы запустить редактор уровней Hammer. | |||
[[File:Authoring_Tools.jpg|270px|thumb|left|]]{{clr}} | [[File:Authoring_Tools.jpg|270px|thumb|left|]]{{clr}} | ||
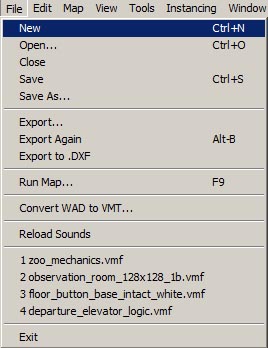
Когда Hammer загрузится, вы можете начать создавать новый уровень, нажав на '''New''' из выпадающего меню '''File'''. | |||
[[Image:P2_hammer_new.jpg|thumb|left|500px]]{{clr}} | [[Image:P2_hammer_new.jpg|thumb|left|500px]]{{clr}} | ||
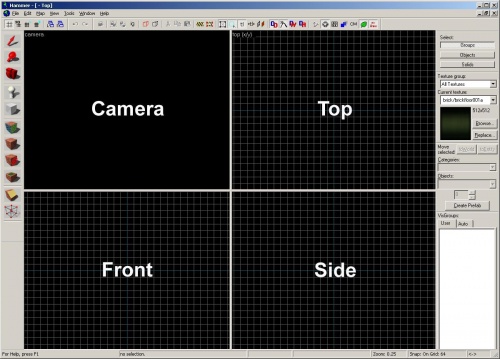
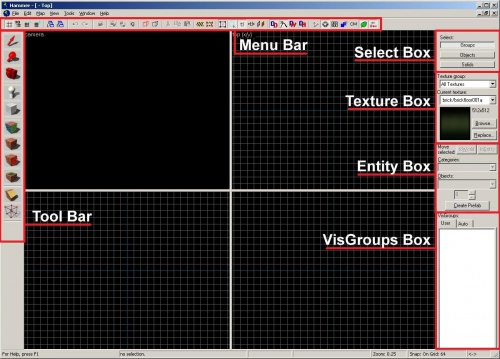
Должно будет появиться новое окно, содержащее четыре зоны редактирования. | |||
[[Image:P2_hammer_ui02.jpg|thumb|left|500px]]{{clr}} | [[Image:P2_hammer_ui02.jpg|thumb|left|500px]]{{clr}} | ||
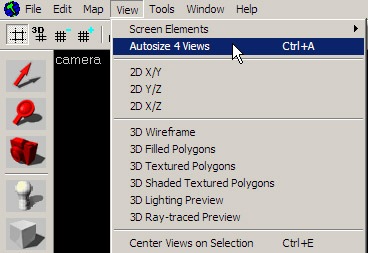
{{note|If your viewports are not equally sized as in the image above, you can reset them by going to '''View''' and selecting '''Autosize 4 Views'''.}} | {{note:ru|If your viewports are not equally sized as in the image above, you can reset them by going to '''View''' and selecting '''Autosize 4 Views'''.}} | ||
[[Image:L4d hammer autosize.jpg|Selecting Autosize 4 Views from the View menu.]] | [[Image:L4d hammer autosize.jpg|Selecting Autosize 4 Views from the View menu.]] | ||
== Hammer Editor | == Интерфейс Hammer Editor == | ||
[[Image:P2_hammer_ui03.jpg|thumb|right|500px]] | [[Image:P2_hammer_ui03.jpg|thumb|right|500px]] | ||
| Line 59: | Line 61: | ||
The strip along on the bottom of the interface gives valuable information while you're editing, such as the size of the selected objects and the current grid settings. | The strip along on the bottom of the interface gives valuable information while you're editing, such as the size of the selected objects and the current grid settings. | ||
{{navbar2|Level Design Introduction (Portal 2)/Getting Started| | {{navbar2|Level Design Introduction (Portal 2)/Getting Started:ru|Приступаем к работе|Level Design Introduction (Portal 2):ru|Введение в разработку уровней|Level Design Introduction (Portal 2)/Your First Level:ru|Ваш первый уровень}} | ||
[[Category:Portal 2 Level Design:ru]] | [[Category:Portal 2 Level Design:ru]] | ||
Revision as of 11:09, 17 September 2011
Первым шагом вам потребуется запустить Hammer, редактор карт для Portal 2 и других игр на движке Source.
Откройте окно Steam, откройте вкладку Инструменты и дважды щелкните на Portal 2 Authoring Tools.
Если вы впервые запускаете средство разработки, то придется подождать какое-о время, пока оно загрузится и установится.
Дважды щелкните Hammer World Editor, чтобы запустить редактор уровней Hammer.
Когда Hammer загрузится, вы можете начать создавать новый уровень, нажав на New из выпадающего меню File.
Должно будет появиться новое окно, содержащее четыре зоны редактирования.
Интерфейс Hammer Editor
Here is a basic description of the Hammer interface. You will learn how to use these items throughout this tutorial, so don't worry about learning about how they all function quite yet.
Map Views and Operations bars
These bars across the top of the window contain a variety of buttons to control the viewing of objects in the map, as well as controls for the grid and snapping tools.
Tools bar
The Tools bar switches the editor to different modes that allow you to select, build, place, texture, and manipulate different objects in your level.
Selection Mode bar
The Selection Mode bar switches between modes of selecting objects in the map:
- Groups — You will select the whole sets of objects that have been grouped together.
- Objects — You will select an entire object even if it consists of more than 1 component.
- Solids — You will select individual components even if it has been joined with others to make one object.
Texture bar
The Texture bar allows you to see the currently selected texture and to browse for other textures by going into the Browse... button.
Object bar
Used to place objects in your level that are not simple geometry. While brushes are the basic building blocks of levels, entities placed with the Object bar are pretty much everything else. You can place lights, props (models) and items using the Object bar.
VisGroups bar
VisGroups are a way to organize your level. You can place any type of object into VisGroups and label them so that you can hide them or reveal them as a group. This allows you to see what you're working on in a much cleaner way than leaving everything visible.
Status bar
The strip along on the bottom of the interface gives valuable information while you're editing, such as the size of the selected objects and the current grid settings.
