De/Leak: Difference between revisions
(Created page with '{{otherlang2 |en=Leak }} ----- TRANSLATION NOT FINISHED YET ----- ÜBERSETZUNG NOCH NICHT ABGESCHLOSSEN ----- == Was ist ein Leck? == Level, die mit der Source Enging erstellt w…') |
Bloodhound (talk | contribs) (weiter übersetzt) |
||
| Line 29: | Line 29: | ||
{{note|Wenn du keine Punkt-Entities während des Kompilierens in deiner Map hast, wird [[Vbsp|vbsp]] vielleicht ein Leck melden, weil es keine Möglichkeit hat, um zu entscheiden, ob entweder der inneree oder äußere Bereich der Map der spielbare Bereich ist...}} | {{note|Wenn du keine Punkt-Entities während des Kompilierens in deiner Map hast, wird [[Vbsp|vbsp]] vielleicht ein Leck melden, weil es keine Möglichkeit hat, um zu entscheiden, ob entweder der inneree oder äußere Bereich der Map der spielbare Bereich ist...}} | ||
== | == Leckeffekte == | ||
Ein Leck in einem Level hat eine Reihe schlechter Effekte. Als erstes wird der <code>vbsp</code> Prozess ein Leck melden und es wird keine ''portal''-Datei (<code>''mapname''.prt</code>) erzeugt. Die portal-Datei wird vom <code>[[Vvis|vvis]]</code> Prozess verwendet, um seine Sichtbarkeitsberechnungen durchzuführen. Gibt es keine portal-Datei, wird <code>vvis</code> nicht laufen. Wenn <code>vvis</code> nicht läuft, wird es nicht die notwendigen Dateien für den <code>[[Vrad|vrad]]</code> Prozess produzieren, um die Lichtreflektionen zu berechnen. Deshalb wird der <code>vrad</code> Prozess nur direkte Beleuchtung ausführen - keine Lichtreflektionen. | Ein Leck in einem Level hat eine Reihe schlechter Effekte. Als erstes wird der <code>vbsp</code> Prozess ein Leck melden und es wird keine ''portal''-Datei (<code>''mapname''.prt</code>) erzeugt. Die portal-Datei wird vom <code>[[Vvis|vvis]]</code> Prozess verwendet, um seine Sichtbarkeitsberechnungen durchzuführen. Gibt es keine portal-Datei, wird <code>vvis</code> nicht laufen. Wenn <code>vvis</code> nicht läuft, wird es nicht die notwendigen Dateien für den <code>[[Vrad|vrad]]</code> Prozess produzieren, um die Lichtreflektionen zu berechnen. Deshalb wird der <code>vrad</code> Prozess nur direkte Beleuchtung ausführen - keine Lichtreflektionen. | ||
| Line 41: | Line 41: | ||
== Lecks finden == | == Lecks finden == | ||
Oft sind die Löcher nicht so groß wie hier im Beispiel. Sie können auch 1 Unit klein sein und trotzdem zu einem Leck führen. Der Compiler erstellt einen ''pointfile'', welcher dir hilft Lecks zu finden. Das Pointfile wird von <code>vbsp</code> generiert und zeichnet eine Linie zwischen der Leere und dem Objekt welches es beim Leckcheck entdeckt hat. Wenn ein Leck auftritt, wird eine <code>''mapname''.lin</code> Datei im selben Ordner wie deine .vmf Datei erstellt. | |||
=== Ein Pointfile laden === | |||
Das Pointfile kann im '''Hammer Editor''' geladen werden um dir präzise zu zeigen wo sich das leck befindet. Um das Pointfile zu laden nutze [[Hammer_Map_Menu#Load Pointfile|Load Pointfile]] im '''Map''' Menu. | |||
[[Image:hammer_leaks5.jpg||thumb|400px|right|Das '''Load Pointfile''' Kommando zeigt den Pfad zum Leck in dem Hammer Ansichtsfensters.]] | |||
Das Bild zeigt das geladene Pointfile im vorherigen Beispiel. Die rote Linie ist in der 3D sowie in der 2D Ansicht zu sehen, und wird vom Objekt zum Loch gezeichnet. | |||
Durch das nutzen der visuellen Hilfe kannst du ganz einfach die Quelle finden, die für das Leck verantwortlich ist. Am besten startet man mit der Suche am Objekt welches in der <code>vbsp</code> Fehlernachricht genannt wird. Schließe das Loch und rekompiliere die Map um zu sehen ob das Leck beseitigt ist.{{clr}} | |||
=== Den Endpunkt finden === | |||
----- | |||
TRANSLATION NOT FINISHED YET | |||
----- | |||
ÜBERSETZUNG NOCH NICHT ABGESCHLOSSEN | |||
----- | |||
If you're having trouble locating the start entity, you can use the [[Hammer_View_Menu#Go_to_Coordinates...|Go to Coordinates]] command on the '''View''' menu to find the entity and the start of the pointfile line. Simply enter the coordinates given by <code>vbsp</code> for the entity location, and the 2D and 3D views will be centered on that location. Follow the line to find your leak. | If you're having trouble locating the start entity, you can use the [[Hammer_View_Menu#Go_to_Coordinates...|Go to Coordinates]] command on the '''View''' menu to find the entity and the start of the pointfile line. Simply enter the coordinates given by <code>vbsp</code> for the entity location, and the 2D and 3D views will be centered on that location. Follow the line to find your leak. | ||
Revision as of 13:17, 11 May 2011
TRANSLATION NOT FINISHED YET
ÜBERSETZUNG NOCH NICHT ABGESCHLOSSEN
Was ist ein Leck?
Level, die mit der Source Enging erstellt werden, müssen innerlich komplett versiegelt werden. Kein Teil des Inneren des Levels, der "Welt", darf mit der Außenseite verbunden sein, die "Leere". Auch der Himmel muss mit einem Brush und einer tools/toolsskybox Textur versiegelt werden. Wenn es irgendeine Art von Lücke ins Leere gibt, entsteht beim kompilieren durch den vbsp ein Leck. Wenn ein Leck auftritt, können Tools nicht feststellen, welcher Teil des Levels innen ist, welcher Teil außen ist und vvis kann nicht laufen. Wenn vvis nicht läuft, mehrere Effekte funktionieren vielleicht nicht oder sehen nicht richtig aus, einschließlich Wasser und ein paar andere Oberflächeneigenschaften, wie Staub.
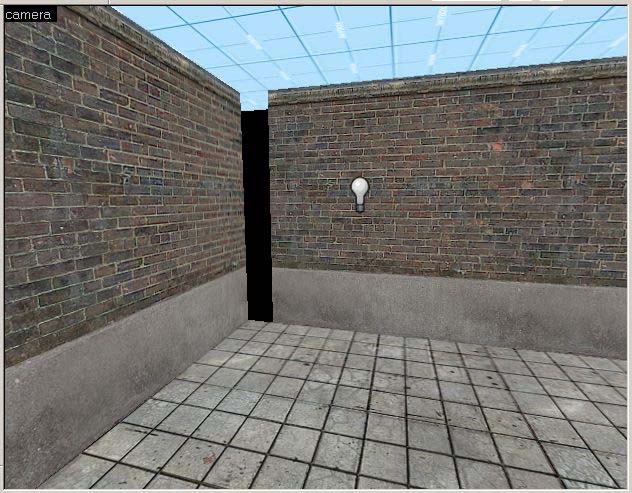
Dieses Beispiel zeigt eine Map mit einer offensichtlichen Lücke in der Geometrie, die ins Leere führt. Das wird eine Leck-Fehlermeldung beim Kompilieren generieren:
Wenn eine solche Map mit einer Lücke zur Leere kompiliert wird, generiert vbsp einen Fehler, der dem aus dem Kompilierungslog ähnlich ist:
ProcessBlock_Thread: 0...1...2...3...4...5...6...7...8...9...10 (0)
**** leaked ****
Entity light (-1607.69 -1094.12 -183.00) leaked!
Mit dieser Fehlermeldung sagt dir vbsp, dass es ein Leck im Level gab und die erste Entity, die es beim Versuch fand, aus der Leere in das Level zu gelangen (in diesem Fall eine Licht Entity). Es gibt dir ebenfalls die Position dieser Entity, ausgedrückt in X, Y, und Z Welteinheit-Koordinaten.
Leckeffekte
Ein Leck in einem Level hat eine Reihe schlechter Effekte. Als erstes wird der vbsp Prozess ein Leck melden und es wird keine portal-Datei (mapname.prt) erzeugt. Die portal-Datei wird vom vvis Prozess verwendet, um seine Sichtbarkeitsberechnungen durchzuführen. Gibt es keine portal-Datei, wird vvis nicht laufen. Wenn vvis nicht läuft, wird es nicht die notwendigen Dateien für den vrad Prozess produzieren, um die Lichtreflektionen zu berechnen. Deshalb wird der vrad Prozess nur direkte Beleuchtung ausführen - keine Lichtreflektionen.
Der bei weitem schwerwiegenste Effekt ist, dass der vvis Prozess nicht laufen wird, wenn ein Leck präsent ist. Wenn das Level im Spiel läuft, werden der Render Engine keine Sihtbarkeitsinformationen zur Verfügung stehen, um sich selbst zu beschränken, weshalb es versucht, die gesamte Map zu zeichnen. Das wird sicherlich zu einer hohen Polygonenanzahl und vielleicht zu fehlerhaft oder gar nicht gerenderten Stellen der Map führen.
Schnell auf Lecks prüfen
Der BSP Teil deiner Kompilierung wird immer alle Lecks melden, die es findet, aber viele Stunden Kompilierzeit und Spielausführung zu investieren, nur um herauszufinden, dass deine Map nach der Kompilierung brach, ist einfach nicht effizient. Wenn du den geringsten Verdacht hast, dass deine Map vielleicht ein Leck hat - gewöhnlich wenn du die Brushwork Grenzen deiner Map erweitert hast - kannst du durch das Öffnen des Run Map Dialog, deaktivieren der VIS und RAD Kompiliertools und aktivieren des Don't run game after compiling, eine schnelle Kompilierung starten, um nach BSP Fehlern zu suchen. Der Prozess zum überprüfen deiner gesamten Map nach Lecks wird nur etwa 8 Sekunden auf diese Art brauchen.
Lecks finden
Oft sind die Löcher nicht so groß wie hier im Beispiel. Sie können auch 1 Unit klein sein und trotzdem zu einem Leck führen. Der Compiler erstellt einen pointfile, welcher dir hilft Lecks zu finden. Das Pointfile wird von vbsp generiert und zeichnet eine Linie zwischen der Leere und dem Objekt welches es beim Leckcheck entdeckt hat. Wenn ein Leck auftritt, wird eine mapname.lin Datei im selben Ordner wie deine .vmf Datei erstellt.
Ein Pointfile laden
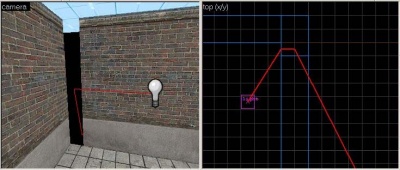
Das Pointfile kann im Hammer Editor geladen werden um dir präzise zu zeigen wo sich das leck befindet. Um das Pointfile zu laden nutze Load Pointfile im Map Menu.
Das Bild zeigt das geladene Pointfile im vorherigen Beispiel. Die rote Linie ist in der 3D sowie in der 2D Ansicht zu sehen, und wird vom Objekt zum Loch gezeichnet.
Durch das nutzen der visuellen Hilfe kannst du ganz einfach die Quelle finden, die für das Leck verantwortlich ist. Am besten startet man mit der Suche am Objekt welches in der vbsp Fehlernachricht genannt wird. Schließe das Loch und rekompiliere die Map um zu sehen ob das Leck beseitigt ist.
Den Endpunkt finden
TRANSLATION NOT FINISHED YET
ÜBERSETZUNG NOCH NICHT ABGESCHLOSSEN
If you're having trouble locating the start entity, you can use the Go to Coordinates command on the View menu to find the entity and the start of the pointfile line. Simply enter the coordinates given by vbsp for the entity location, and the 2D and 3D views will be centered on that location. Follow the line to find your leak.
Another method to find the source of the leak is to zoom out in one or more of the 2D views. After loading the pointfile, zoom out until you see the red line. Follow the line until you reach the entity at the one of the endpoints. Then select the entity, and choose Center 3D Views on Selection from the View menu. Now you can follow the pointfile line to find the leak.
Other causes of leaks
Besides gaps in outside geometry, there are other map errors that can cause vbsp to generate a leak error.
Entities outside the level
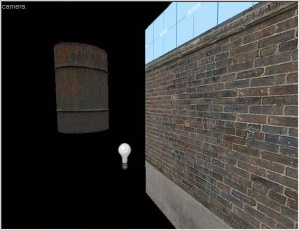
One common mistake is the accidental placement of an entity outside the interior level space. This can happen if you place an entity outside in the void area while you're working on it, then forget to delete it when you're finished. This can also occur if you attempt to seal the map with an brush entity, such as a func_door. Since brush entities do not block visibility, this will create the same condition as if there were a gap in their place. All entities must be inside valid level space, or the map will generate a leak. This is because vbsp determines the inside of the level depending on where it finds entities.
Improperly constructed areaportals
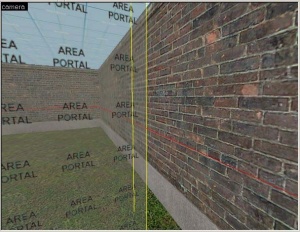
Leak error messages can also be generated when an areaportal does not properly seal the two areas it connects. Find leaks with areaportals using the same methods as geometry gap leaks.
See areaportal for more information on the uses of areaportals.
Non-solid geometry does not seal the world
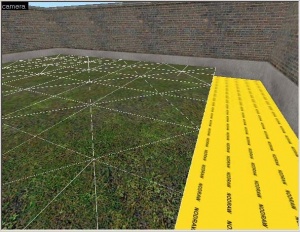
One more cause of leaks is if you try to seal a map using other types of non-solid geometry, such as displacements (terrain), water, or func_detail brushes. None of these non-solid brush types will block visibility and seal the world. Attempting to use them in this way will generate a leak. You can fix this type of leak by adding a solid brush behind them to seal the map. Using a brush with the tools/toolsnodraw material will seal the map, but not add any additional rendering cost, so it's a great way to seal the map behind non-solid geometry.
Mismatched entity origins
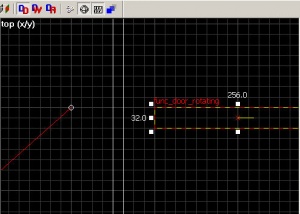
A more subtle cause of leaks can be with any entities that have origin helpers, such as func_door_rotating or func_rot_button. While the entity itself may be inside the world, if the origin helper is outside the map, the entity will cause a leak. If you find a pointfile heading to a empty spot outside of the map, and there is no entity there, an origin helper is a good thing to look for.
One way to quickly tell if an entity origin is causing the leak is to:
- Load the pointfile.
- Find the endpoint(s) of the pointfile.
- Choose Select All from the Edit Menu.
- Make sure Show Helpers is checked on the View Menu.
- If you see an origin helper appear at the pointfile, you know that's the problem.
If you have an origin helper causing a leak, you can select the object and manually move the origin back into the world, use the Center Origins command from the Tools Menu, or simply right-click on the origin helper and select Center on entity.
Mismatched entity origins usually occur when a brush entity with one of these helpers is moved while in Solids mode. Moving a brush entity in solids mode does not move the entity's origin helper.
Translucent geometry
There is a particular case where your geometry could be entirely sealed and yet a leak would constantly appear, even if you have absolutely no entity around the leak. If loading the pointfile doesn't help you at all, then you might be facing this particular situation. In this case, the red line would be passing through solid geometry. The cause is pretty simple - it is most likely that you have at least one of the brush sides textured with a translucent material. When this situation appear, the brush isn't able to seal anything anymore. In most cases, this will cause problems with areaportals that wouldn't be able to seal rooms. Remember that the sides in question could be located anywhere, even between other brushes.
Conclusion: An ounce of prevention
Using the pointfile tools makes finding leaks relatively painless, but one of the most important ways to fix leaks is by preventing them in the first place. Taking your time when building, and making sure brushes are snapped properly to the grid can go a long way towards eliminating leaks before they occur. The cleaner and more organized your geometry, the more likely you are to be able to spot leaks when they occur, or even prevent them from happening in the first place. You can also help prevent lots of extra work by compiling your level as you go along, instead of building your whole level before trying to compile it. Finding one leak at a time while the map is only partially complete is a lot easier and faster than finding a leaks in a complete map that is full of geometry.
