Creating an energy ball launcher and catcher: Difference between revisions
(POV) |
(cleanup (please don't spam the links to related articles. link the first instance and code-tag the rest. TLDR: In formatting, less still is more.)) |
||
| Line 1: | Line 1: | ||
== Introduction == | |||
= Introduction = | The purpose of this tutorial is to illustrate how to create a single ball launcher and have a single ball catcher as its target. Both, the launcher and the catcher instructions will detail how the basic animations as well as the visual and sound effects work. | ||
The purpose of this tutorial is to illustrate how to create a single ball launcher and have a single ball catcher | |||
=The Aperture Science High Energy Pellet Launcher = | == The Aperture Science High Energy Pellet Launcher == | ||
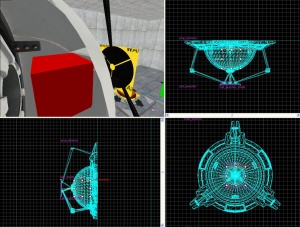
[[Image:launcher-catcher01.jpg|right|thumb|Launcher | [[Image:launcher-catcher01.jpg|right|thumb|Launcher assembly]] | ||
The launcher is comprised of three entities: | The launcher is comprised of three entities: | ||
* | * [[func_brush]] | ||
* | * [[point_energy_ball_launcher]] | ||
* | * [[prop_dynamic]] | ||
The model used is: | The model used is: | ||
* | * <code>models/props/combine_ball_launcher.mdl</code> | ||
To create the launcher: | To create the launcher: | ||
:1. | :1. Create a <code>prop_dynamic</code> entity (<code>Shift+E</code>) with a World Model set to "<code>models/props/combine_ball_launcher.mdl</code>" and the Name key of "ball_launcher". | ||
:2. | :2. Place the new entity where you want it in your map. | ||
:3. | :3. Create a <code>point_energy_ball_launcher</code> entity and set its name to "ball". | ||
:4. | :4. Place the new entity inside the dome of the "ball_launcher" model. | ||
:5. | :5. Create a new brush 20 units or so square and 1 unit thick with the [[Tool textures|nodraw texture]]. | ||
:6. | :6. Turn this brush into a <code>func_brush</code> entity (<code>Ctrl+T</code>) and name it "ball_launcher_shield". | ||
:7. | :7. Place the "ball_launcher_shield" so that it is touching the black circular shield of the "ball_launcher model". | ||
:8. | :8. Open up the <code>point_energy_ball_launcher</code> properties and set these outputs: | ||
::{| | ::{| | ||
! || My Output || Target Entity || Target Input || Parameter || Delay || Only Once | ! || My Output || Target Entity || Target Input || Parameter || Delay || Only Once | ||
| Line 28: | Line 31: | ||
| [[Image:Io11.png]] || OnPostSpawnBall || ball_launcher_shield || Enable || <none> || 2.00 || No | | [[Image:Io11.png]] || OnPostSpawnBall || ball_launcher_shield || Enable || <none> || 2.00 || No | ||
|} | |} | ||
:9. | :9. Adjust the [[Keyvalue|keyvalues]] of <code>point_energy_ball_launcher</code> to set the desired direction, speed, type, and life of the ball. | ||
The Aperture Science High Energy Pellet Launcher is now complete. | The Aperture Science High Energy Pellet Launcher is now complete. | ||
{{note| If | |||
=The Aperture Science High Energy Pellet Target = | {{note| If necessary, you can also place the <code>point_energy_ball_launcher</code> outside of the "<code>ball_launcher</code>" model and remove the "<code>ball_launcher_shield</code>" outputs.}} | ||
[[Image:launcher-catcher02.JPG|right|thumb|Target | |||
== The Aperture Science High Energy Pellet Target == | |||
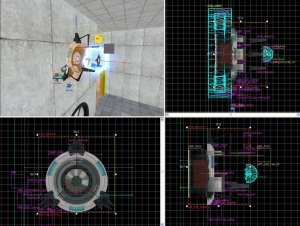
[[Image:launcher-catcher02.JPG|right|thumb|Target assembly]] | |||
The target is comprised of eleven entities: | The target is comprised of eleven entities: | ||
* | * [[ambient_generic]] | ||
* | * [[env_sprite]] | ||
* | * [[filter_combineball_type]] | ||
* | * [[func_tracktrain]] | ||
* | * [[logic_relay]] | ||
* | * [[path_track]] (2) | ||
* | * [[point_spotlight]] | ||
* | * [[prop_dynamic]] (2) | ||
* | * [[trigger_multiple]] | ||
The models used are: | The models used are: | ||
* | * <code>/models/props/combine_ball_catcher.mdl</code> | ||
* | * <code>/models/Effects/combineball.mdl</code> | ||
To create the catcher: | To create the catcher: | ||
:1. | :1. Create a <code>prop_dynamic</code> entity with a World Model key pointing to "<code>models/props/combine_ball_catcher.mdl</code>" and the Name set to "ball_trap". | ||
:2. | :2. Place the entity where you want it in your map. | ||
:3. | {{note|The model requires a hole of at least 32 units square and 8 units deep. Otherwise, when the model animates to its closed state, part of the model will be hidden in a wall.}} | ||
:4. | :3. Create a <code>filter_combineball_type</code> entity and name it filter_ball. | ||
:5. | :4. Set the ball type for "filter_ball" to "Launched by <code>point_combine_ball_launcher</code>". | ||
:6. | :5. Create a brush with the trigger texture to cover the opening of the "ball_trap" model. | ||
:7. | :6. Turn this brush into a <code>trigger_multiple</code> entity and name it "trigger_ball_trap", also set the filter_name to "filter_ball". | ||
:8. | :7. Create a <code>prop_dynamic</code> entity with a World Model of "<code>models/Effects/combineball.mdl</code>", set its parent to "ball_trap" and name it "ball_trap_ball". | ||
:9. | :8. Create a <code>env_sprite</code> entity, set its Sprite Name to "<code>sprites/physring1.vmt</code>", set its parent to "ball_trap" and name it "ball_trap_sprite". | ||
:10. | :9. Place both "ball_trap_ball" and "ball_trap_sprite" somewhere near the front of the "ball_trap" model. | ||
:11. | :10. Create a <code>logic_relay</code> entity and name it "relay_ball_trap_spawn". | ||
:11. Open up the <code>logic_relay</code> properties and set these outputs: | |||
::{| | ::{| | ||
! || My Output || Target Entity || Target Input || Parameter || Delay || Only Once | ! || My Output || Target Entity || Target Input || Parameter || Delay || Only Once | ||
| Line 65: | Line 74: | ||
| [[Image:Io11.png]] || OnSpawn || ball_trap_sprite || SetParentAttachment || ball_attachment || 0.00 || No | | [[Image:Io11.png]] || OnSpawn || ball_trap_sprite || SetParentAttachment || ball_attachment || 0.00 || No | ||
|} | |} | ||
:12. | :12. Create a <code>path_track</code> entity and name it "path_ball_trap_01", set Next Stop Target to "path_ball_trap_02". | ||
:13. | :13. Place "path_ball_trap_01" in front of and slightly above the "ball_trap" model. | ||
:14. | :14. Create a <code>path_track</code> entity and name it "path_ball_trap_02, set Next Stop Target to "path_ball_trap_01". | ||
:15. | :15. Place "path_ball_trap_02" behind and slightly above the "ball_trap" model. | ||
:16. | :16. Create a brush with the nodraw texture. | ||
:17. | :17. Turn this brush into a <code>func_tracktrain</code> entity and name it "ball_trap_door". | ||
:18. | :18. Place brush slightly above the two <code>path_track</code> entities and behind the "path_ball_trap_01". | ||
:19. | :19. Open up the property window for "ball_trap_door" and set these keyvalues: | ||
::{| | ::{| | ||
! Property Name || Value | ! Property Name || Value | ||
| Line 79: | Line 88: | ||
|- | |- | ||
| Move Sound || d3_citadel.podarm_move | | Move Sound || d3_citadel.podarm_move | ||
|- | |- | ||
| Start Sound || d3_citadel.podarm_move_start | | Start Sound || d3_citadel.podarm_move_start | ||
| Line 85: | Line 93: | ||
| Stop Sound || d3_citadel.podarm_move_stop | | Stop Sound || d3_citadel.podarm_move_stop | ||
|} | |} | ||
:20. | :20. Open up the property window for "path_ball_trap_02" and set this output: | ||
::{| | ::{| | ||
! || My Output || Target Entity || Target Input || Parameter || Delay || Only Once | ! || My Output || Target Entity || Target Input || Parameter || Delay || Only Once | ||
| Line 91: | Line 99: | ||
| [[Image:Io11.png]] || OnPass || ball_trap_door || SetSpeed || 0 || 0.00 || No | | [[Image:Io11.png]] || OnPass || ball_trap_door || SetSpeed || 0 || 0.00 || No | ||
|} | |} | ||
:21. | :21. Create a <code>point_spotlight</code> entity (Shift + E) and name it "ball_trap_spotlight" You may also want to disable the dynamic light flag. | ||
:22. | :22. Set the color for "ball_trap_spotlight" to "255 0 0", the beam length is normally the length of the room, and the width somewhere between 20 and 40. | ||
:23. | :23. Create an <code>ambient_generic</code> entity and name it "ball_trap_sound" | ||
:24. | :24. Set the Sound Name key for "ball_trap_sound" to "AlyxEMP.Charge" | ||
:25 | :25. Open the property window for "trigger_ball_trap" and set these outputs: | ||
::{| | ::{| | ||
! || My Output || Target Entity || Target Input || Parameter || Delay || Only Once | ! || My Output || Target Entity || Target Input || Parameter || Delay || Only Once | ||
| Line 117: | Line 125: | ||
| [[Image:Io11.png]] || OnStartTouch || ball_trap_sound || PlaySound || <none> || 0.00 || No | | [[Image:Io11.png]] || OnStartTouch || ball_trap_sound || PlaySound || <none> || 0.00 || No | ||
|} | |} | ||
::Then under Flags | ::Then under the Flags tab un-check "clients" and check everything else. | ||
The Aperture Science High Energy Pellet Target is now complete. | The Aperture Science High Energy Pellet Target is now complete. | ||
{{note|The "ball_trap_door" sounds are drowned out by the "ball_trap_sound", you may want to adjust the delay for the <code>PlaySound</code>}} | |||
== The theory == | |||
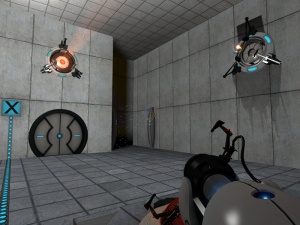
[[Image:launcher-catcher03.jpg|right|thumb|Energy Pellet Launcher and Target at work]] | |||
These instructions illustrate the most basic use of the launcher and catchers. Theoretically you should be able to have one launcher and multiple catchers, or even catchers that reset themselves.{{clr}} | |||
== See also == | |||
* [[Portal Level Creation]] | |||
[[Category:Level Design Tutorials]] | |||
Revision as of 14:55, 1 December 2007
Introduction
The purpose of this tutorial is to illustrate how to create a single ball launcher and have a single ball catcher as its target. Both, the launcher and the catcher instructions will detail how the basic animations as well as the visual and sound effects work.
The Aperture Science High Energy Pellet Launcher
The launcher is comprised of three entities:
The model used is:
models/props/combine_ball_launcher.mdl
To create the launcher:
- 1. Create a
prop_dynamicentity (Shift+E) with a World Model set to "models/props/combine_ball_launcher.mdl" and the Name key of "ball_launcher". - 2. Place the new entity where you want it in your map.
- 3. Create a
point_energy_ball_launcherentity and set its name to "ball". - 4. Place the new entity inside the dome of the "ball_launcher" model.
- 5. Create a new brush 20 units or so square and 1 unit thick with the nodraw texture.
- 6. Turn this brush into a
func_brushentity (Ctrl+T) and name it "ball_launcher_shield". - 7. Place the "ball_launcher_shield" so that it is touching the black circular shield of the "ball_launcher model".
- 8. Open up the
point_energy_ball_launcherproperties and set these outputs:
- 9. Adjust the keyvalues of
point_energy_ball_launcherto set the desired direction, speed, type, and life of the ball.
The Aperture Science High Energy Pellet Launcher is now complete.
point_energy_ball_launcher outside of the "ball_launcher" model and remove the "ball_launcher_shield" outputs.The Aperture Science High Energy Pellet Target
The target is comprised of eleven entities:
- ambient_generic
- env_sprite
- filter_combineball_type
- func_tracktrain
- logic_relay
- path_track (2)
- point_spotlight
- prop_dynamic (2)
- trigger_multiple
The models used are:
/models/props/combine_ball_catcher.mdl/models/Effects/combineball.mdl
To create the catcher:
- 1. Create a
prop_dynamicentity with a World Model key pointing to "models/props/combine_ball_catcher.mdl" and the Name set to "ball_trap". - 2. Place the entity where you want it in your map.
- 3. Create a
filter_combineball_typeentity and name it filter_ball. - 4. Set the ball type for "filter_ball" to "Launched by
point_combine_ball_launcher". - 5. Create a brush with the trigger texture to cover the opening of the "ball_trap" model.
- 6. Turn this brush into a
trigger_multipleentity and name it "trigger_ball_trap", also set the filter_name to "filter_ball". - 7. Create a
prop_dynamicentity with a World Model of "models/Effects/combineball.mdl", set its parent to "ball_trap" and name it "ball_trap_ball". - 8. Create a
env_spriteentity, set its Sprite Name to "sprites/physring1.vmt", set its parent to "ball_trap" and name it "ball_trap_sprite". - 9. Place both "ball_trap_ball" and "ball_trap_sprite" somewhere near the front of the "ball_trap" model.
- 10. Create a
logic_relayentity and name it "relay_ball_trap_spawn". - 11. Open up the
logic_relayproperties and set these outputs:
- 12. Create a
path_trackentity and name it "path_ball_trap_01", set Next Stop Target to "path_ball_trap_02". - 13. Place "path_ball_trap_01" in front of and slightly above the "ball_trap" model.
- 14. Create a
path_trackentity and name it "path_ball_trap_02, set Next Stop Target to "path_ball_trap_01". - 15. Place "path_ball_trap_02" behind and slightly above the "ball_trap" model.
- 16. Create a brush with the nodraw texture.
- 17. Turn this brush into a
func_tracktrainentity and name it "ball_trap_door". - 18. Place brush slightly above the two
path_trackentities and behind the "path_ball_trap_01". - 19. Open up the property window for "ball_trap_door" and set these keyvalues:
Property Name Value First Stop Target path_ball_trap_01 Move Sound d3_citadel.podarm_move Start Sound d3_citadel.podarm_move_start Stop Sound d3_citadel.podarm_move_stop
- 20. Open up the property window for "path_ball_trap_02" and set this output:
- 21. Create a
point_spotlightentity (Shift + E) and name it "ball_trap_spotlight" You may also want to disable the dynamic light flag. - 22. Set the color for "ball_trap_spotlight" to "255 0 0", the beam length is normally the length of the room, and the width somewhere between 20 and 40.
- 23. Create an
ambient_genericentity and name it "ball_trap_sound" - 24. Set the Sound Name key for "ball_trap_sound" to "AlyxEMP.Charge"
- 25. Open the property window for "trigger_ball_trap" and set these outputs:
- Then under the Flags tab un-check "clients" and check everything else.
The Aperture Science High Energy Pellet Target is now complete.
PlaySoundThe theory
These instructions illustrate the most basic use of the launcher and catchers. Theoretically you should be able to have one launcher and multiple catchers, or even catchers that reset themselves.


