Uk/Installing Hammer++ for Other Games: Difference between revisions
No edit summary |
No edit summary |
||
| Line 1: | Line 1: | ||
{{Toc-right}} | |||
{{Back|Hammer++}} | |||
{{hammerpp|4}} is a powerful mapping tool that solves many issues that the {{hammer|3.1|nt=1}} introduces, and adds some much needed features that useful to every mapper. However the only official versions of Hammer++ available are for {{css|3.1}}, {{src13sp|3.1}}, {{src13mp|3.1}}, {{tf2|3.1}} and {{csgo|3.1}}. Thankfully, it is possible to configure Hammer++ to use assets and compilers for other games that they were not originally intended for, including {{portal2|3.1}}, {{l4d2|3.1}}, {{bms|3.1}}, and more! Almost every source game can run using some version of Hammer++. The games in the list below have been proven to work using the method below: | |||
<onlyinclude> | |||
{| class="standard-table" | {| class="standard-table" | ||
|+ | |+ | ||
! | !Game | ||
! | !Hammer++ Version | ||
! | !Notes | ||
|- | |- | ||
| {{Portal2|4.1}} | | {{Portal2|4.1}} | ||
| {{csgo|nt=1|3.1}} | | {{csgo|nt=1|3.1}} | ||
| | | None | ||
|- | |- | ||
| {{p2ce|4.1}} | | {{p2ce|4.1}} | ||
| {{csgo|nt=1|3.1}} | | {{csgo|nt=1|3.1}} | ||
| | | Unsupported by devs; They will not help if any issues are found | ||
|- | |- | ||
| {{l4d2|4.1}} | | {{l4d2|4.1}} | ||
| {{csgo|nt=1|3.1}} | | {{csgo|nt=1|3.1}} | ||
| | | Some models may appear as errors | ||
|- | |- | ||
| {{momentum|4.1}} | | {{momentum|4.1}} | ||
| Line 28: | Line 31: | ||
| {{gmod|4.1}} | | {{gmod|4.1}} | ||
| {{src13mp|3.1}} | | {{src13mp|3.1}} | ||
| | | Similar to [[Installing Hammer++ for Other Games#Installing Hammer++|standard method]], but make sure to view [https://github.com/RealParSec/realparsec.github.io/blob/master/README.md this file] as well for additional steps | ||
|- | |- | ||
| {{dods|4.1}} | | {{dods|4.1}} | ||
| Line 36: | Line 39: | ||
| {{bms|4.1}} (Steam) | | {{bms|4.1}} (Steam) | ||
| {{src13mp|3.1}} | | {{src13mp|3.1}} | ||
| | | New lighting entities may not show in lighting preview; use old entities during light test and swap to final for full compile | ||
|- | |- | ||
| {{bms|4.1}} (Mod) | | {{bms|4.1}} (Mod) | ||
| {{src13sp|3.1}} | | {{src13sp|3.1}} | ||
| | | Make sure to point towards the Source 2007 compilers! | ||
|- | |- | ||
| {{mapbase|4.1}} | | {{mapbase|4.1}} | ||
| {{src13sp|3.1}} | | {{src13sp|3.1}} | ||
| | | None | ||
|} | |}</onlyinclude> | ||
<br/> | |||
'''This method and accompanying pictures were taken from [https://steamcommunity.com/sharedfiles/filedetails/?id=2742731712 this steam guide] by the user [https://steamcommunity.com/id/erin-rose-webs Erin-Rose-Webs].''' | |||
==Installing Hammer++== | |||
[[File:Noconfig hpp.png|150px|right|thumb|The popup you will see when first starting Hammer++]] | |||
{{ModernNote|For the sake of this tutorial, Portal 2 will be used as an example. Make sure to replace the appropriate files and downloads with the corresponding version stated above.}} | |||
{{ModernWarning|Make sure you have opened the expert compile dialogue in stock Hammer at least once before this process, as doing so creates an important file that must exist before any map can be compiled in Hammer++.}} | |||
===Download List=== | |||
:- https://ficool2.github.io/HammerPlusPlus-Website/download.html | |||
:- https://schinagl.priv.at/nt/hardlinkshellext/linkshellextension.html#download (This is not required, but will make the process much easier) | |||
:- Game with supported Hammer++ version (See Above, Portal 2 uses CS:GO) | |||
===Installing Hammer++ on supported game=== | |||
The next step is actually installing Hammer++ into the files. Extract the <code>bin</code> folder in the archive into the Counter Strike: Global Offensive folder in your <code>steamapps/common</code> folder. Now, go into the <code>bin</code> folder and launch Hammer++. Now, we will create a new configuration pointed at the Portal 2 assets. Now, this is where things can get complicated. You will now launch the <code>hammerplusplus.exe</code> executable. You will get a popup that says that there are no configurations. Make sure to click no, otherwise you will get redirected to another article on this wiki. After clicking no, you will see a screen that is similar to the one seen below, but just completely blank:<br/> | |||
[[File:P2hammerppSetup1.png|250px]] <br/> | |||
Then, copy the information that is seen above into the respective boxes. If your game is in a separate folder than your normal steam directory, you will have to replace <code>$SteamUserDir</code> with the full file directory. Now click "Ok" to close and save this information. You will get two popups that say how this information will not update until Hammer++ restarts, but they are not important so just click "Ok" on both. With this completed, you are halfway done with configuring Hammer++. | |||
Now, for compiling the map, we need to define the build programs. Go to Tools>Options>Build programs and copy the information below:<br/> | |||
[[File:P2hammerppSetup2.png|250px]]<br/> | |||
After you do this, press "Apply" then press "Ok" to save your changes. Then, close Hammer++. Now, we will have to bring over Portal 2's lighting data into CS:GO. Because Portal 2 had different texlights compared to CS:GO, we need to define portal 2's lights in the CS:GO directory l. Open Portal 2's <code>lights.rad</code> located in <code>Portal 2/portal2</code> with any text editor and copy all of its contents. Then, go to CS:GO's lights file and paste Portal 2's contents at the bottom of the file. It should look similar to this (comments not needed):<br/> | |||
[[File:P2hammerppSetup5.png|300px]]<br/> | |||
You have now completed the setup of Hammer++! However if you load a new map you will find that many of your custom models and textures are missing. This is because the program is searching through the CS:GO directory for the necessary files and then it doesn't find them it presents you with a missing model/texture. To fix this, we will need to create symbolic links. | |||
==Adding custom content== | |||
This is where things can get complicating. You can copy-paste all your custom files, but that can bloat your hard drive more than it needs to. Instead, it can be more space effective to create symbolic links. This is where the Link Shell Extension can help, but it is possible to use command prompt. | |||
First, navigate to <code>Portal 2\portal2\Gameinfo.txt</code> and add all the Portal_dlcx folders as well as all your custom folders following the format seen below: <br/> | |||
[[File:P2hammerppSetup3.png|275px]] <br/> | |||
We do this because CS:GO's engine, and in turn Hammer++'s engine, do not search automatically for the dlcs folders, so we have to manually list them. | |||
===Link Shell Extension=== | |||
Go to your base Portal 2 directory and Ctrl+Left click all your custom folders and dlcs folders and right click. Select "Choose link source" to start creating links. Then, go to your CS:GO directory and right click an empty space. Hover over "Drop link as" and select "Symbolic Links". | |||
===Command Prompt Method=== | |||
Press the Windows key on your keyboard and type "cmd". Right click "Command Prompt" and click "Run as Administrator." A User Account Control prompt should pop up, press "Ok". | |||
{{ModernNote|If you are on Windows 11, you do not need to run Command Prompt as administrator to access the mklink command}} | |||
Now, type something similar to this: <br/> | |||
mklink /j "C:\Program Files (x86)\Steam\steamapps\common\Counter-Stike Global Offensive\portal2_dlc1" "C:\Program Files (x86)\Steam\steamapps\common\Portal 2\portal2_dlc1" | |||
{{ModernTip|Make sure to replace the file paths with the file paths that link to your CS:GO and Portal 2 directories.}} | |||
The first directory is the name of the folder the link will be named. The second directory is the name of the folder you are linking to. To simplify, by running this command you are creating a folder in your CS:GO directory called <code>portal2_dlc1</code> that, when you open it, will show all the contents of the same folder, but in your Portal 2 directory. By creating this link you are not actually copying the files in those folders, you are essentially tricking Hammer++ into thinking that it is accessing a folder in CS:GO's directory when it is actually seeing files located in Portal 2's directory. This also works across drives, so you can have symbolic links on your <code>D:</code> drive that point to folders in your <code>C:</code> drive. | |||
You will now repeat this process for every custom folder you use, including the dlc folders. | |||
===Final Result=== | |||
After you make links to all the folders, your CS:GO folder should look similar to this, just with all your custom folders instead: <br/> | |||
[[File:P2hammerppSetup4.png|250px]]<br/> | |||
Now to fix the Hammer models, open the <code>Counter-Stike Global Offensive\platform</code> folder and delete the <code>materials</code> and <code>Models</code> folder and replace them with Symbolic Links to their respective folders in the <code>Portal 2\platform</code> folder. It should look similar to this: <br/> | |||
[[File:P2hammerppSetup6.png|250px]] <br/> | |||
{{ModernNote|Even after all these steps, some L4D2 models or textures may appear as missing. Unfortunately, this cannot be fixed. If you need to accurately position these models or textures, use the version of Hammer included in the Left 4 Dead 2 Authoring Tools. Do remember to save frequently; stock Hammer does have some stability issues.}} | |||
After you do this, open Hammer++ again. Now, you should be set! To get a list of all new features, try checking out the Hammer++ website and its page on [[Hammer++|this wiki.]] For general Hammer assistance, check out [[:Category:Hammer|this article]]. | |||
{{ModernNote|Some mods use the original game's assets folder for shared content. While this is a bad practice, it must also be taken into account when pointing towards game files. Make sure that if this is the case to also create symbolic links to the original game's vpk folder.}} | |||
==External Links== | |||
[https://steamcommunity.com/sharedfiles/filedetails/?id=2742731712 Installing Hammer++ For Portal 2 (original guide)] <br/> | |||
[https://ficool2.github.io/HammerPlusPlus-Website/index.html Hammer++ Website] <br/> | |||
[https://steamcommunity.com/linkfilter/?url=https://schinagl.priv.at/nt/hardlinkshellext/linkshellextension.html#download Link Shell Extension Website] | |||
[[Category:Hammer]] | |||
Revision as of 04:56, 23 June 2023
![]() Hammer++ is a powerful mapping tool that solves many issues that the Valve Hammer Editor introduces, and adds some much needed features that useful to every mapper. However the only official versions of Hammer++ available are for Counter-Strike: Source, Source 2013 Singleplayer, Source 2013 Multiplayer, Team Fortress 2 and Counter-Strike: Global Offensive. Thankfully, it is possible to configure Hammer++ to use assets and compilers for other games that they were not originally intended for, including Portal 2, Left 4 Dead 2, Black Mesa, and more! Almost every source game can run using some version of Hammer++. The games in the list below have been proven to work using the method below:
Hammer++ is a powerful mapping tool that solves many issues that the Valve Hammer Editor introduces, and adds some much needed features that useful to every mapper. However the only official versions of Hammer++ available are for Counter-Strike: Source, Source 2013 Singleplayer, Source 2013 Multiplayer, Team Fortress 2 and Counter-Strike: Global Offensive. Thankfully, it is possible to configure Hammer++ to use assets and compilers for other games that they were not originally intended for, including Portal 2, Left 4 Dead 2, Black Mesa, and more! Almost every source game can run using some version of Hammer++. The games in the list below have been proven to work using the method below:
| Game | Hammer++ Version | Notes |
|---|---|---|
| CS:GO | None | |
| CS:GO | Unsupported by devs; They will not help if any issues are found | |
| CS:GO | Some models may appear as errors | |
| CS:GO | [Template:Dictionary/Confirm/uk] | |
| CS:GO | [Template:Dictionary/Confirm/uk] | |
| Source 2013 Multiplayer | Similar to standard method, but make sure to view this file as well for additional steps | |
| Source 2013 Multiplayer | None | |
| Source 2013 Multiplayer | New lighting entities may not show in lighting preview; use old entities during light test and swap to final for full compile | |
| Source 2013 Singleplayer | Make sure to point towards the Source 2007 compilers! | |
| Source 2013 Singleplayer | None |
This method and accompanying pictures were taken from this steam guide by the user Erin-Rose-Webs.
Installing Hammer++
Template:ModernNote Template:ModernWarning
Download List
- - https://ficool2.github.io/HammerPlusPlus-Website/download.html
- - https://schinagl.priv.at/nt/hardlinkshellext/linkshellextension.html#download (This is not required, but will make the process much easier)
- - Game with supported Hammer++ version (See Above, Portal 2 uses CS:GO)
Installing Hammer++ on supported game
The next step is actually installing Hammer++ into the files. Extract the bin folder in the archive into the Counter Strike: Global Offensive folder in your steamapps/common folder. Now, go into the bin folder and launch Hammer++. Now, we will create a new configuration pointed at the Portal 2 assets. Now, this is where things can get complicated. You will now launch the hammerplusplus.exe executable. You will get a popup that says that there are no configurations. Make sure to click no, otherwise you will get redirected to another article on this wiki. After clicking no, you will see a screen that is similar to the one seen below, but just completely blank:
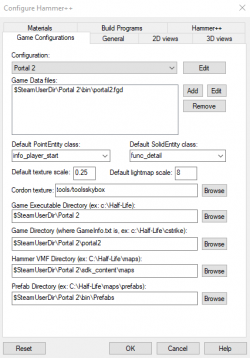
Then, copy the information that is seen above into the respective boxes. If your game is in a separate folder than your normal steam directory, you will have to replace $SteamUserDir with the full file directory. Now click "Ok" to close and save this information. You will get two popups that say how this information will not update until Hammer++ restarts, but they are not important so just click "Ok" on both. With this completed, you are halfway done with configuring Hammer++.
Now, for compiling the map, we need to define the build programs. Go to Tools>Options>Build programs and copy the information below:
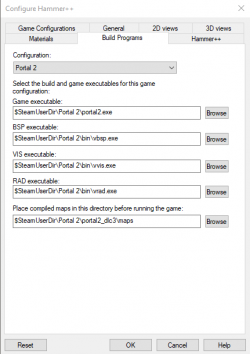
After you do this, press "Apply" then press "Ok" to save your changes. Then, close Hammer++. Now, we will have to bring over Portal 2's lighting data into CS:GO. Because Portal 2 had different texlights compared to CS:GO, we need to define portal 2's lights in the CS:GO directory l. Open Portal 2's lights.rad located in Portal 2/portal2 with any text editor and copy all of its contents. Then, go to CS:GO's lights file and paste Portal 2's contents at the bottom of the file. It should look similar to this (comments not needed):
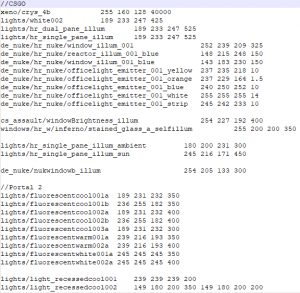
You have now completed the setup of Hammer++! However if you load a new map you will find that many of your custom models and textures are missing. This is because the program is searching through the CS:GO directory for the necessary files and then it doesn't find them it presents you with a missing model/texture. To fix this, we will need to create symbolic links.
Adding custom content
This is where things can get complicating. You can copy-paste all your custom files, but that can bloat your hard drive more than it needs to. Instead, it can be more space effective to create symbolic links. This is where the Link Shell Extension can help, but it is possible to use command prompt.
First, navigate to Portal 2\portal2\Gameinfo.txt and add all the Portal_dlcx folders as well as all your custom folders following the format seen below:
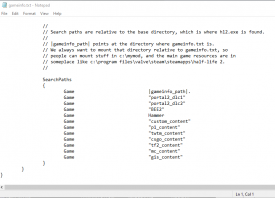
We do this because CS:GO's engine, and in turn Hammer++'s engine, do not search automatically for the dlcs folders, so we have to manually list them.
Link Shell Extension
Go to your base Portal 2 directory and Ctrl+Left click all your custom folders and dlcs folders and right click. Select "Choose link source" to start creating links. Then, go to your CS:GO directory and right click an empty space. Hover over "Drop link as" and select "Symbolic Links".
Command Prompt Method
Press the Windows key on your keyboard and type "cmd". Right click "Command Prompt" and click "Run as Administrator." A User Account Control prompt should pop up, press "Ok".
Template:ModernNote
Now, type something similar to this:
mklink /j "C:\Program Files (x86)\Steam\steamapps\common\Counter-Stike Global Offensive\portal2_dlc1" "C:\Program Files (x86)\Steam\steamapps\common\Portal 2\portal2_dlc1"
Template:ModernTip
The first directory is the name of the folder the link will be named. The second directory is the name of the folder you are linking to. To simplify, by running this command you are creating a folder in your CS:GO directory called portal2_dlc1 that, when you open it, will show all the contents of the same folder, but in your Portal 2 directory. By creating this link you are not actually copying the files in those folders, you are essentially tricking Hammer++ into thinking that it is accessing a folder in CS:GO's directory when it is actually seeing files located in Portal 2's directory. This also works across drives, so you can have symbolic links on your D: drive that point to folders in your C: drive.
You will now repeat this process for every custom folder you use, including the dlc folders.
Final Result
After you make links to all the folders, your CS:GO folder should look similar to this, just with all your custom folders instead:
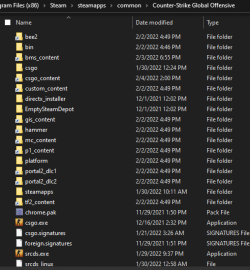
Now to fix the Hammer models, open the Counter-Stike Global Offensive\platform folder and delete the materials and Models folder and replace them with Symbolic Links to their respective folders in the Portal 2\platform folder. It should look similar to this:
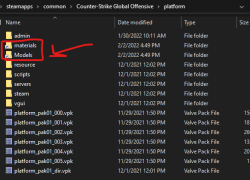
Template:ModernNote
After you do this, open Hammer++ again. Now, you should be set! To get a list of all new features, try checking out the Hammer++ website and its page on this wiki. For general Hammer assistance, check out this article.
External Links
Installing Hammer++ For Portal 2 (original guide)
Hammer++ Website
Link Shell Extension Website
