Hammer Camera Tool: Difference between revisions
No edit summary |
Kestrelguy (talk | contribs) m (updated language bar.) |
||
| Line 1: | Line 1: | ||
{{ | {{lang|Hammer Camera Tool}}[[Category:Hammer Tools]] | ||
| | |||
[[Image:mt-camera.png|float|left]] | [[Image:mt-camera.png|float|left]] | ||
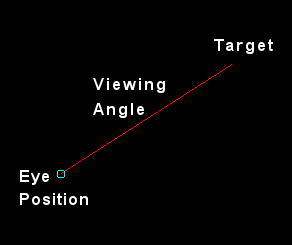
[[Image:camera_angle.png|frame|right|The | [[Image:camera_angle.png|frame|right|The camera components shown in the 2D Views.]] | ||
The '''Camera Tool''' allows you to place and modify cameras within your level. While in camera mode, hold | The '''Camera Tool''' allows you to place and modify cameras within your level. While in camera mode, hold {{key|Shift}} and left-click and drag in any 2D view to create the camera. A line with a dot (the view point) will be drawn in the 2D views. You can adjust it until it is pointing in the direction you'd like by Left-clicking and dragging on the dot to reposition the camera viewpoint. Click and drag at the end of the line to move the target that the camera is looking towards. Hold down {{key|Ctrl}} to move the both camera points simultaneously. To place more than one camera in a level, repeat the above steps. | ||
Cameras are good for helping you visualize the creation of your level. They are especially useful when using the | Cameras are good for helping you visualize the creation of your level. They are especially useful when using the {{Hammer vertex}}, as they allow you to see exactly what you are doing to a brush. You will also find multiple cameras especially useful if you are working on several areas of a level at once. Placing a new camera in an area negates the need to search for that area when you want to work on it again. Additionally, cameras are useful if you want to take multiple pictures of an area from the same exact spot.{{clr}} | ||
== Using multiple cameras | == Using Multiple Cameras == | ||
There are a number of options available to you when using multiple cameras. You must have the {{Hammer camera}} selected to take advantage of these: | |||
* {{key|PgUp}} — Cycle up to the next camera position. | |||
* {{key|PgDn}} — Cycle down to the last camera position. | |||
* {{key|Delete}} — Delete the current camera position. If you delete the last camera position, a new one is automatically created at the [[origin]] of the map grid. | |||
* {{key|Shift}} — Hold and click-drag with the left mouse button to create a new camera. | |||
== Creating New Cameras == | |||
== Creating | |||
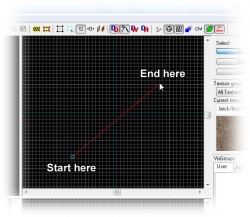
[[Image:Hammer_top2dview2.jpg|thumb|250px|right|Creating a new camera.]] | [[Image:Hammer_top2dview2.jpg|thumb|250px|right|Creating a new camera.]] | ||
To create a viewpoint camera: | To create a viewpoint camera: | ||
# Select the | # Select the {{Hammer camera}}. | ||
# Hold down | # Hold down {{key|Shift}} and drag a line in any 2D view. | ||
# Click and drag the circle to move the camera position in any 2D view. | # Click and drag the circle to move the camera position in any 2D view. | ||
# Click and drag the end of the line to move the position the camera is pointing at. | # Click and drag the end of the line to move the position the camera is pointing at. | ||
{{clr}} | |||
== See Also == | == See Also == | ||
* [[Hammer Viewports]] | |||
[[Hammer Viewports | |||
Revision as of 19:56, 15 June 2022
The Camera Tool allows you to place and modify cameras within your level. While in camera mode, hold ⇧ Shift and left-click and drag in any 2D view to create the camera. A line with a dot (the view point) will be drawn in the 2D views. You can adjust it until it is pointing in the direction you'd like by Left-clicking and dragging on the dot to reposition the camera viewpoint. Click and drag at the end of the line to move the target that the camera is looking towards. Hold down Ctrl to move the both camera points simultaneously. To place more than one camera in a level, repeat the above steps.
Cameras are good for helping you visualize the creation of your level. They are especially useful when using the Vertex tool ![]() , as they allow you to see exactly what you are doing to a brush. You will also find multiple cameras especially useful if you are working on several areas of a level at once. Placing a new camera in an area negates the need to search for that area when you want to work on it again. Additionally, cameras are useful if you want to take multiple pictures of an area from the same exact spot.
, as they allow you to see exactly what you are doing to a brush. You will also find multiple cameras especially useful if you are working on several areas of a level at once. Placing a new camera in an area negates the need to search for that area when you want to work on it again. Additionally, cameras are useful if you want to take multiple pictures of an area from the same exact spot.
Using Multiple Cameras
There are a number of options available to you when using multiple cameras. You must have the Camera tool ![]() selected to take advantage of these:
selected to take advantage of these:
- PgUp — Cycle up to the next camera position.
- PgDn — Cycle down to the last camera position.
- Delete — Delete the current camera position. If you delete the last camera position, a new one is automatically created at the origin of the map grid.
- ⇧ Shift — Hold and click-drag with the left mouse button to create a new camera.
Creating New Cameras
To create a viewpoint camera:
- Select the Camera tool
 .
. - Hold down ⇧ Shift and drag a line in any 2D view.
- Click and drag the circle to move the camera position in any 2D view.
- Click and drag the end of the line to move the position the camera is pointing at.

