Creating an incinerator: Difference between revisions
Jump to navigation
Jump to search

 Warning:This tutorial is incomplete/possibly inaccurate! Someone experienced with Portal mapping is required to check for errors.
No edit summary |
No edit summary |
||
| Line 31: | Line 31: | ||
|- | |- | ||
|} | |} | ||
<li>Create a room under it with the walls textured with "<code>metal/metalwall048c_gradient</code>" and the floors textured with "<code>lights/light_orange001</code>". | |||
<li>Create a <code>[[filter_activator_name]]</code> nearby your button with the following properties: | |||
::{| class=standard-table | ::{| class=standard-table | ||
! | ! Property Name || Value | ||
|- | |- | ||
| | | Name || filter_victim_box | ||
|- | |- | ||
| | | Filter Name || victim_box | ||
|} | |}</li> | ||
<li> | |||
<li>Create a 2 unit tall <code>[[trigger_once]]</code> covering the bottom of the room with the following properties: | <li>Create a 2 unit tall <code>[[trigger_once]]</code> covering the bottom of the room with the following properties: | ||
::{| class=standard-table | ::{| class=standard-table | ||
| Line 46: | Line 46: | ||
| Name || trigger_door1 | | Name || trigger_door1 | ||
|- | |- | ||
| Filter Name || | | Filter Name || filter_victim_box | ||
|- | |- | ||
|}</li> | |}</li> | ||
| Line 53: | Line 53: | ||
=== Step 3 - The Door === | === Step 3 - The Door === | ||
<ol start=" | <ol start="6"><li>Refer to [[Creating_a_button_and_door#The_door_setup]] for door creation.</li></ol> | ||
=== Step | === Step 4 - The Button === | ||
<!--Copied straight from http://developer.valvesoftware.com/wiki/Creating_a_button_and_door#The_button and modified to fit tutorial--> | <!--Copied straight from http://developer.valvesoftware.com/wiki/Creating_a_button_and_door#The_button and modified to fit tutorial--> | ||
<ol start="7"> | <ol start="7"> | ||
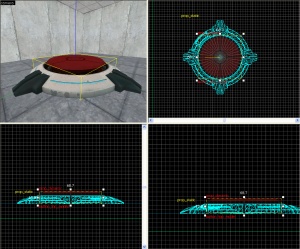
[[Image: | [[Image:Buttonanddoor3.jpg|right|thumb|How to align the button models.]] | ||
<li>Create a <code> | <li>Create a <code>prop_static</code> with the following properties: | ||
::{| class=standard-table | ::{| class=standard-table | ||
! Property Name || Value | ! Property Name || Value | ||
|- | |- | ||
| | | World Model || <code>models/props/button_base_reference.mdl</code> | ||
|} | |}</li> | ||
<li>Create a <code>prop_dynamic</code> aligned on top of the <code>prop_static</code> with the following properties: | |||
<li>Create a <code> | |||
::{| class=standard-table | ::{| class=standard-table | ||
! Property Name || Value | ! Property Name || Value | ||
|- | |- | ||
| Name || | | Name || button_top_model | ||
|- | |- | ||
| | | World Model || models/props/button_top_reference.mdl | ||
|}</li> | |}</li> | ||
<li>Create an <code>[[ambient_generic]]</code> with the following properties: | <li>Create an <code>[[ambient_generic]]</code> with the following properties: | ||
::{| class=standard-table | ::{| class=standard-table | ||
| Line 94: | Line 82: | ||
| Source Entity Name || button_top_model | | Source Entity Name || button_top_model | ||
|}</li> | |}</li> | ||
<li>Create another <code> | <li>Create another <code>ambient_generic</code> with the following properties: | ||
::{| class=standard-table | ::{| class=standard-table | ||
! Property Name || Value | ! Property Name || Value | ||
| Line 104: | Line 92: | ||
| Source Entity Name || button_top_model | | Source Entity Name || button_top_model | ||
|}</li> | |}</li> | ||
<li> | </li>Create a <code>58Wx58Lx9H</code> cylinder <code>[[func_door]]</code> with 8 sides with the following properties: | ||
::{| class=standard-table | ::{| class=standard-table | ||
! | ! Property Name || Value | ||
|- | |||
| Name || button_top_door | |||
|- | |- | ||
| | | Speed || 25 | ||
|- | |- | ||
| | | Delay before Reset || -1 | ||
|- | |||
| Move Direction || 90 0 0 (or Down) | |||
|} | |||
Give it the following outputs: | |||
::{| class=standard-table | |||
! || My Output || Target Entity || Target Input || Parameter || Delay || Only Once | |||
|- | |- | ||
| [[Image:Io11.png]] || OnClose || button_up || PlaySound || <none> || 0.00 || No | | [[Image:Io11.png]] || OnClose || button_up || PlaySound || <none> || 0.00 || No | ||
|- | |- | ||
| [[Image:Io11.png]] || OnOpen || | | [[Image:Io11.png]] || OnOpen || button_down || PlaySound || <none> || 0.00 || No | ||
|} | |||
Move it underneath your <code>prop_dynamic, and Uncheck all flags.</li> | |||
<li>Set the Parent of <code>button_top_model</code> to "button_top_door".</li> | |||
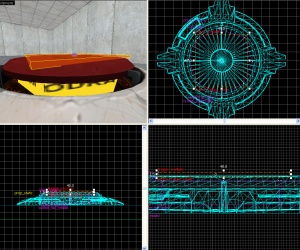
[[Image:Buttonanddoor4.jpg|right|thumb|The larger trigger_multiple.]] | |||
<li>Create a <code>48Wx48Lx1H</code> <code>[[trigger_multiple]]</code> with the following properties: | |||
::{| class=standard-table | |||
! Property Name || Value | |||
|- | |||
| Name || button_trigger_player | |||
|} | |||
Place it right on top of the button_top_model.</li> | |||
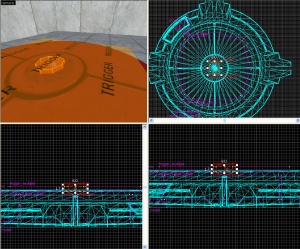
[[Image:Buttonanddoor5.jpg|right|thumb|The smaller trigger_multiple.]] | |||
<li>Next create a <code>7Wx7Lx1H</code> cylinder <code>trigger_multiple</code> with 8 sides and the following properties: | |||
::{| class=standard-table | |||
! Property Name || Value | |||
|- | |- | ||
| | | Name || button_trigger_box | ||
|- | |- | ||
| | | Filter Name || button_filter_boxes | ||
|} | |} | ||
Change the flags so only "Physics Objects" is set, and place it directly on top and in the center of the <code>button_top_model</code></li> | |||
<li>Select "button_trigger_player" and setup the Output as below: | |||
::{| class=standard-table | ::{| class=standard-table | ||
! || My Output || Target Entity || Target Input || Parameter || Delay || Only Once | ! || My Output || Target Entity || Target Input || Parameter || Delay || Only Once | ||
| Line 132: | Line 143: | ||
|- | |- | ||
| [[Image:Io11.png]] || OnStartTouch || button_top_door || Open || <none> || 0.00 || No | | [[Image:Io11.png]] || OnStartTouch || button_top_door || Open || <none> || 0.00 || No | ||
|} | |}</li> | ||
<li>Select the smaller, cylinder <code>trigger_multiple</code>, "button_trigger_box" and setup the Output as below: | |||
::{| class=standard-table | ::{| class=standard-table | ||
! || My Output || Target Entity || Target Input || Parameter || Delay || Only Once | ! || My Output || Target Entity || Target Input || Parameter || Delay || Only Once | ||
| Line 144: | Line 155: | ||
|- | |- | ||
| [[Image:Io11.png]] || OnStartTouch || button_top_door || Open || <none> || 0.00 || No | | [[Image:Io11.png]] || OnStartTouch || button_top_door || Open || <none> || 0.00 || No | ||
|} | |}</li> | ||
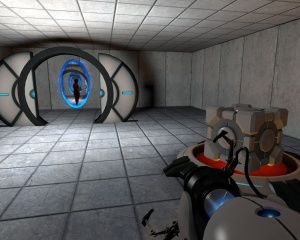
[[Image:Buttonanddoor6.jpg|right|thumb|The final product.]] | [[Image:Buttonanddoor6.jpg|right|thumb|The final product.]] | ||
<li>Create a [[light]] completely underneath the top of the button but still inside the base with the following properties: | |||
::{| class=standard-table | ::{| class=standard-table | ||
! Property Name || Value | ! Property Name || Value | ||
| Line 154: | Line 165: | ||
| BrightnessHDR || 251 159 57 20 | | BrightnessHDR || 251 159 57 20 | ||
|} | |} | ||
{{Note|The light should be '''2''' Units above the original base ground that the main base Button model is on, in order to cast correctly.}} | {{Note|The light should be '''2''' Units above the original base ground that the main base Button model is on, in order to cast correctly.}}</li> | ||
</ol> | |||
== Temp == | == Temp == | ||
(This section is being used to store information during the current edit. Do not modify) | (This section is being used to store information during the current edit. Do not modify) | ||
::{| class=standard-table | ::{| class=standard-table | ||
! | ! || My Output || Target Entity || Target Input || Parameter || Delay || Only Once | ||
|- | |- | ||
| | | [[Image:Io11.png]] || OnUser1 || incinerator || SetAnimation || open || 0.00 || No | ||
|- | |- | ||
| | | [[Image:Io11.png]] || OnUser1 || incinerator || SetAnimation || close || 4.00 || No | ||
| | |||
| | |||
| | |||
| | |||
|} | |} | ||
== See also == | == See also == | ||
Revision as of 21:51, 30 December 2009
This article or section needs to be cleaned up to conform to a higher standard of quality.
For help, see the VDC Editing Help and Wikipedia cleanup process. Also, remember to check for any notes left by the tagger at this article's talk page.
For help, see the VDC Editing Help and Wikipedia cleanup process. Also, remember to check for any notes left by the tagger at this article's talk page.
Introduction
In this tutorial you will learn how to make an Aperture Science Emergency Intelligence Incinerator that will open when a certian box is placed into it, and open when that box is placed on a 1500-Megawatt Aperture Science Heavy-Duty Supercolliding Superbutton.
Instructions
Step 1 - The Box
- Create a
prop_physicswith the following properties:Property Name Value Name victim_box World Model models/props/metal_box.mdl
Step 2 - The Incinerator
- Create a
prop_dynamicwith the following properties:Property Name Value Name incinerator World Model models/props_bts/glados_aperturedoor.mdl
- Create a room under it with the walls textured with "
metal/metalwall048c_gradient" and the floors textured with "lights/light_orange001". - Create a
filter_activator_namenearby your button with the following properties:Property Name Value Name filter_victim_box Filter Name victim_box
- Create a 2 unit tall
trigger_oncecovering the bottom of the room with the following properties:Property Name Value Name trigger_door1 Filter Name filter_victim_box
Step 3 - The Door
- Refer to Creating_a_button_and_door#The_door_setup for door creation.
Step 4 - The Button
- Create a
prop_staticwith the following properties:Property Name Value World Model models/props/button_base_reference.mdl
- Create a
prop_dynamicaligned on top of theprop_staticwith the following properties:Property Name Value Name button_top_model World Model models/props/button_top_reference.mdl
- Create an
ambient_genericwith the following properties:Property Name Value Name button_down Sound Name Portal.button_down Source Entity Name button_top_model
- Create another
ambient_genericwith the following properties:Property Name Value Name button_up Sound Name Portal.button_up Source Entity Name button_top_model
Create a Property Name Value Name button_top_door Speed 25 Delay before Reset -1 Move Direction 90 0 0 (or Down)
- Set the Parent of
button_top_modelto "button_top_door". - Create a
48Wx48Lx1Htrigger_multiplewith the following properties:Property Name Value Name button_trigger_player
- Next create a
7Wx7Lx1Hcylindertrigger_multiplewith 8 sides and the following properties:Property Name Value Name button_trigger_box Filter Name button_filter_boxes
button_top_model - Select "button_trigger_player" and setup the Output as below:
- Select the smaller, cylinder
trigger_multiple, "button_trigger_box" and setup the Output as below: - Create a light completely underneath the top of the button but still inside the base with the following properties:
Property Name Value Brightness 251 159 57 30 BrightnessHDR 251 159 57 20
 Note:The light should be 2 Units above the original base ground that the main base Button model is on, in order to cast correctly.
58Wx58Lx9H cylinder func_door with 8 sides with the following properties:
Give it the following outputs:
prop_dynamic, and Uncheck all flags.
Temp
(This section is being used to store information during the current edit. Do not modify)
See also


