Zh-tw/Your First Left 4 Dead Map: Difference between revisions
| Line 68: | Line 68: | ||
=== NAV Marking === | === NAV Marking === | ||
在這個情況,「nav_generate」所生成的路線圖是十分完美的,所有相關的屬性都已經為我們設定好了。但是有時候運氣不是太好,需要手動設定一些屬性。你要用指令「mark A」,A是你想設定的屬於。 | |||
例如,「nav_generate」不能設定安全室的屬地,你需要以下指令: | |||
sv_cheats 1 | sv_cheats 1 | ||
nav_edit | nav_edit 1」 | ||
現在到安全室,準星向著安全室的地上,打開控制台,選入「mark CHECKPOINT」。有時候安全室內有多個區域需要設定成CHECKPOINT,我們可以用指令「nav_gui」方便選取多個區域。選取後,同樣做法,在控制台,選入「mark CHECKPOINT」。 | |||
如果你設定錯誤,可以用以下指令: | |||
* <code>nav_clear_attribute A</code> | * <code>nav_clear_attribute A</code> | ||
** | ** 你想移除某區域內屬性A (eg: <code>nav_clear_attribute CHECKPOINT</code>) | ||
或者你想移除整個地圖的屬性,可用以下指令: | |||
* <code>wipe_attributes</code> | * <code>wipe_attributes</code> | ||
當你完成了設定屬性後,切記要儲存,指令是「<code>nav_save</code>」,之你需要用指令「<code>nav_analyze</code> | |||
」分析一次你的地圖。 | |||
== Getting the infected to spawn == | == Getting the infected to spawn == | ||
Revision as of 19:53, 14 March 2009
這個教程會教大家製作一個基本的Left 4 Dead地圖。教程會教大家如何使用一些在必需Left 4 Dead地圖上必要的Entity , 例如Director,生成可用的武器和生成喪屍等等。還解釋一些地圖製作者常犯的錯。
這個教程對象並不是入門級的地圖製作者,所以教程所用的技巧可能看不懂,建議先看Basic level construction。

這個教程會教大家製作一個一共包含兩個章地圖的戰役,但永遠玩不完,没有結局。Sounds fun, right? 這個教程目標不是完整的戰役,但會教大家如何製作一個基作的基本的L4D地圖。
首先,製作一個可玩的L4D地圖需要以下的東西:
- A director (導演)
- 生還者開始地點
- 兩道安全門
- 武器,彈藥和藥包
- 救出死去同伴的密室
- 轉換地圖
- 雾的控制器 (粒子效果需要)
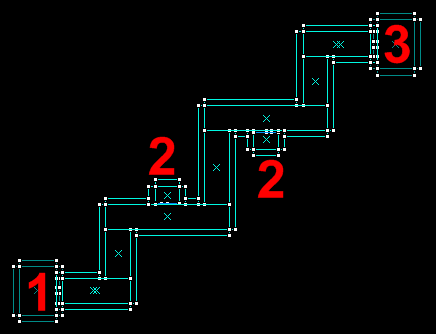
以下教程會根據右面那張圖的布局。
還有的是Hammer並没有中文版,所以一些功能上的字眼仍然使用英文。
生還者開始地點
首先在上圖最左邊(區域紅色1)里面增加一個Entity名叫info_player_start。之後,增加另外兩個Entity,info_director和env_fog_controller,這兩個Entity放在那裡都可以。為了方便,建議都放到區域1。
之後確保env_fog_controller的「Properties」內,「Fog Enable」是「Yes」的。
在這里,我們可以新增加以下補給的Entity:
- 四個藥包,
weapon_first_aid_kit_spawn - 兩支槍;
weapon_smg_spawn和weapon_pumpshotgun_spawn - 彈藥
weapon_ammo_spawn
開始地點需要一道安全門,新增一個Entity叫prop_door_rotating_checkpoint。在「Properties」里,更改名稱(Name)為「checkpoint_exit」,「Spawn Position」設定成「Closed」,「world model」設成「models/props_doors/checkpoint_door_01.mdl」和確定「Flag」內的「Starts Open」没有被選取。還有確保安全門上「EXIT」的標誌是向內的。
生還者開始地點大致上完成,最後增加一個Entity叫info_landmark,並命名為「landmark_a」,之後會解釋為什麼。
救出死去同伴的密室
之後我們會製作兩個小密室(上圖區域2),救出死去同伴。在第一個小密室里,大家只需要增加四個Entity,包括三個info_survivor_rescue和一個prop_door_rotating。在第二個小密室里,同樣做法。
我們需要一道闊54個單位,高104個單位的門,所以prop_door_rotating里的「world model」設成「models/props_doors/doormain01.mdl」。
安全室和轉換地圖
現在我們製作一個可以轉換到下一個地圖的安全室。安全室(區域3)門口位新增一個一道門prop_door_rotating_checkpoint,這里與之前的安全門有少許不相同,開它的「Properties」,並把它命名為「checkpoint_entrance」,「world model」設成「models/props_doors/checkpoint_door_02.mdl」,亦都確保「Flag」內的「Starts Open」是選取了的。還有安全門上「小屋圖示」是向外的。
我們要轉換地圖需要增加info_landmark 和 trigger_changelevel。首先我們在安全室的中間位置增加info_landmark,之後將其命名為「landmark_2」。現在我們在安全室內建立一個大型的方塊(Brush),方塊的大小要蓋著整個安全室,不可有空位,最低限度需要貼著牆邊,穿過牆都不要緊。之後開啟trigger_changelevel的「Properties」,「landmark name」設成「landmark_b」和「Next map」設成「1st_l4dmap_b」。
要令電腦玩家懂得在你的地圖上走動,無論是生還者或感染者,你都需要為你的地圖製作一個路線圖(mapname.nav 檔案)。製作一個基本的路線圖,你需要編譯你的地圖,並進入遊戲,成功載入你的地圖。當地圖完全載入,你的準星要描著地上,開啟指令控制台(按~鍵),輸入以下指令:
sv_cheats 1nav_edit 1nav_mark_walkablenav_generate
當你選入了nav_generate,地圖會自動運算路線圖。如果你運氣好的話,當運算完畢時你不會再看見錯誤信息「NAV ERRORS - Map is unplayable!」,因為nav_generate亦都會為你的路線圖設定屬性(Attribute)。
用「select_with_attribute A」指令以看到一些屬性變化。選取了的區域(淡黃高亮)是所「Marked」的屬性。例子,現在我們想找CHECKPOINT的位置,使用「select_with_attribute CHECKPOINT」指令,選取了的區域(淡黃高亮)就是CHECKPOINT位置。
選入「nav_edit 1」指令,之後選入以下指令:
- select_with_attribute DOOR
- 有門的地方會被選取。
- select_with_attribute CHECKPOINT
- 安全室會被選取。
- select_with_attribute RESCUE_CLOSET
- 救同伴的密室會被選取。
- select_with_attribute ESCAPE_ROUTE
- 有很多區域會被選取,由生還者玩家開始地點到安全室。
NAV Marking
在這個情況,「nav_generate」所生成的路線圖是十分完美的,所有相關的屬性都已經為我們設定好了。但是有時候運氣不是太好,需要手動設定一些屬性。你要用指令「mark A」,A是你想設定的屬於。
例如,「nav_generate」不能設定安全室的屬地,你需要以下指令:
sv_cheats 1
nav_edit 1」
現在到安全室,準星向著安全室的地上,打開控制台,選入「mark CHECKPOINT」。有時候安全室內有多個區域需要設定成CHECKPOINT,我們可以用指令「nav_gui」方便選取多個區域。選取後,同樣做法,在控制台,選入「mark CHECKPOINT」。
如果你設定錯誤,可以用以下指令:
nav_clear_attribute A- 你想移除某區域內屬性A (eg:
nav_clear_attribute CHECKPOINT)
- 你想移除某區域內屬性A (eg:
或者你想移除整個地圖的屬性,可用以下指令:
wipe_attributes
當你完成了設定屬性後,切記要儲存,指令是「nav_save」,之你需要用指令「nav_analyze
」分析一次你的地圖。
Getting the infected to spawn
Now that the nav mesh is built, you should be able to get the infected to spawn by using the console commands:
director_stopdirector_start
You should only have to do this once inside the map, then every time you load the map after that the director should start on it's own.
Making the second chapter
With the first map out of the way, the second map can be made quite easily. Back in Hammer, with the map we just compiled still loaded, go up to the file menu and choose "Save As". Now type in "lst_l4dmap_b" to save the current map under a new name. Go up to the exit menu and hit "Select all", hit CTRL and M to bring up the translation tool and type 180 into the Z field and hit "Ok".
Change the name of the info_landmark entities so that the one in the starting room is named "landmark_b" and the one in the ending safehouse is named "landmark_a". Remember "landmark_a" we created in the first map? We're going to link the changelevel in our new map to it, open the trigger_changelevel's properties and replace "landmark_b" with "landmark_a" and "lst_l4dmap_b" with "lst_l4dmap_a". After changing up the names, finish up by compiling the map and repeating the nav creation steps you used for the previous map, don't forget to mark the spawn room with the checkpoint attribute. If all goes well, you should now have a working 2 level campaign.
Additional possibilities
For spawn areas in later chapters of the campaign, you do not have to keep using the weapon_smg_spawn and weapon_pumpshotgun_spawn you used in the first map as most players will likely have already swapped these for other more powerful weapons they've found along the way. These more powerful weapons you can use in the spawn areas for the later chapters will usually consist of:
- a
weapon_rifle_spawn,weapon_autoshotgun_spawn, and aweapon_hunting_rifle_spawn.
