Proper compile settings: Difference between revisions
MrBlackMesa1 (talk | contribs) (title fix) |
|||
| (10 intermediate revisions by 3 users not shown) | |||
| Line 1: | Line 1: | ||
{{DISPLAYTITLE: Black Mesa - Proper Compile Settings}} | {{DISPLAYTITLE: Black Mesa - Proper Compile Settings}} | ||
{{back | Black Mesa Level Creation}} | {{back | Black Mesa Level Creation}} | ||
{{ | {{TOC|right}} | ||
{{ | |||
{{Tutorial Skill Level | skill=2}} | |||
{{ | == How to use proper with {{bms|4.1}} == | ||
{{warning|These settings are NOT recommended for quick testing / gameplay testing, for that use the normal compile window!}} | |||
{{warning|Unfinished guide, do not use. Instead use the external HTCT compiler | |||
* [[Compiling_your_map_using_htct|Compiling maps using HTCT]]}} | |||
{{note|'''Lighting parameters have been sourced from the official mapsrc.'''}} | |||
= Opening the expert compile window = | == Opening the expert compile window == | ||
Run a map by pressing '''F9''' and then you will see a dialog box, simply press on the Expert button. | Run a map by pressing '''F9''' and then you will see a dialog box, simply press on the Expert button. | ||
[[ | [[File:Bms normal compile window.png|thumb|right|300px|Press the Expert button]] | ||
=== Creating a new configuration === | |||
= Creating a new configuration = | |||
Now it's time to actually implement the compile parameters, press the edit button and create a new configuration by pressing new, call it '''expert compile''' then press OK | Now it's time to actually implement the compile parameters, press the edit button and create a new configuration by pressing new, call it '''expert compile''' then press OK | ||
[[ | [[File:Bms expert compile steps.png|thumb|right|300px|Steps to create a new configuration]] | ||
= Setting up the configuration = | === Setting up the configuration === | ||
Head back to the main expert compile window, this time press the new button under edit button, this should now generate an empty box: | Head back to the main expert compile window, this time press the new button under edit button, this should now generate an empty box: | ||
Paste in these arguments: | Paste in these arguments: | ||
== First Box: (bsp) == | == First Box: (bsp) == | ||
{| class=standard-table | {| class=standard-table | ||
| Line 56: | Line 58: | ||
=== Interior earthbound maps === | === Interior earthbound maps === | ||
<code>-staticproppolys -textureshadows -staticproplighting3 -extrasky 32 -smooth 35 -ambientocclusion -choptexlights</code> | <code>-staticproppolys -textureshadows -staticproplighting3 -extrasky 32 -smooth 35 -ambientocclusion -choptexlights -game $gamedir $path\$file</code> | ||
=== Exterior earthbound maps (IF ANY SKY IS VISIBLE)=== | === Exterior earthbound maps (IF ANY SKY IS VISIBLE)=== | ||
<code>-staticproppolys -textureshadows -staticproplighting3 -extrasky 32 -smooth 35 -ambientocclusion -choptexlights -cascadeshadows</code> | <code>-staticproppolys -textureshadows -staticproplighting3 -extrasky 32 -smooth 35 -ambientocclusion -choptexlights -cascadeshadows -game $gamedir $path\$file</code> | ||
=== Interior Xen maps === | === Interior Xen maps === | ||
<code>-staticproppolys -textureshadows -staticproplighting3 -extrasky 32 -smooth 35 -ambientocclusion -choptexlights</code> | <code>-staticproppolys -textureshadows -staticproplighting3 -extrasky 32 -smooth 35 -ambientocclusion -choptexlights -game $gamedir $path\$file</code> | ||
=== Xen Maps with no real sky === | === Xen Maps with no real sky === | ||
<code>-staticproppolys -textureshadows -staticproplighting3 -extrasky 32 -smooth 35 -ambientocclusion -choptexlights -cascadeshadows</code> | <code>-staticproppolys -textureshadows -staticproplighting3 -extrasky 32 -smooth 35 -ambientocclusion -choptexlights -cascadeshadows -game $gamedir $path\$file</code> | ||
=== Xen maps with real sky === | === Xen maps with real sky === | ||
<code>-staticproppolys -textureshadows -staticproplighting3 -extrasky 32 -smooth 35 -ambientocclusion -choptexlights -cascadeshadows -realskylight</code> | <code>-staticproppolys -textureshadows -staticproplighting3 -extrasky 32 -smooth 35 -ambientocclusion -choptexlights -cascadeshadows -realskylight -game $gamedir $path\$file</code> | ||
{{note|It is recommended to have different configurations for each of these, see below picture:}} | |||
== Fourth Box: (Copy FIle) == | == Fourth Box: (Copy FIle) == | ||
| Line 90: | Line 92: | ||
! Command: || Parameters: | ! Command: || Parameters: | ||
|- | |- | ||
| $game_exe || -dev -console -allowdebug | | $game_exe || -dev -console -allowdebug -game $gamedir +map $file | ||
|- | |- | ||
| || | | || | ||
| Line 98: | Line 100: | ||
= Copying and editing configurations = | = Copying and editing configurations = | ||
Because Black Mesa uses different VRAD settings for different types of maps, it is recommended to create new configurations for each one of these, simply copy paste the configuration that you created and rename it, then edit the VRAD Parameters accordingly, see pictures for explanation: | Because Black Mesa uses different VRAD settings for different types of maps, it is recommended to create new configurations for each one of these, simply copy paste the configuration that you created and rename it, then edit the VRAD Parameters accordingly, see pictures for explanation: | ||
[[ | [[File:Bmc expert compile copying.png|thumb|center|900px|Copying process]] | ||
<br> | <br> | ||
= Your configurations should look like this, each having their logically according VRAD parameter: = | = Your configurations should look like this, each having their logically according VRAD parameter: = | ||
[[ | [[File:Bms expert configs.png|thumb|center|900px|Copying process]] | ||
<br> | <br> | ||
You have now completed the very tedious task of setting up Expert Compilers for Black Mesa, good job! | You have now completed the very tedious task of setting up Expert Compilers for Black Mesa, good job! | ||
Latest revision as of 13:13, 1 November 2024
| Skill Level
This tutorial expects you to have this amount of knowledge within the topic to follow along smoothly. | |||||
|---|---|---|---|---|---|
| Novice | Familiar | Competent | Proficient | Expert | |
How to use proper with  Black Mesa
Opening the expert compile window
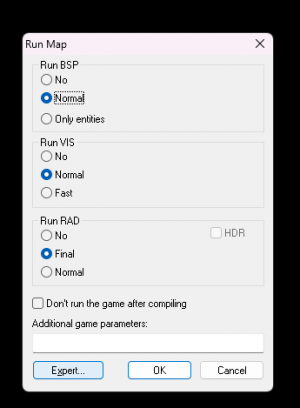
Run a map by pressing F9 and then you will see a dialog box, simply press on the Expert button.
Creating a new configuration
Now it's time to actually implement the compile parameters, press the edit button and create a new configuration by pressing new, call it expert compile then press OK
Setting up the configuration
Head back to the main expert compile window, this time press the new button under edit button, this should now generate an empty box: Paste in these arguments:
First Box: (bsp)
| Command: | Parameters: |
|---|---|
| $bsp_exe | -game $gamedir $path\$file |
Second Box: (vis)
press the new button and paste in these arguments:
| Command: | Parameters: |
|---|---|
| $vis_exe | -game $gamedir $path\$file |
Third Box : (vrad)
Now this is the tricky part, the parameters depend on multiple factors but the command stays the same:
| Command: | |
|---|---|
| $light_exe | |
Interior earthbound maps
-staticproppolys -textureshadows -staticproplighting3 -extrasky 32 -smooth 35 -ambientocclusion -choptexlights -game $gamedir $path\$file
Exterior earthbound maps (IF ANY SKY IS VISIBLE)
-staticproppolys -textureshadows -staticproplighting3 -extrasky 32 -smooth 35 -ambientocclusion -choptexlights -cascadeshadows -game $gamedir $path\$file
Interior Xen maps
-staticproppolys -textureshadows -staticproplighting3 -extrasky 32 -smooth 35 -ambientocclusion -choptexlights -game $gamedir $path\$file
Xen Maps with no real sky
-staticproppolys -textureshadows -staticproplighting3 -extrasky 32 -smooth 35 -ambientocclusion -choptexlights -cascadeshadows -game $gamedir $path\$file
Xen maps with real sky
-staticproppolys -textureshadows -staticproplighting3 -extrasky 32 -smooth 35 -ambientocclusion -choptexlights -cascadeshadows -realskylight -game $gamedir $path\$file
Fourth Box: (Copy FIle)
Repeat the same process as box 1 and 2, press the new button and paste in these arguments:
| Command: | Parameters: |
|---|---|
| Copy File | $path\$file.bsp $bspdir\$file.bsp |
Fifth Box: (Game)
press the new button and paste in these arguments:
| Command: | Parameters: |
|---|---|
| $game_exe | -dev -console -allowdebug -game $gamedir +map $file |
Copying and editing configurations
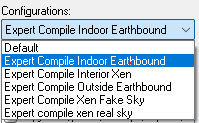
Because Black Mesa uses different VRAD settings for different types of maps, it is recommended to create new configurations for each one of these, simply copy paste the configuration that you created and rename it, then edit the VRAD Parameters accordingly, see pictures for explanation:
Your configurations should look like this, each having their logically according VRAD parameter:
You have now completed the very tedious task of setting up Expert Compilers for Black Mesa, good job!


