Creating worldmodels from viewmodels: Difference between revisions
(First version) |
Thunder4ik (talk | contribs) m (Unicodifying, replaced: [[Image: → [[File: (2)) |
||
| (20 intermediate revisions by 11 users not shown) | |||
| Line 1: | Line 1: | ||
[[ | This tutorial teaches you how to create a world model from a [[Viewmodel|view model]]. It does not teach you how to do modeling or how to work with a model editor. Even though the screenshot shows 3ds max 7, the same can easily be done in all other model editors if you have sufficient knowledge of them. | ||
Please note that even though this tutorial uses a view model for demonstration a world model should have a lot less polys and / or [[LOD_Models]] to ensure best performance in-game. | |||
== Setting up your model == | |||
If you just take your model and compile it as a [[prop_physics]], the engine will not know where to put it onto the playermodel. The result can be somewhat hilarious but is most likely not what you are looking for. | |||
To change this, load your view model (without hands) into your favorite model editor. It will be helpful (but is not necessary) to remove all bones that you needed for animating your view model, so you end up with one object/bone. | |||
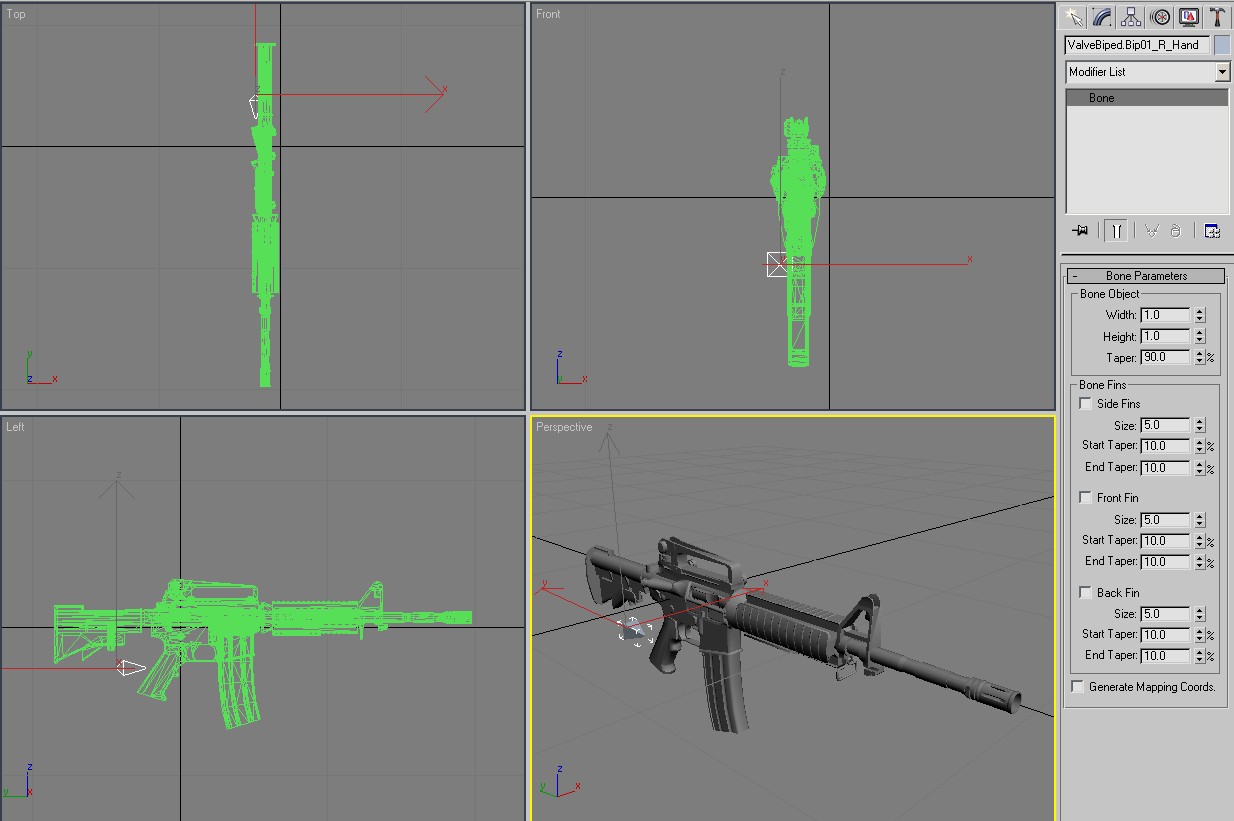
[[File:worldmodel_heatm4.jpg|thumb|200px|[[Media:worldmodel_heatm4.jpg|click to enlarge]]]] | |||
=== Place the hand bone === | |||
Now there are two ways to go. The first one is if you are doing a new model (not a replacement model) or if you don't have the model you want to replace decompiled: | |||
Create a new bone with the name <code>ValveBiped.Bip01_R_Hand</code>. Place it so that it is in the position you want the right hand of the playermodel to be. Now <code>link</code> your model to the bone. (If you move <code>ValveBiped.Bip01_R_Hand</code> now, the weapon moves with it.) | |||
In case you have a decompiled model you want to replace, move your new model into the position of the old one, delete the old one and <code>link</code> your model to the <code>ValveBiped.Bip01_R_Hand</code> bone. | |||
{{Note|<code>ValveBiped.Bip01_R_Hand</code> is part of the standard Valve rig. If you use a custom rig, you'll need to use the bone name of that one.}} | |||
{{Note|<code>ValveBiped.Bip01_R_Hand</code> will not work as a bone name when using XSI. Instead you must create a bone called BIP01_R_Hand and parent it to the ValveBiped node}} | |||
=== Export and compile === | |||
Export your model (make sure to export unused bones if your exporter asks you). Compile it like any other physics prop (however without $staticprop because that would collapse your bones). | |||
Just for reference here is the .qc that was used to compile the model seen in the screenshots: | |||
$modelname "weapons/w_m4a1.mdl" | |||
$cdmaterials "models/weapons" | |||
$scale 1 | |||
$keyvalues { "prop_data" { "base" "metal.medium" } } | |||
$model w_m4a1 "w_m4a1.smd" | |||
$sequence idle "w_m4a1" loop fps 15 | |||
$collisionmodel "w_m4a1.smd" | |||
{ | |||
$mass 3.0 // Mass in kilograms | |||
$concave | |||
} | |||
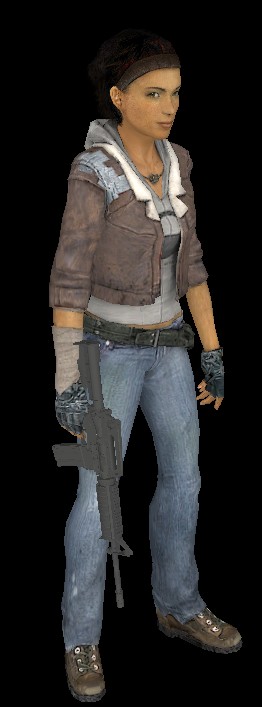
[[File:worldmodel_heatm4alyx.jpg|thumb|150px|[[Media:worldmodel_heatm4alyx.jpg|click to enlarge]]]] | |||
Now start the model viewer and load a playermodel of your choice as well as your world model. Most likely your weapon will not be perfectly sitting in the hand, might range from some fingers going through the weapon to the weapon pointing in a completely wrong direction. | |||
Go back to your model editor. The actual position of the weapon or of the bone ''doesn't matter at all!'' All that counts is the ''relative position towards each other.'' In some cases you need to rotate. I'd advise not to rotate the weapon model but the bone. Either unlink it and link it later again or edit it without affecting children bones (for max you can find this setting in the hierarchy tab). | |||
In case you want to add attachment-bones, like for a muzzle flash, add a bone with an according name (e.g. <code>ValveBiped.muzzle flash</code>) and link it to <code>ValveBiped.Bip01_R_Hand</code>. | |||
== Technical explanation == | |||
If you want to have a little bit of extra knowledge that helps you to understand how this works, read on. | |||
The engine merges the bone <code>ValveBiped.Bip01_R_Hand</code> of your player model with the bone of the same name in your world model (in case it's the root bone). All bones that are a child of this bone will naturally move with it, that's why we have linked the weapon and the muzzle flash to it. The skeleton of the player model and of your world model have become one! When you have loaded both in the model viewer and you activate <code>Bones</code> in the render tab you can easily see it. | |||
To make sure that you got this correctly, you can also look into your [[SMD_file_format|.smd file]]. | |||
If everything is correct, it should start like this: | |||
<pre>version 1 | |||
nodes | |||
0 "ValveBiped.Bip01_R_Hand" -1 | |||
1 "m4a1" 0 | |||
end | |||
skeleton | |||
time 0 | |||
0 # # # # # # | |||
1 # # # # # # | |||
end</pre> | |||
As you can see, in <code>nodes</code> the <code>ValveBiped.Bip01_R_Hand</code> is defined as the root bone while the bone called m4a1 is a child of it. In the <code>skeleton</code> part the position of both are defined. | |||
If this is not the case, but you are sure that everything is set up correctly, check your exporter settings again. | |||
== See also == | |||
* [[Viewmodels_in_XSI | Viewmodels in XSI]] | |||
* [[Attachments]] | |||
[[Category:Modeling]] | |||
Latest revision as of 08:42, 8 January 2024
This tutorial teaches you how to create a world model from a view model. It does not teach you how to do modeling or how to work with a model editor. Even though the screenshot shows 3ds max 7, the same can easily be done in all other model editors if you have sufficient knowledge of them.
Please note that even though this tutorial uses a view model for demonstration a world model should have a lot less polys and / or LOD_Models to ensure best performance in-game.
Setting up your model
If you just take your model and compile it as a prop_physics, the engine will not know where to put it onto the playermodel. The result can be somewhat hilarious but is most likely not what you are looking for.
To change this, load your view model (without hands) into your favorite model editor. It will be helpful (but is not necessary) to remove all bones that you needed for animating your view model, so you end up with one object/bone.

Place the hand bone
Now there are two ways to go. The first one is if you are doing a new model (not a replacement model) or if you don't have the model you want to replace decompiled:
Create a new bone with the name ValveBiped.Bip01_R_Hand. Place it so that it is in the position you want the right hand of the playermodel to be. Now link your model to the bone. (If you move ValveBiped.Bip01_R_Hand now, the weapon moves with it.)
In case you have a decompiled model you want to replace, move your new model into the position of the old one, delete the old one and link your model to the ValveBiped.Bip01_R_Hand bone.
ValveBiped.Bip01_R_Hand is part of the standard Valve rig. If you use a custom rig, you'll need to use the bone name of that one.ValveBiped.Bip01_R_Hand will not work as a bone name when using XSI. Instead you must create a bone called BIP01_R_Hand and parent it to the ValveBiped nodeExport and compile
Export your model (make sure to export unused bones if your exporter asks you). Compile it like any other physics prop (however without $staticprop because that would collapse your bones).
Just for reference here is the .qc that was used to compile the model seen in the screenshots:
$modelname "weapons/w_m4a1.mdl"

$cdmaterials "models/weapons"

$scale 1

$keyvalues { "prop_data" { "base" "metal.medium" } }

$model w_m4a1 "w_m4a1.smd"

$sequence idle "w_m4a1" loop fps 15

$collisionmodel "w_m4a1.smd"
{
	$mass 3.0 // Mass in kilograms
	$concave
}

Now start the model viewer and load a playermodel of your choice as well as your world model. Most likely your weapon will not be perfectly sitting in the hand, might range from some fingers going through the weapon to the weapon pointing in a completely wrong direction.
Go back to your model editor. The actual position of the weapon or of the bone doesn't matter at all! All that counts is the relative position towards each other. In some cases you need to rotate. I'd advise not to rotate the weapon model but the bone. Either unlink it and link it later again or edit it without affecting children bones (for max you can find this setting in the hierarchy tab).
In case you want to add attachment-bones, like for a muzzle flash, add a bone with an according name (e.g. ValveBiped.muzzle flash) and link it to ValveBiped.Bip01_R_Hand.
Technical explanation
If you want to have a little bit of extra knowledge that helps you to understand how this works, read on.
The engine merges the bone ValveBiped.Bip01_R_Hand of your player model with the bone of the same name in your world model (in case it's the root bone). All bones that are a child of this bone will naturally move with it, that's why we have linked the weapon and the muzzle flash to it. The skeleton of the player model and of your world model have become one! When you have loaded both in the model viewer and you activate Bones in the render tab you can easily see it.
To make sure that you got this correctly, you can also look into your .smd file.
If everything is correct, it should start like this:
version 1
nodes
  0 "ValveBiped.Bip01_R_Hand"  -1
  1 "m4a1"   0
end
skeleton
time 0
  0 # # # # # #
  1 # # # # # #
end
As you can see, in nodes the ValveBiped.Bip01_R_Hand is defined as the root bone while the bone called m4a1 is a child of it. In the skeleton part the position of both are defined.
If this is not the case, but you are sure that everything is set up correctly, check your exporter settings again.