Source 2/Docs/Modeling/Exporting a mesh from Blender: Difference between revisions
(Added category to the page, added shortpagetitle template) |
|||
| (29 intermediate revisions by 12 users not shown) | |||
| Line 1: | Line 1: | ||
{{ | {{Source 2 topicon}} | ||
{{LanguageBar|title = Exporting a mesh from Blender to Source 2}} | |||
This tutorial explains how to export a non-animated prop from {{Blender|4}} to {{Source 2|4}}. While basic knowledge of Blender's tools is helpful, even new users should be able to follow all steps easily. You'll learn how to set up the right scaling for your prop, how to assign materials in a way that's readable for Hammer and what settings to use for exporting. | |||
If you don't have Blender installed on your computer, you can download it from [[File:Blender 16.png|(icon)|link=]] [https://www.blender.org/download/ '''blender.org/download'''] or on [https://store.steampowered.com/app/365670/Blender/ Steam] for free. | |||
If you don't have Blender installed on your computer, you can download it from [[File:Blender 16.png|(icon)|link=]] [ | |||
== Units setup == | == Units setup == | ||
Before | Before working on your mesh, ensure Blender’s scene units are set up correctly. To do so, switch to the Scene tab in the Properties menu and choose either the Inches preset or set the length to None. | ||
If you set the length to none, add a cube, which will be 6 Blender Units big. That is equal to 10 Hammer Units. So if you want to make a prop that is almost exactly 64 Hammer Units big, then you have to do a 6:10 ratio, the larger number being the Hammer Unit. So 64 x 3/5 = 38.4. This means that the prop in Blender has to be 38.4 Blender Units big. This could be useful if you would like to make props that are almost a perfect size. | |||
[[File:Blender 4.0 Units Setup.png]] | |||
== Mesh scale and orientation == | == Mesh scale and orientation == | ||
We’ll use the default Suzanne monkey head as an example prop for this tutorial. Add it to | We’ll use the default Suzanne monkey head as an example prop for this tutorial. Add it to your scene by pressing {{key|Shift}} + {{key|A}} → Mesh → Monkey. You can check the size by opening the 3D viewport’s right menu by pressing {{key|N}} and taking a look at the dimensions in the Transform category. For this tutorial we’ll scale up Suzanne until the Z size is roughly 6.5 feet or 78 inch/generic units. To do so, press {{key|S}} and move your cursor away from the monkey head to scale it up. Confirm with the left mouse button. | ||
{{Note|The amount of scaling is relative to the distance between your mouse cursor and the object. The closer your cursor is to the object when you press S, the higher the scale factor. If you have problems scaling the monkey head, move your mouse cursor farther away from it before you press S.}} | {{Note|The amount of scaling is relative to the distance between your mouse cursor and the object. The closer your cursor is to the object when you press {{key|S}}, the higher the scale factor. If you have problems scaling the monkey head, move your mouse cursor farther away from it before you press {{key|S}}.}} | ||
Apply the mesh’s scaling by pressing Ctrl+A → Rotation and Scale. Make a habit of always applying scaling and rotation before exporting a mesh to Hammer. | Apply the mesh’s scaling by pressing {{key|Ctrl}} + {{key|A}} → Rotation and Scale. Make a habit of always applying scaling and rotation before exporting a mesh to Hammer. | ||
Your mesh should be facing south in Blender to be aligned properly with Hammer's coordinates, which the monkey head does by default. | Your mesh should be facing south in Blender to be aligned properly with Hammer's coordinates, which the monkey head does by default. | ||
[[File:Blender 4.0 Mesh Scale And Orientation.png|1000px]] | |||
With your mesh selected Right-Click within the 3D Viewport and click Shade Smooth to change Suzanne to smooth shading. | |||
[[File:Blender 4.0 Set Shade Smooth.png|1000px]] | |||
== Material setup == | == Material setup == | ||
=== Adding two materials === | === Adding two materials === | ||
We will create two different materials, a red and a blue one. Navigate to the Material tab in the Properties and click on New to create a new material. | We will create two different materials, a red and a blue one. Navigate to the Material tab in the Properties and click on New to create a new material. | ||
[[File:Blender 4.0 Material Setup 1.png]] | |||
[[File:Blender | |||
Click on the + icon to create a new empty material slot. Select this slot and press the big new button again to create a second material. Rename the materials to red and blue. | Click on the + icon to create a new empty material slot. Select this slot and press the big new button again to create a second material. Rename the materials to red and blue. | ||
[[File:Blender 4.0 Material Setup 2.png]] | |||
[[File:Blender | |||
The material name you enter here is not relevant or tied to the material name used by Hammer. But for the sake of consistency it is advised to use the same material name as in the engine. | The material name you enter here is not relevant or tied to the material name used by Hammer. But for the sake of consistency it is advised to use the same material name as in the engine. | ||
| Line 68: | Line 52: | ||
{{Note|Make sure to spell FBX_vmatPath with the right capitalizations. This property is case sensitive and does not export correctly if the capitalizations are wrong.}} | {{Note|Make sure to spell FBX_vmatPath with the right capitalizations. This property is case sensitive and does not export correctly if the capitalizations are wrong.}} | ||
[[File:Blender 4.0 Material Custom Property.png]] | |||
[[File:Blender | |||
Repeat the same steps for the blue material, but change the value to materials/models/props_items/blue. | Repeat the same steps for the blue material, but change the value to materials/models/props_items/blue. | ||
| Line 78: | Line 60: | ||
Choose a Viewport Color in the Settings category of both materials. Switch to Edit Mode by pressing Tab and assign the two materials to different faces by using the Assign button in the material editor. | Choose a Viewport Color in the Settings category of both materials. Switch to Edit Mode by pressing Tab and assign the two materials to different faces by using the Assign button in the material editor. | ||
[[File:Blender 4.0 Assigning Materials.png|1200px]] | |||
[[File:Blender | |||
== Mesh export == | == Mesh export == | ||
| Line 86: | Line 66: | ||
Click on File → Export → FBX to export you mesh as FBX. For this tutorial we’ll assume that you project has a models\props_items\fbx\ folder. | Click on File → Export → FBX to export you mesh as FBX. For this tutorial we’ll assume that you project has a models\props_items\fbx\ folder. | ||
[[File:Blender 4.0 Mesh Export.png]] | |||
[[File:Blender | |||
{| class="wikitable" | {| class="wikitable" | ||
| Line 109: | Line 87: | ||
== Conclusion == | == Conclusion == | ||
With your FBX exported to the right folder you're ready to import your prop into Hammer. Check out the [[ | With your FBX exported to the right folder you're ready to import your prop into Hammer. Check out the [[Dota 2 Workshop Tools/Model Editor/How To|Model Editor]] tutorial to find out how. If you need help creating your materials, the [[Dota 2 Workshop Tools/Materials|material creation tutorials]] will help you getting started. | ||
Latest revision as of 00:00, 13 September 2025
This tutorial explains how to export a non-animated prop from ![]() Blender to
Blender to ![]() Source 2. While basic knowledge of Blender's tools is helpful, even new users should be able to follow all steps easily. You'll learn how to set up the right scaling for your prop, how to assign materials in a way that's readable for Hammer and what settings to use for exporting.
Source 2. While basic knowledge of Blender's tools is helpful, even new users should be able to follow all steps easily. You'll learn how to set up the right scaling for your prop, how to assign materials in a way that's readable for Hammer and what settings to use for exporting.
If you don't have Blender installed on your computer, you can download it from ![]() blender.org/download or on Steam for free.
blender.org/download or on Steam for free.
Units setup
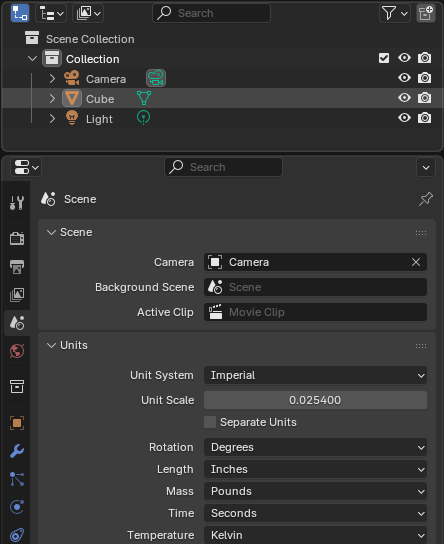
Before working on your mesh, ensure Blender’s scene units are set up correctly. To do so, switch to the Scene tab in the Properties menu and choose either the Inches preset or set the length to None.
If you set the length to none, add a cube, which will be 6 Blender Units big. That is equal to 10 Hammer Units. So if you want to make a prop that is almost exactly 64 Hammer Units big, then you have to do a 6:10 ratio, the larger number being the Hammer Unit. So 64 x 3/5 = 38.4. This means that the prop in Blender has to be 38.4 Blender Units big. This could be useful if you would like to make props that are almost a perfect size.
Mesh scale and orientation
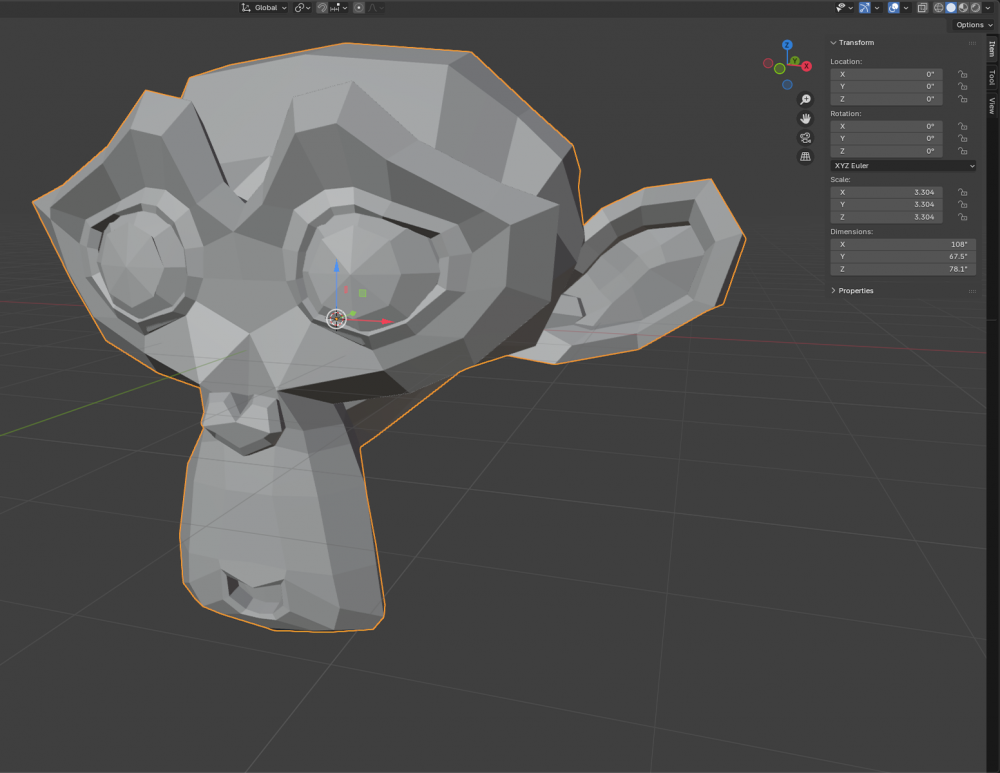
We’ll use the default Suzanne monkey head as an example prop for this tutorial. Add it to your scene by pressing ⇧ Shift + A → Mesh → Monkey. You can check the size by opening the 3D viewport’s right menu by pressing N and taking a look at the dimensions in the Transform category. For this tutorial we’ll scale up Suzanne until the Z size is roughly 6.5 feet or 78 inch/generic units. To do so, press S and move your cursor away from the monkey head to scale it up. Confirm with the left mouse button.
Apply the mesh’s scaling by pressing Ctrl + A → Rotation and Scale. Make a habit of always applying scaling and rotation before exporting a mesh to Hammer.
Your mesh should be facing south in Blender to be aligned properly with Hammer's coordinates, which the monkey head does by default.
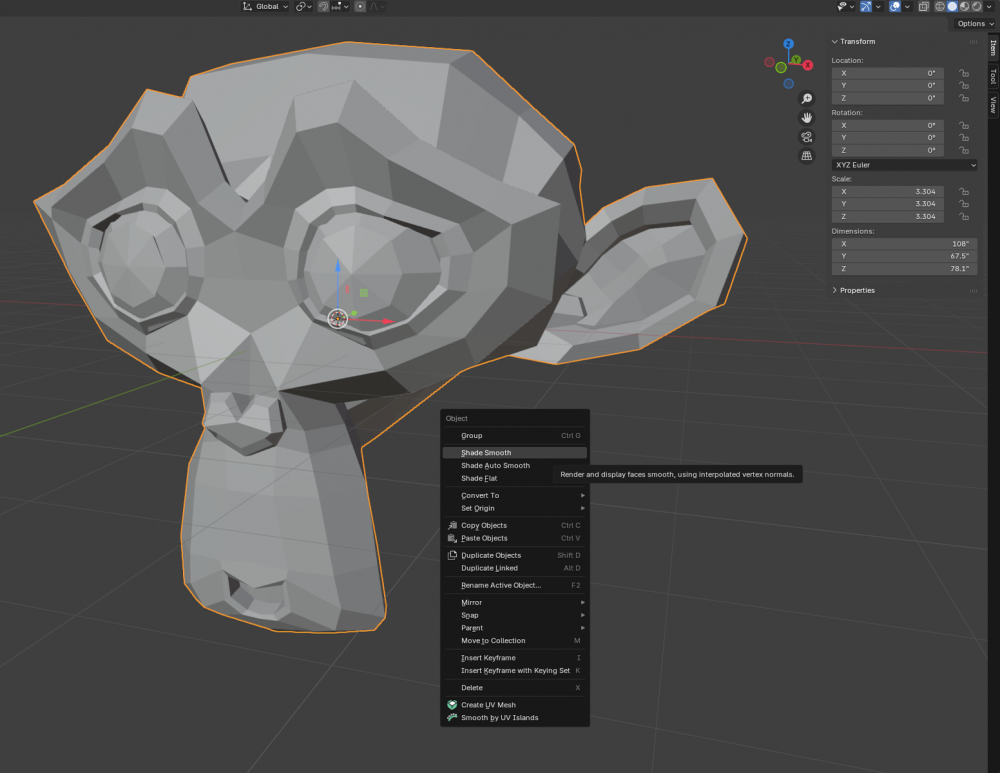
With your mesh selected Right-Click within the 3D Viewport and click Shade Smooth to change Suzanne to smooth shading.
Material setup
Adding two materials
We will create two different materials, a red and a blue one. Navigate to the Material tab in the Properties and click on New to create a new material.
Click on the + icon to create a new empty material slot. Select this slot and press the big new button again to create a second material. Rename the materials to red and blue.
The material name you enter here is not relevant or tied to the material name used by Hammer. But for the sake of consistency it is advised to use the same material name as in the engine.
Material properties
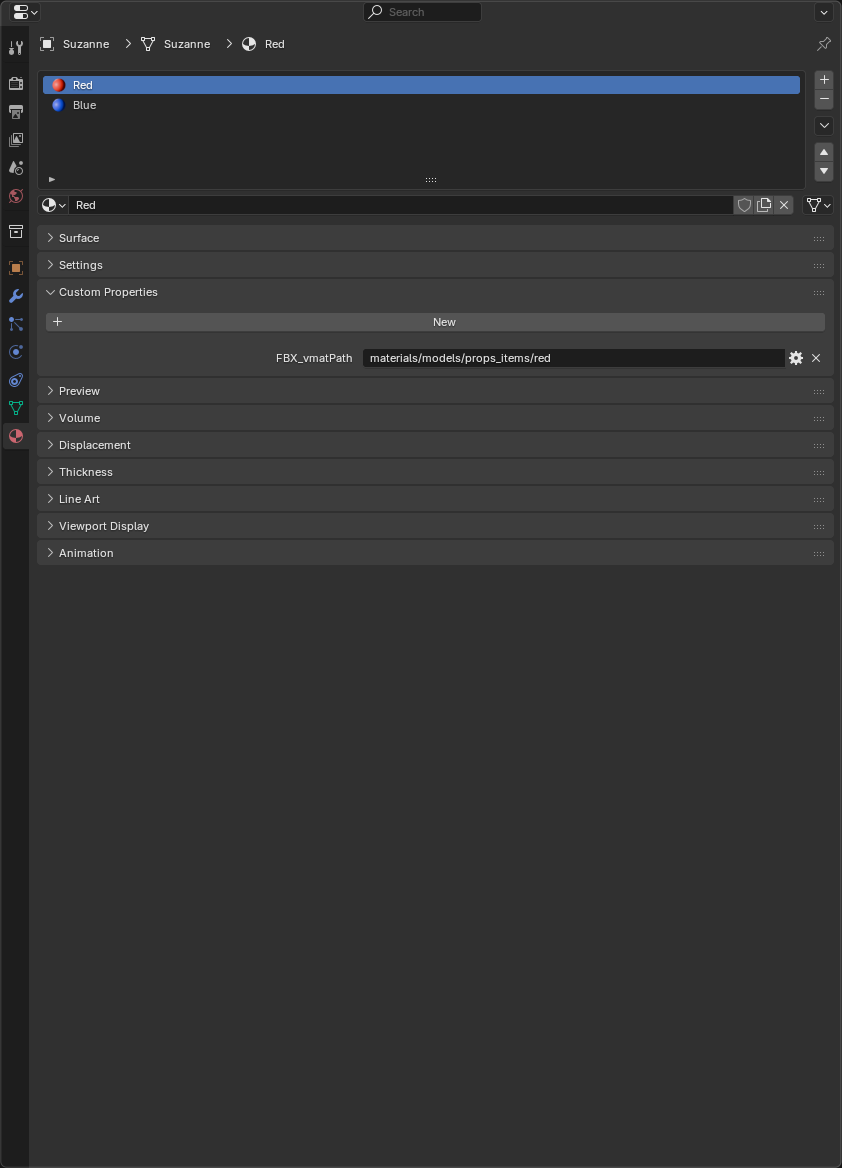
Hammer can’t read the materials unless you add a so called Custom Property to them that points to the correct material name and path used in Hammer.
Select the red material. For this tutorial we’re going to assume that you have created a material called red.vmt in the folder “materials/models/props_items” of your project with Hammer’s material editor. If you didn't, thats fine too. You can create the materials after finishing this tutorial. There's a link in this article's conclusion that will help you to do so.
There’s a Custom Properties category in the material menu. If you can’t see the big Add button in it, click the Custom Properties text to expand it. Make sure your red material is selected and click the Add button. A new property with the Property Name prop and Property Value of 1 will be created. Click the Edit button and change the name to FBX_vmatPath and the value to materials/models/props_items/red.
Repeat the same steps for the blue material, but change the value to materials/models/props_items/blue.
Assigning materials
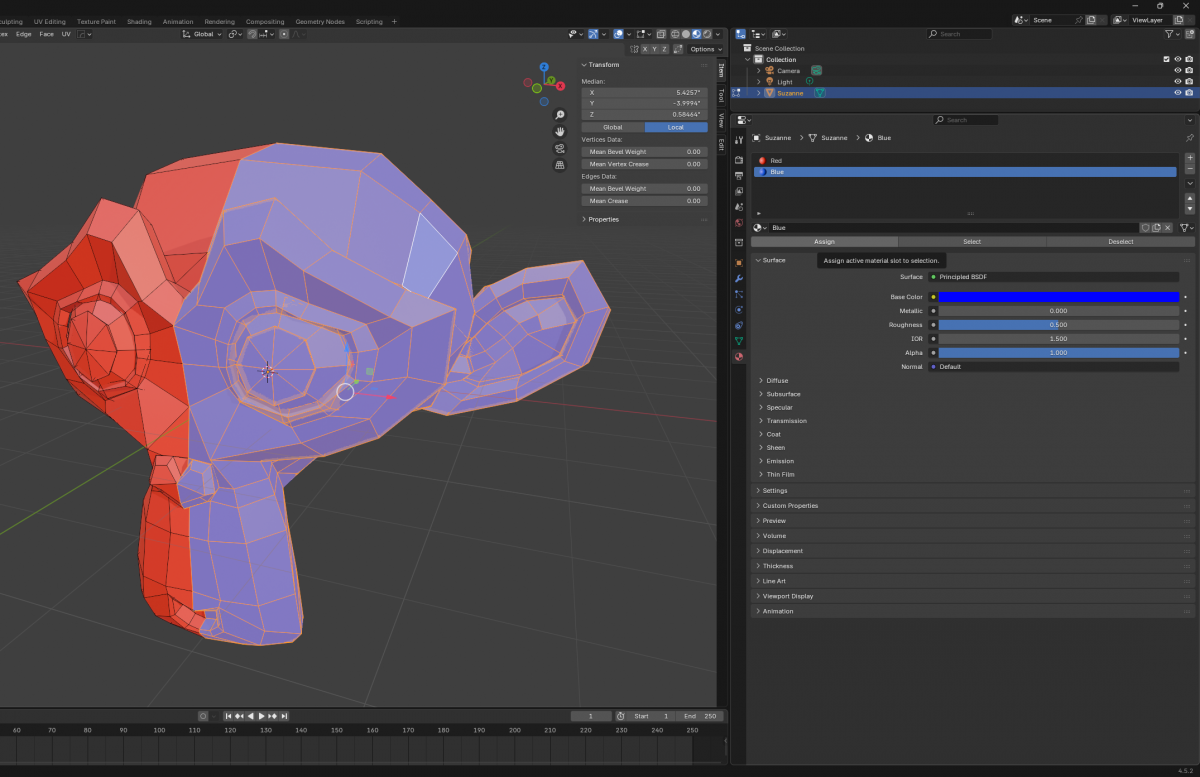
Choose a Viewport Color in the Settings category of both materials. Switch to Edit Mode by pressing Tab and assign the two materials to different faces by using the Assign button in the material editor.
Mesh export
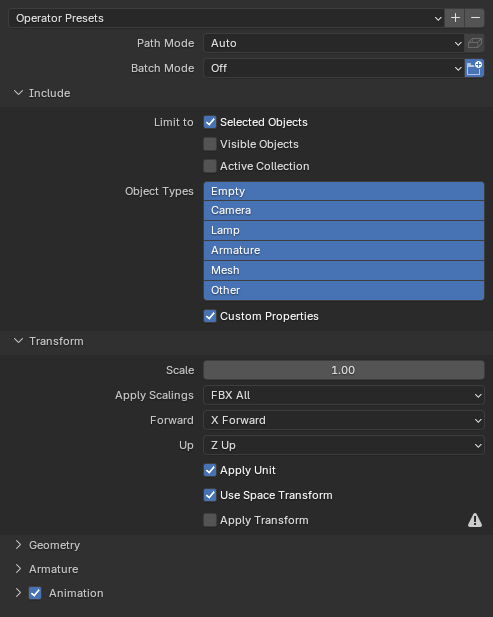
Click on File → Export → FBX to export you mesh as FBX. For this tutorial we’ll assume that you project has a models\props_items\fbx\ folder.
| Selected Objects | Tick this box if your scene contains more than one prop. Make sure to select the right prop before opening the export dialogue. |
| Apply Scalings | Choose FBX All. |
| Forward / Up | This does not seem to affect the mesh’s orientation in Hammer. For the sake of consistency with Hammer’s coordination system it’s set to X Forward and Z Up. |
| Custom Properties | Make sure to tick this box or your materials will not be recognized in Hammer. |
You can safely ignore the tabs Geometries, Armatures and Animation for regular props. Enter a prop name in the upper toolbar and click on Export FBX in the upper right to export your mesh.
If you'd like to save your settings as a preset, click on the + button to the right side of the Operator Presets list and enter a name. You can select the new preset by clicking on the Operator Presets button. Remember to always select the preset before exporting in a new Blender session, as the selected preset is reset when Blender is closed.
Conclusion
With your FBX exported to the right folder you're ready to import your prop into Hammer. Check out the Model Editor tutorial to find out how. If you need help creating your materials, the material creation tutorials will help you getting started.
