Ko/TF2/Adding Menu Photos: Difference between revisions
Jump to navigation
Jump to search
No edit summary |
mNo edit summary |
||
| (7 intermediate revisions by 4 users not shown) | |||
| Line 1: | Line 1: | ||
{{lang|TF2/Adding Menu Photos}} | |||
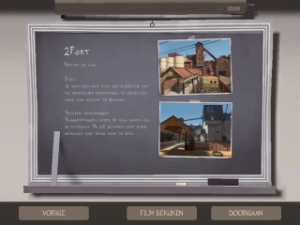
'''메뉴 사진''' 들은 맵이 로딩중일때 맵의 설명에서 나오는 화면입니다. 플레이어들은 만약 그들이 이 맵에서 첫번째 플레이라면 맵이 대강 어떻게 생겼는지 파악이 가능합니다. | '''메뉴 사진''' 들은 맵이 로딩중일때 맵의 설명에서 나오는 화면입니다. 플레이어들은 만약 그들이 이 맵에서 첫번째 플레이라면 맵이 대강 어떻게 생겼는지 파악이 가능합니다. | ||
[[ | [[File:TF2_Menu_Photos.png|thumb|right|2fort의 메뉴 사진.]] | ||
__TOC__ | __TOC__ | ||
== | == 당신의 메뉴 사진들을 만들어보세요 == | ||
[[ | [[File:Menu_photos_ctf_2fort.vtf.png|thumb|right|2fort 메뉴 사진들의 VTF 모습.]] | ||
메뉴 사진들은 매우 만들기 간단하지만 당신은 질감들과 이미지 에디터에 대해서 조금의 지식이 필요합니다. | |||
메뉴 사진들을 위한 2개의 파일들 : | |||
*menu_photos_[mapname].vtf | *menu_photos_[mapname].vtf | ||
*menu_photos_[mapname].vmt | *menu_photos_[mapname].vmt | ||
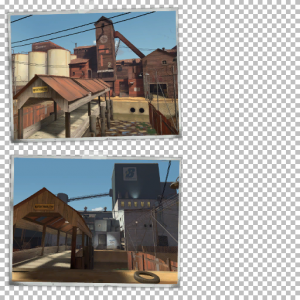
VTF는 그저 단순한 2장의 사진을 포함한 투명한 오버레이 사진입니다. | |||
=== | === VTF 파일 만들기 === | ||
# | # 먼저, 당신의 맵에서 중요한 장소들을 멋있게 촬영하세요. | ||
# | #{{L|GCFScape}}를 사용하여 당신의 메뉴 사진의 견본이 될 VTF를 얻으세요. 당신은 vtf파일을 tf\materials\vgui\maps\menu_photos_[mapname]이곳에서 찾을수 있습니다. | ||
# | # 이름에 "menu_photos_".vtf가 있는 텍스쳐를 고르세요. | ||
# | # VTF 파일을 {{L|VTFEdit}}로 열어서 PNG 이미지로 만드세요. | ||
# | # PNG 파일을 열어서 당신의 두개의 스크린샷을 이미지 에디터로 수정하세요. | ||
# | # 수치를 제고 이리저리 돌려서 당신의 스크린샷이 기존의 사진들과 완벽하게 일치하게 하세요. | ||
# | # 당신의 새로운 이미지를 저장하고 이것을 다시 {{L|VTFEdit}}를 이용하여 VTF파일로 만들어주세요. menu_photos_[your map's name].vtf 이런식으로 저장하세요 | ||
# | # 파일을 tf\materials\vgui\maps로 옮겨주세요. 만약에 경로들이 아직 만들어지지 않았다면, 만드셔도 됩니다. | ||
=== | === VMT 파일 만들기 === | ||
* | * 메모장을 하나 만드셔서 아래의 코드를 붙여 넣어주세요 : | ||
"UnlitGeneric" | "UnlitGeneric" | ||
| Line 35: | Line 36: | ||
} | } | ||
* | * "menu_photos_mapname"에 당신의 VTF파일과 함께 놓으세요. | ||
* | * "menu_photos_[mapname].vmt"을 VTF과 같은 경로에 저장하세요. | ||
=== | === 결과 === | ||
한번 시험해 보세요! 당신은 이제 아름다운 로딩 화면을 가진겁니다! | |||
== See | == See also == | ||
*[[Material Creation]] | * [[Material Creation]] | ||
* | * {{L|Team Fortress 2 Level Creation|카테고리 : 팀 포트리스2 레벨디자인}} | ||
{{ACategory|Team Fortress 2}} | |||
Latest revision as of 08:06, 9 October 2025
메뉴 사진 들은 맵이 로딩중일때 맵의 설명에서 나오는 화면입니다. 플레이어들은 만약 그들이 이 맵에서 첫번째 플레이라면 맵이 대강 어떻게 생겼는지 파악이 가능합니다.
당신의 메뉴 사진들을 만들어보세요
메뉴 사진들은 매우 만들기 간단하지만 당신은 질감들과 이미지 에디터에 대해서 조금의 지식이 필요합니다.
메뉴 사진들을 위한 2개의 파일들 :
- menu_photos_[mapname].vtf
- menu_photos_[mapname].vmt
VTF는 그저 단순한 2장의 사진을 포함한 투명한 오버레이 사진입니다.
VTF 파일 만들기
- 먼저, 당신의 맵에서 중요한 장소들을 멋있게 촬영하세요.
- GCFScape를 사용하여 당신의 메뉴 사진의 견본이 될 VTF를 얻으세요. 당신은 vtf파일을 tf\materials\vgui\maps\menu_photos_[mapname]이곳에서 찾을수 있습니다.
- 이름에 "menu_photos_".vtf가 있는 텍스쳐를 고르세요.
- VTF 파일을 VTFEdit로 열어서 PNG 이미지로 만드세요.
- PNG 파일을 열어서 당신의 두개의 스크린샷을 이미지 에디터로 수정하세요.
- 수치를 제고 이리저리 돌려서 당신의 스크린샷이 기존의 사진들과 완벽하게 일치하게 하세요.
- 당신의 새로운 이미지를 저장하고 이것을 다시 VTFEdit를 이용하여 VTF파일로 만들어주세요. menu_photos_[your map's name].vtf 이런식으로 저장하세요
- 파일을 tf\materials\vgui\maps로 옮겨주세요. 만약에 경로들이 아직 만들어지지 않았다면, 만드셔도 됩니다.
VMT 파일 만들기
- 메모장을 하나 만드셔서 아래의 코드를 붙여 넣어주세요 :
"UnlitGeneric"
{
 "$basetexture" "vgui\maps\menu_photos_mapname"
 "$translucent" 1
 "$ignorez" 1
 "$vertexcolor" 1
}
- "menu_photos_mapname"에 당신의 VTF파일과 함께 놓으세요.
- "menu_photos_[mapname].vmt"을 VTF과 같은 경로에 저장하세요.
결과
한번 시험해 보세요! 당신은 이제 아름다운 로딩 화면을 가진겁니다!

