Creating poison water: Difference between revisions
Jump to navigation
Jump to search


m (Formatting to conform with other Portal tutorials, and adding proper Categories and link back to the Portal Mapping page) |
Le Glaconus (talk | contribs) (formatting) |
||
| (17 intermediate revisions by 6 users not shown) | |||
| Line 1: | Line 1: | ||
{{languageBar|title=Portal - Tutorial - Hazard Liquid}} | |||
{{back | Portal Level Creation}} | |||
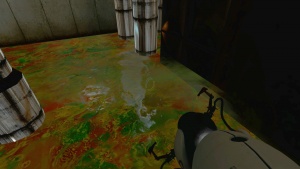
[[{{ns:6}}:PoisonWater.jpg|thumb|300px| | [[{{ns:6}}:PoisonWater.jpg|thumb|300px|Hazard Liquid in the game.]] | ||
This is a tutorial for creating the Hazard Liquid seen in {{portal|4}}. | |||
==Summary== | ==Summary== | ||
# Create a | # Create a world brush with <code>tools/[[tool textures#nodraw|toolsnodraw]]</code> on five sides and <code>nature/hazardliquid</code> on the top face. | ||
# Add | # Add {{ent|info_particle_system}}s to create gaseous effect. | ||
# Use trigger_hurt to damage player if | # Use {{ent|trigger_hurt}} to damage and kill the player if they touch the water. | ||
== Construction == | == Construction == | ||
To add a water volume to your level, follow these steps: | To add a [[water]] volume to your level, follow these steps: | ||
# Create a brush the size of the water volume using the Block Tool. | # Create a brush the size of the water volume using the [[Block Tool]]. | ||
# Open the '''Texture Browser''' by clicking the '''Browse''' button on the Texture Bar. | # Open the '''[[Texture Browser]]''' by clicking the '''Browse''' button on the Texture Bar. | ||
# Find and select the | # Find and select the <code>tools/[[tool textures#nodraw|toolsnodraw]]</code> material in the Texture Browser. | ||
# With your water brush selected, click the Apply Current Texture button to assign the <code> | # With your water brush selected, click the '''Apply Current Texture''' button to assign the <code>tools/toolsnodraw</code> material to the whole brush. | ||
# Select the Texture Application tool, which opens the '''Face Edit''' mode. | # Select the Texture Application tool, which opens the '''Face Edit''' mode. | ||
# Left-Click the top face of the water brush in the 3D view to select it. | # Left-Click the top face of the water brush in the 3D view to select it. | ||
# Click '''Browse''' to bring up the '''Texture Browser''' again. | # Click '''Browse''' to bring up the '''Texture Browser''' again. | ||
# Select | # Select <code>nature/hazard_liquid</code>. | ||
# Click the '''Apply''' button on the '''Face Edit''' panel. | # Click the '''Apply''' button on the '''Face Edit''' panel. | ||
Now you will need to add the gas particle effect that floats above the surface of the water. | Now you will need to add the gas particle effect that floats above the surface of the water. | ||
#Select the '''Entity''' | # Select the '''[[Entity Tool]]'''. | ||
#In the Entities selection box, make sure the Category is set to ''Entities'' and choose the Object | # In the Entities selection box, make sure the Category is set to ''Entities'' and choose the Object {{ent|info_particle_system}}. | ||
#In the 3D view, click on the center of the top of your water brush to place the info_particle_system entity there. {{tip|If the body of water is large, you might want to use multiple particle systems placed in various places on top of it}} | # In the 3D view, click on the center of the top of your water brush to place the info_particle_system entity there. | ||
#Go into the '''Properties''' window for the particle system by selecting it and pressing | :{{tip|If the body of the water is large, you might want to use multiple particle systems placed in various places on top of it.}} | ||
#Set the '''Particle System Name''' parameter to | # Go into the '''Properties''' window for the particle system by selecting it and pressing {{key|Alt|Enter}}. | ||
# Set the '''Particle System Name''' parameter to one of these: | |||
;<code>water_mist_1024_512</code> | |||
:This particle covers up 1024*512 units in it's area. | |||
;<code>water_mist_256</code> | |||
:This particle covers up 256 units in it's area.'' | |||
;<code>water_mist_384_128</code> | |||
:This particle covers up 384*128 units in it's area.'' | |||
;<code>water_mist_512</code> | |||
:This particle covers up 512 units in it's area.'' | |||
;<code>water_mist_128</code> | |||
:This particle covers up 128 units in it's area.'' | |||
==Making the water deadly== | ==Making the water deadly== | ||
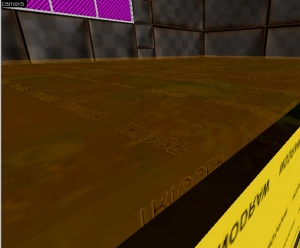
[[{{ns:6}}:PoisonWaterHammer.jpg|thumb|300px| | [[{{ns:6}}:PoisonWaterHammer.jpg|thumb|300px|Hazard Liquid and the trigger_hurt in Hammer editor.]] | ||
You will need to add a | You will need to add a {{ent|trigger_hurt}} to make the water hurt the player. This is a simple process | ||
#Open the '''Texture Browser''' and select the | #Open the '''Texture Browser''' and select the <code>tools\[[tool textures#trigger|toolstrigger]]</code> texture. | ||
#Create a new brush that fills approximately the same space as the water brush (you might want to extend or retract the edges slightly so it is easier to distinguish from the water brush) {{tip|You can also duplicate the water brush, apply the ''toolstrigger'' texture, and scale it down slightly}} | #Create a new brush that fills approximately the same space as the water brush (you might want to extend or retract the edges slightly so it is easier to distinguish from the water brush) {{tip|You can also duplicate the water brush, apply the ''toolstrigger'' texture, and scale it down slightly}} | ||
#Right-click the new brush and choose "Tie To Entity". Select | #Right-click the new brush and choose "Tie To Entity". Select {{ent|trigger_hurt}}. | ||
#Open the trigger_hurt's Properties window with Alt | #Open the trigger_hurt's Properties window with {{key|Alt|Enter}}. | ||
#Set up the properties using these values: | #Set up the properties using these values: | ||
::{| class=standard-table | |||
! Property Name || Value | |||
|- | |||
| Damage || 100 | |||
|- | |||
| Damage Type || CHEMICAL | |||
|- | |||
| Damage Model || Normal | |||
|- | |||
| Zero Damage Force || Yes | |||
|} | |||
That's it! You now have a body of | That's it! You now have a body of Hazard Liquid that emits a gas effect and will kill the player on contact. Don't forget to add {{ent|water_lod_control}} entity! | ||
==See also== | ==See also== | ||
* [[Portal Level Creation]] | * [[Portal Level Creation]] | ||
* [[Water]] | * [[Adding Water]] | ||
* | * {{ent|info_particle_system}} | ||
* [ | * {{ent|trigger_hurt}} | ||
== External links == | |||
* [http://forums.thinkingwithportals.com/downloads.php?view=detail&df_id=289 Example map] {{dead link}} Example map using this tutorial. VMF included. | |||
[[Category:Portal]] | [[Category:Portal]] | ||
[[Category:Level Design]] | |||
[[Category:Tutorials]] | |||
Latest revision as of 17:06, 22 May 2025
This is a tutorial for creating the Hazard Liquid seen in ![]() Portal.
Portal.
Summary
- Create a world brush with
tools/toolsnodrawon five sides andnature/hazardliquidon the top face. - Add info_particle_systems to create gaseous effect.
- Use trigger_hurt to damage and kill the player if they touch the water.
Construction
To add a water volume to your level, follow these steps:
- Create a brush the size of the water volume using the Block Tool.
- Open the Texture Browser by clicking the Browse button on the Texture Bar.
- Find and select the
tools/toolsnodrawmaterial in the Texture Browser. - With your water brush selected, click the Apply Current Texture button to assign the
tools/toolsnodrawmaterial to the whole brush. - Select the Texture Application tool, which opens the Face Edit mode.
- Left-Click the top face of the water brush in the 3D view to select it.
- Click Browse to bring up the Texture Browser again.
- Select
nature/hazard_liquid. - Click the Apply button on the Face Edit panel.
Now you will need to add the gas particle effect that floats above the surface of the water.
- Select the Entity Tool.
- In the Entities selection box, make sure the Category is set to Entities and choose the Object info_particle_system.
- In the 3D view, click on the center of the top of your water brush to place the info_particle_system entity there.
 Tip:If the body of the water is large, you might want to use multiple particle systems placed in various places on top of it.
- Go into the Properties window for the particle system by selecting it and pressing Alt+↵ Enter.
- Set the Particle System Name parameter to one of these:
water_mist_1024_512- This particle covers up 1024*512 units in it's area.
water_mist_256- This particle covers up 256 units in it's area.
water_mist_384_128- This particle covers up 384*128 units in it's area.
water_mist_512- This particle covers up 512 units in it's area.
water_mist_128- This particle covers up 128 units in it's area.
Making the water deadly
You will need to add a trigger_hurt to make the water hurt the player. This is a simple process
- Open the Texture Browser and select the
tools\toolstriggertexture. - Create a new brush that fills approximately the same space as the water brush (you might want to extend or retract the edges slightly so it is easier to distinguish from the water brush)
 Tip:You can also duplicate the water brush, apply the toolstrigger texture, and scale it down slightly
 - Right-click the new brush and choose "Tie To Entity". Select trigger_hurt.
- Open the trigger_hurt's Properties window with Alt+↵ Enter.
- Set up the properties using these values:
Property Name Value Damage 100 Damage Type CHEMICAL Damage Model Normal Zero Damage Force Yes
That's it! You now have a body of Hazard Liquid that emits a gas effect and will kill the player on contact. Don't forget to add water_lod_control entity!
See also
External links
- Example map [dead link] Example map using this tutorial. VMF included.

